The store, bookkeeper, or accountant knows these relationships. Vori’s job is to show them where to make each one. If you’re not sure where a line should map, ask whoever closes your books.
General accounts
Store-level items that don’t belong to any single department, grouped by type:
These mappings feed the daily sales journal entry.
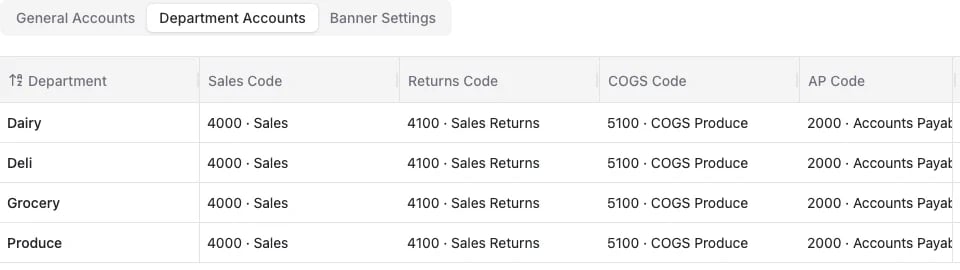
Department accounts
Every parent department in your store can be mapped to up to four account types:
A few important notes:
- All four are optional. A store that only wants revenue-level detail maps Sales. If you want live department margin tracking and perpetual inventory, map all four.
- COGS and Inventory go together. Because they’re two sides of the same movement, Vori needs both mapped to post either one. Mapping both is what lets your accounting system show department margin without extra work at period end.
- Returns is for shopper refunds only. It posts each department’s POS refund total on the daily sales journal entry and in the daily export. Vendor bills, vendor credits, and returns to a vendor don’t use it. If a department has refunds and no Returns account, the daily entry stops and lists that department as unmapped.
- Multiple Vori departments can share one account. Many stores have departments that are more granular than their accounting structure. Map those Vori departments to the same account and their activity rolls up together.
Segments
If you run several stores out of one accounting company, Vori tags every line it posts with that store’s segment value, so you can filter reports by store. That includes each line of an invoice bill and each line of the daily journal entry. Assign these under Accounting → GL Account Mapping. What the segment is called depends on your system:
A segment value must match one that already exists in your accounting system, or the line posts untagged. Single-store operators generally don’t need this.
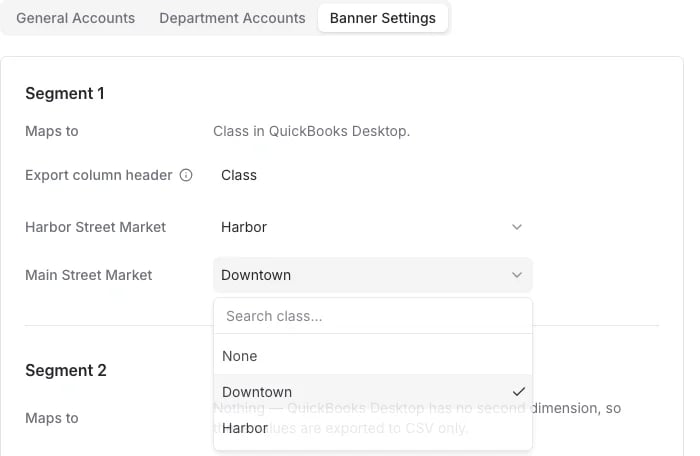
Set the class for QuickBooks Desktop
Vori reads your class list from QuickBooks Desktop along with your chart of accounts. To tag a store’s bills and daily entries with a class:- Go to Accounting → GL Account Mapping and open the Banner Settings tab.
- On the Segment 1 card, Maps to reads Class in QuickBooks Desktop. In Export column header, type a name, such as
Class, then click outside the box to save. The store rows unlock once this has a value. - In each store’s row, open the dropdown and choose the store’s class.