The new Cost Change workflow gives you more control over your data with advanced filters, manual vendor mapping, and a continuous "left-to-right" view that eliminates the need to save line-by-line
✏️ Note: This article describes features in New Back Office. For instructions on accessing it, view our guide: Access New Back Office.
Table of Contents
- Accessing the Invoice Dashboard
- Reviewing Invoices
- Mapping Vendor Products to Retail Products
- Print Tags
Accessing the Invoice Dashboard
-
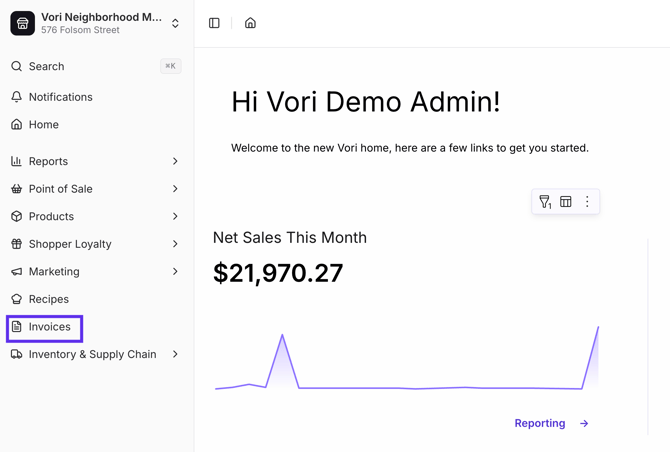
To access the new Invoices module in New Back Office (app.vori.com), select Invoices from the left-hand navigation panel.
-
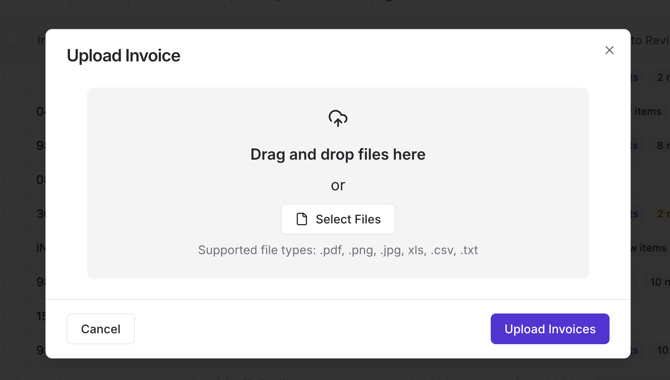
Getting your invoices into Vori is easy. Start by following our Upload Invoices guide.
Filtering and Searching for Invoices
You can instantly organize your dashboard to focus on what matters most:
-
Precision Search: Search by Invoice No. or Vendor name.
-
Status Filters: Use the dropdown to view only Ready, Processing, or Rejected invoices.
- Bulk Actions: Select multiple checkboxes to Delete, Change Vendor, or Mark as Done simultaneously.

💡 Tip: The default view shows all rejected, processing, and ready invoices. Click the Status filter to narrow down your list (e.g., view only "Ready" invoices).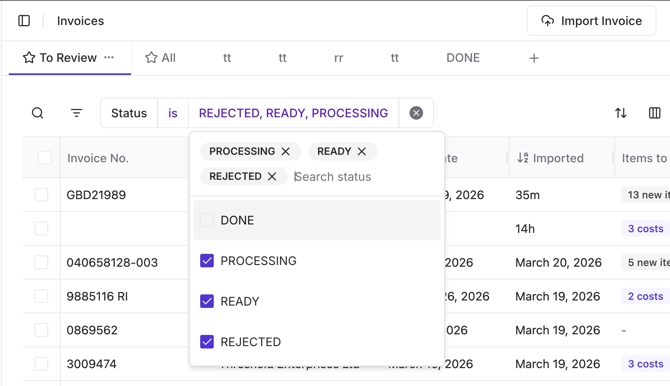
Working with Processing Invoices
- Skip Processing: If you need to start reviewing an invoice before AI extraction is finished, click Skip Processing in the banner at the top of the invoice.
- This pauses extraction and lets you work through the line items manually.
- Some data may not be fully extracted as a result.

The Golden Rule for Fast Processing
For the fastest processing times (often under 10 minutes), your Store Vendor must be linked to a Vori Vendor. Mapping to a Vori Vendor ensures better data integrity and access to global catalogs for auto-filling product details.
How to link a vendor:
-
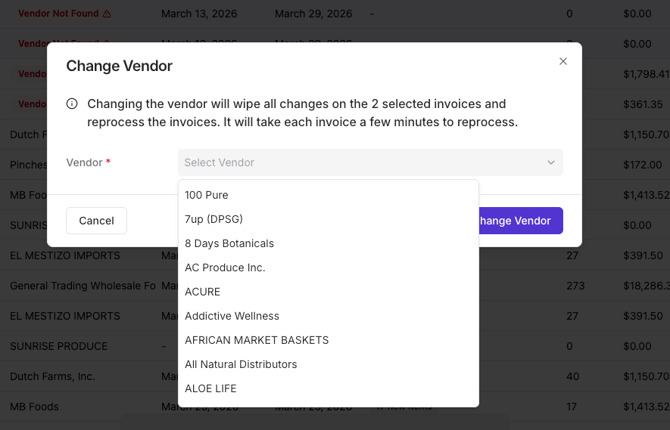
If an invoice shows a Vendor Not Found flag, click the checkbox for that invoice.

-
Select Change Vendor from the quick action bar.
- Choose the correct vendor from your store list to map it and trigger faster reprocessing.
Reviewing Invoices
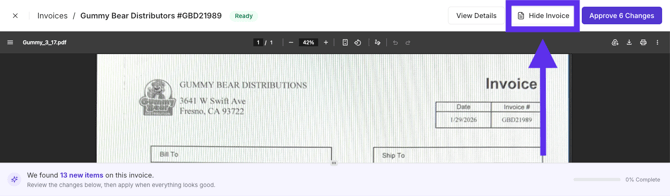
Vori provides a full-width PDF view of your invoice alongside your data rows so you can work without the paper shuffle.
-
Use the Hide Invoice and View Invoice buttons to toggle between a focused data entry view and a detailed cross-reference view.

Adjusting Invoice Header Details
When an invoice is opened, you’ll see the header information at the top. Use the Details Panel to manage vendor details, key invoice dates, and totals in one place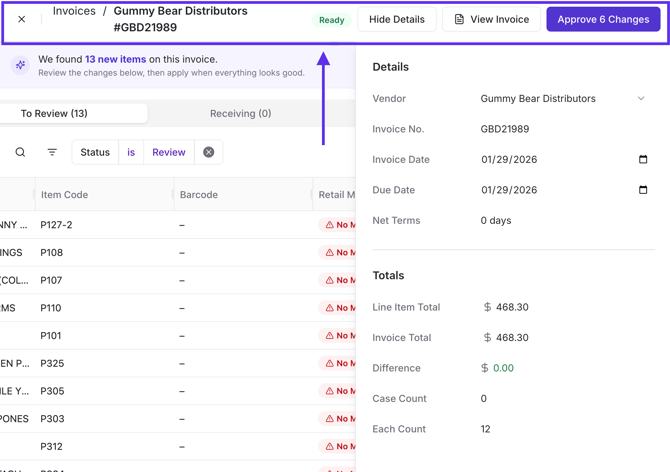
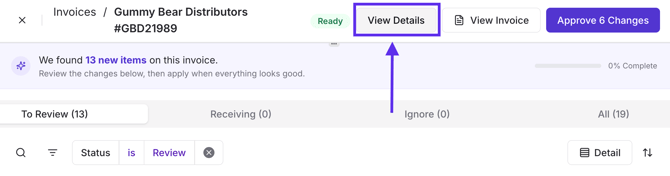
-
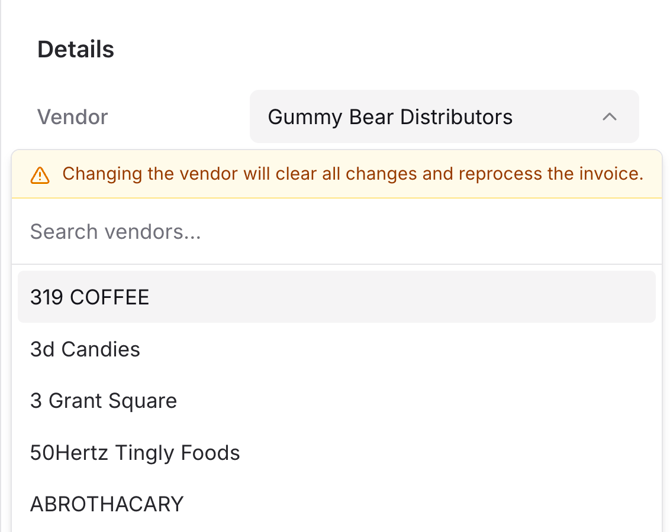
Manage Vendor and Identifiers: Open the side panel by clicking View Details in the top navigation bar to confirm the Vendor name is correct.
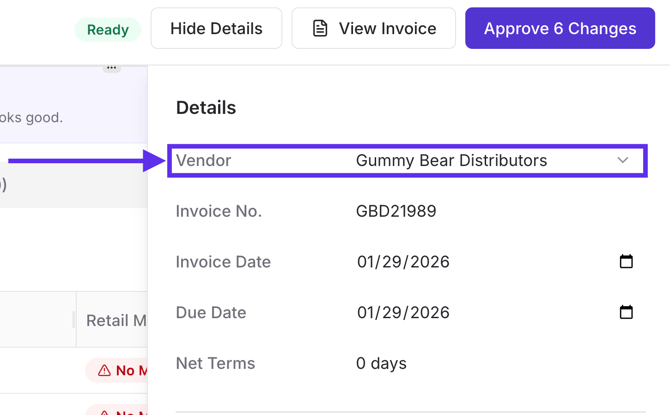
-
If the vendor is incorrect, selecting a new one will clear current changes and reprocess the invoice. You can also click into the Invoice No. field to manually update the alphanumeric code if it was extracted incorrectly.
-
- Control Billing Timelines: Use the calendar icons next to Invoice Date or Due Date to adjust your records for accurate accounting. You can also enter the Net Terms to automatically calculate when payments are due.
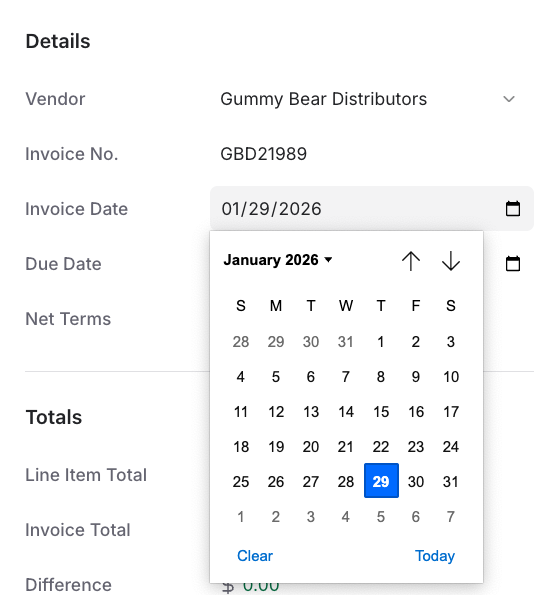
- Reconcile Totals and Differences: Review the Totals section to compare the Line Item Total (the sum of processed items) against the Invoice Total from your paper records. If you enter a manual total, Vori will calculate the Difference to help you catch billing errors immediately.

Editable vs. Calculated Fields
-
Editable Fields: Vendor, Invoice No., Invoice Date, Due Date, Net Terms, and Invoice Total.
-
Calculated Fields: Line Item Total, Difference, Case Count, and Each Count are updated automatically as you review items.
✏️Note: If you notice consistent errors (e.g., the AI misidentified a "Case" as an "Each" for the entire document), you can review and edit the raw extracted data by selecting Summary
Summary of Changes

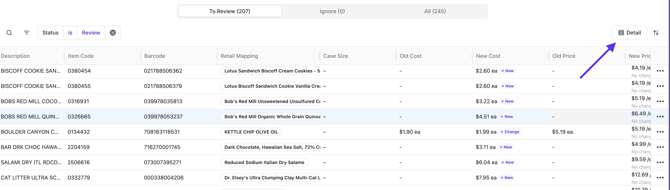
You can toggle between tabs to organize your work as well:
- To Review: Items requiring attention (new items, cost changes, or mapping issues).
-
Ignore: Items you have skipped (e.g., gasoline charges).
- Auto-Ignored Items (EDI Invoices): For invoices processed through an EDI integration, Vori will automatically move certain line items to the Ignore tab — specifically items with no cost or no quantity recorded. These typically represent items that were ordered but not fulfilled by the vendor. You don't need to take any action on these, but you can review them in the Ignore tab at any time.
-
All: Shows every line item on the invoice.

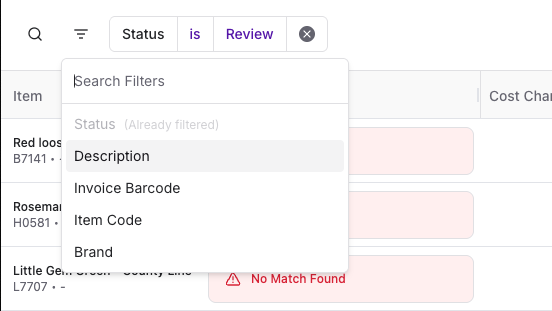
- Filters: Use the filter in the left-hand corner to further narrow down your list of items.
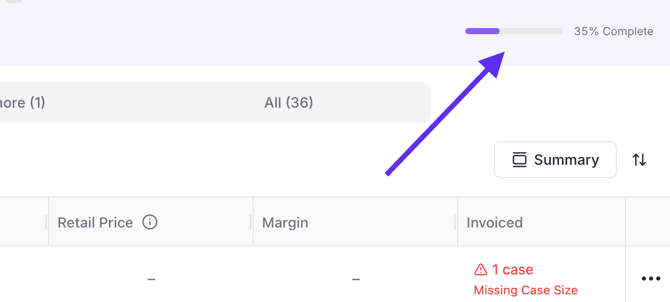
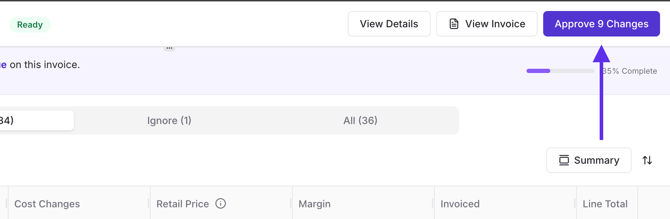
- Progress Bar: The % Complete indicator in the top-right corner of the invoice tracks how many items you've reviewed out of the total. Use it to gauge where you are before clicking Approve Changes.
Mapping Vendor Products to Retail Products
Items in Vori have two distinct identities that must be linked to keep your margins accurate:
-
Vendor Product: The details directly from the invoice (what you buy).
-
Retail Product: The product as it exists in your POS (what you sell).
Resolving Mapping Issues (The Red Box)

If a red box appears in the Retail Mapping column, action is required:
-
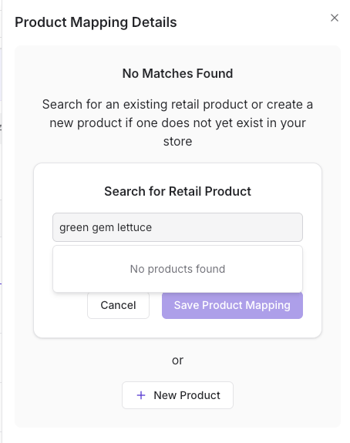
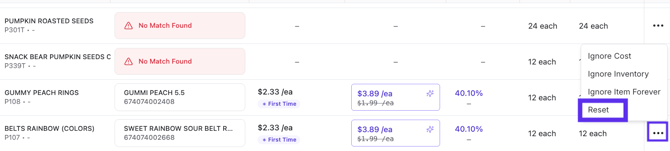
No Match Found: Click No Match Found to open the Product Mapping Details panel. Use the search bar to look for the existing store product by name or UPC to make sure you aren't creating a duplicate. If it doesn't exist, click + New Product.
-
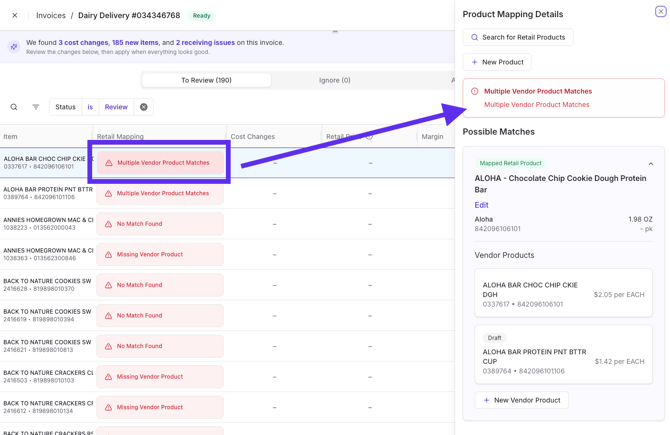
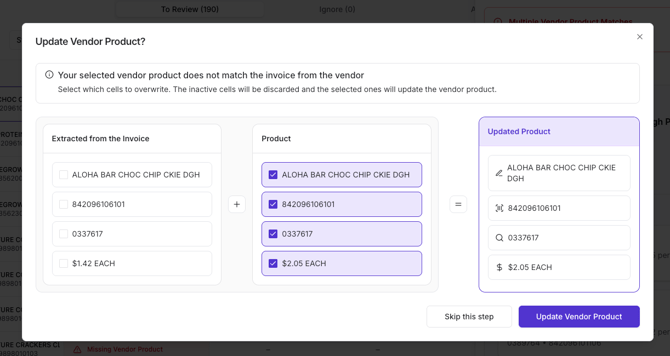
Multiple Vendor Product Matches: Vori found potential hits in your system. You must select and update the correct one to ensure the invoice links to the right size or flavor.
-
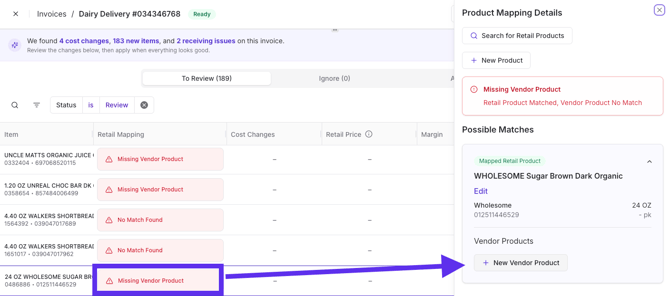
Missing Vendor Product: Vori recognizes your retail item but needs you to save this specific vendor's "identity" (item code and cost) for future tracking.

Editing Costs and Retail Prices
Changes are handled in a single row without a "Save" button—your work is saved as a draft automatically as you edit.
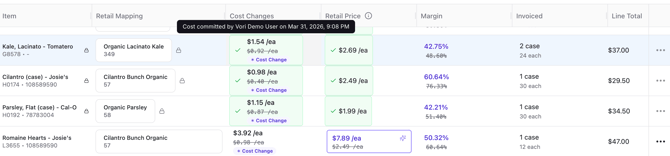
Visual Indicators: Vori uses cues to show if a cost has moved up or down compared to your last purchase.
| Label | What it means | Action needed |
|---|---|---|
| ★ First Time | First time Vori has recorded any cost for this vendor product. No previous cost to compare against. |
Review the cost carefully before approving. |
| ★ Cost Change | Vori detected a cost difference from the last recorded cost. Previous cost, price, and margin appear crossed out for comparison. |
Review old vs. new cost. Use Target Margin to find a new retail price if needed. |
| ★ Promo | Vendor cost dropped below expected pricing — likely a promotional price. Retail price will not change automatically. |
Keep your standard price to benefit from higher margin, or manually adjust if passing savings to shoppers. |
- Target Margin: Enter a percentage in the Target Margin field. Vori will suggest a New Price to help you hit that specific margin goal.

✏️ Note: Vori only suggests a new retail price when two conditions are met: the store product already has a Target Margin set, and the cost has increased. If a cost decreases — such as during a vendor promotion — Vori will not suggest lowering your retail price. You can still adjust it manually if you want to pass the savings on to shoppers.
- Catch Weight/Produce: For items sold by weight, you can edit Case Size or Unit Cost inline to ensure margin calculations are accurate.

- Detail View: Use the Detail toggle in the top-right corner of the item list to switch to an expanded view that shows the full cost and margin picture for every line item — including Old Cost, New Cost, Old Price, New Price, Old Margin, New Margin, Invoiced quantity, and Line Total. This is the best view to use when you're actively reviewing cost changes and want to see how a new cost flows through to margin before approving.
-
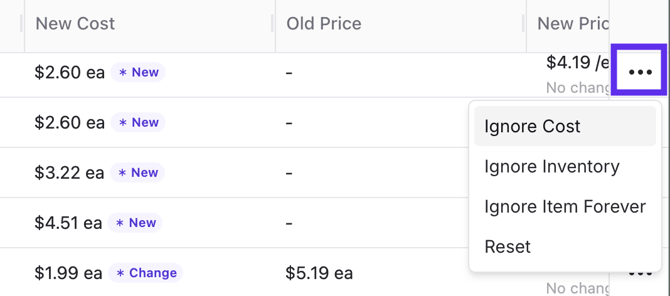
Ignoring Items: The three-dot menu at the end of each row gives you three ignore options depending on what you need:
-
Ignore Cost: Keeps the item in your inventory but skips the cost update for this invoice. Use this action to ignore the specific cost value detected on the current invoice. The existing cost in your system will remain active and your retail price will not change.
-
✏️ Note: Ignoring a cost only skips the exact cost value on this invoice — it does not permanently suppress future cost change alerts.
- If this item appears on a future invoice with a different cost than what's currently saved in your system, Vori will flag it as a new cost change.
- If this item appears on a future invoice with the exact same cost you just ignored, Vori will not flag a cost change.
-
-
-
-
Ignore Item Forever: Permanently excludes this item from all future cost change reviews. Best used for non-inventory charges like bottle deposits, fuel surcharges, or freight fees that appear on every invoice.
-
To reverse this, click the three dots in the Ignore tab and select Undo Ignore. The item will move back to your To Review tab.

-
-
Discounted Pricing
Vori handles discounted pricing by prioritizing the latest cost and maintaining your standard retail prices unless you make manual adjustments. Here's how the system handles different discount scenarios:
- Line-Item Discounts and Promo Pricing: When a vendor cost decreases due to a promotion, Vori identifies the change and flags it as ★ Promo in the Cost Changes column. Your margin will appear higher based on the lower cost, but Vori will not automatically lower your retail price. You keep your standard pricing and benefit from the increased margin — or you can manually adjust the retail price if you want to pass the savings on to shoppers.
- Off-Invoice Discounts: If your vendor applies a discount to the invoice total rather than to individual line items, enter the actual total from your paper records in the Invoice Total field in the Details panel. Vori will automatically calculate the Difference between your line item sum and the entered total to help you identify off-invoice discounts or catch billing errors.
- Ignoring One-Time Costs: If a discount or cost change is a one-time event you don't want influencing your ongoing pricing data, select Ignore Cost for that item. The item moves to the Ignore tab for this invoice, and the cost will return to review status the next time it appears on a future invoice.
Approving and Committing Changes
Your updates are not live in your POS until you formally commit them. This prevents floor prices from mismatching the register until you are ready.
-
Complete your review of the necessary line items.
-
Click Approve Changes at the top right of the screen.
-
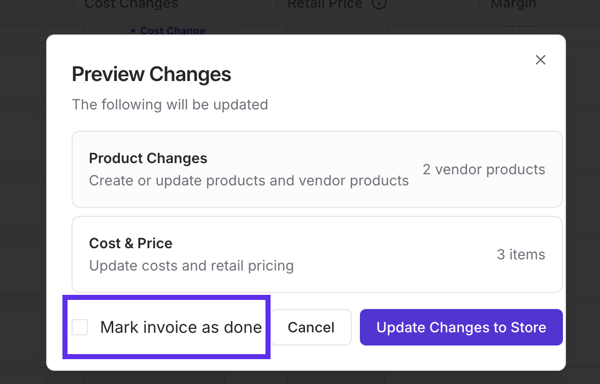
Partial Approval: If you aren't finished with the whole invoice, uncheck Mark invoice as Done in the confirmation box. Vori will commit the items you've finished and leave the rest in "Review".
-
Row Locking: Once committed, price and cost rows are locked to maintain clean financial records.
Troubleshooting & Tips
-
Processing Lock: If you edit an invoice while its status is still "Processing," AI extraction will pause. It is best to wait until the status turns to Ready.
- Manual Reset: If an item is mapped to the wrong product, click the three dots at the end of the row and select Reset to clear the link.
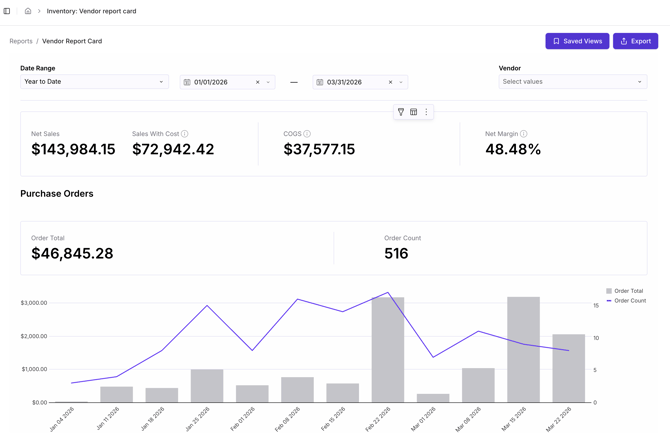
- Exporting Invoice Data: To get a summary of invoice data for accounting, navigate to Reports > Vendor Report Card to view and export invoice data to Excel.
Printing Tags
The Print Tags notification has been simplified for a cleaner experience:
- Web View: Printing tags are no longer displayed in the web interface to reduce clutter.
- Status Impact: Printing tags no longer drives the logic for moving an invoice to "Done."
How to Print: This remains a Vori OS app handheld-first action. Tags will appear under Recent Updates on your handheld device for physical printing. More details can be found here Print Product Tags on Vori OS.