> ## Documentation Index
> Fetch the complete documentation index at: https://help.vori.com/llms.txt
> Use this file to discover all available pages before exploring further.
# Setting Up Quick Food Service Counters
> Quick Food Service (QFS) lets you manage made-to-order items right inside Vori, alongside everyday grocery sales.
Quick Food Service (QFS) tools allow you to manage made-to-order items—like coffee, sandwiches, and tacos—directly inside the POS alongside everyday grocery sales. This integrated workflow helps you capture more meal spend, improve profitability, and keep lines moving from a single system.
Quick Food Service is optimized for specific counter service formats with simple orders, such as coffee bars, deli stations, taquerias, and smoothie counters.
***
### Before You Start
* Ensure your store is on the latest version of the POS software.
* Verify you have access to the Vori Back Office for menu configuration.
***
### Configure Food Modifiers in New Back Office
Modifiers make made-to-order possible. Before you start selling, set up your modifier categories ( e.g., Quesadilla) and individual options (e.g., Cheese, Carnitas, and Veggies)
#### Create a New Food Modifier
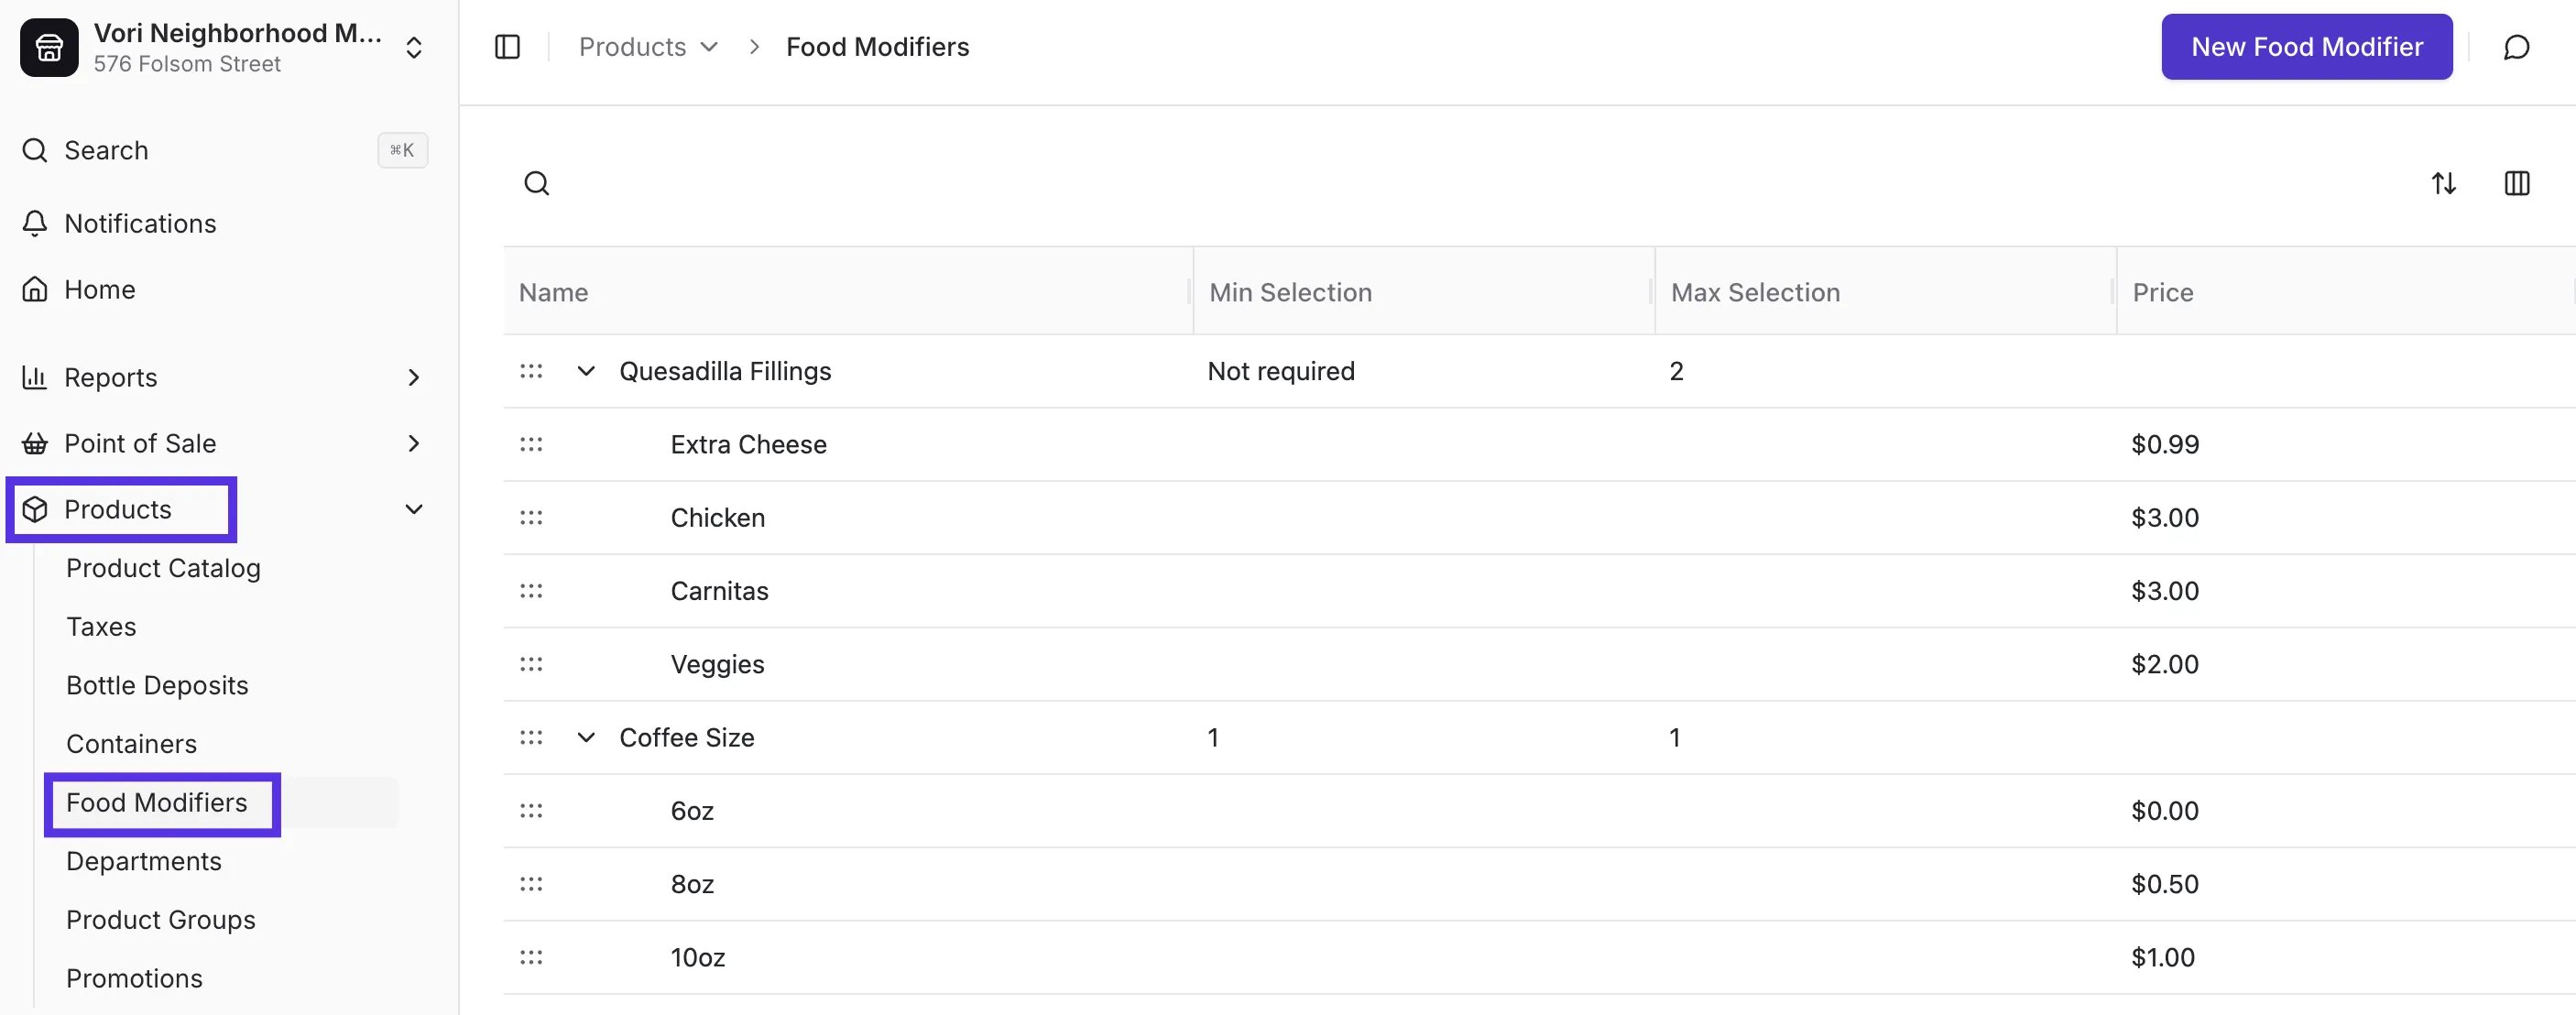
1. Go to **Products** and select **[Food Modifiers](https://app.vori.com/retail/food-modifiers)** in the left-hand navigation menu.
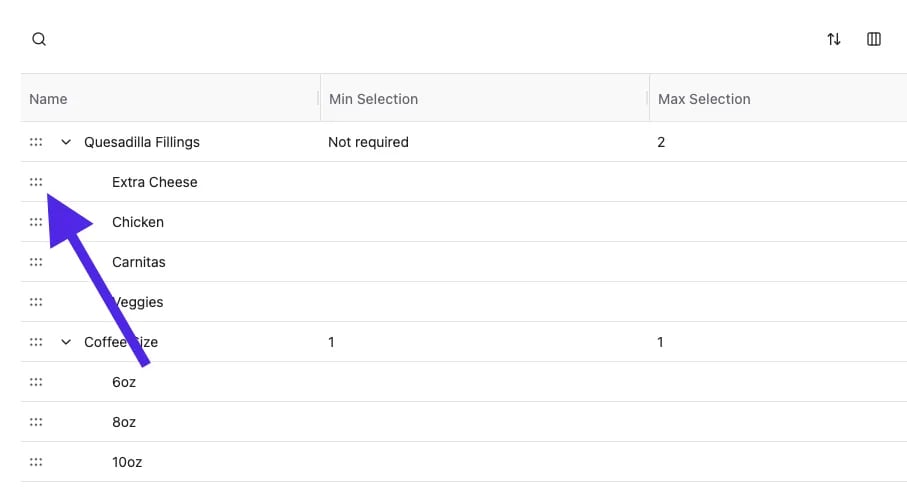
2. Select **New Food Modifier** from the top right corner.
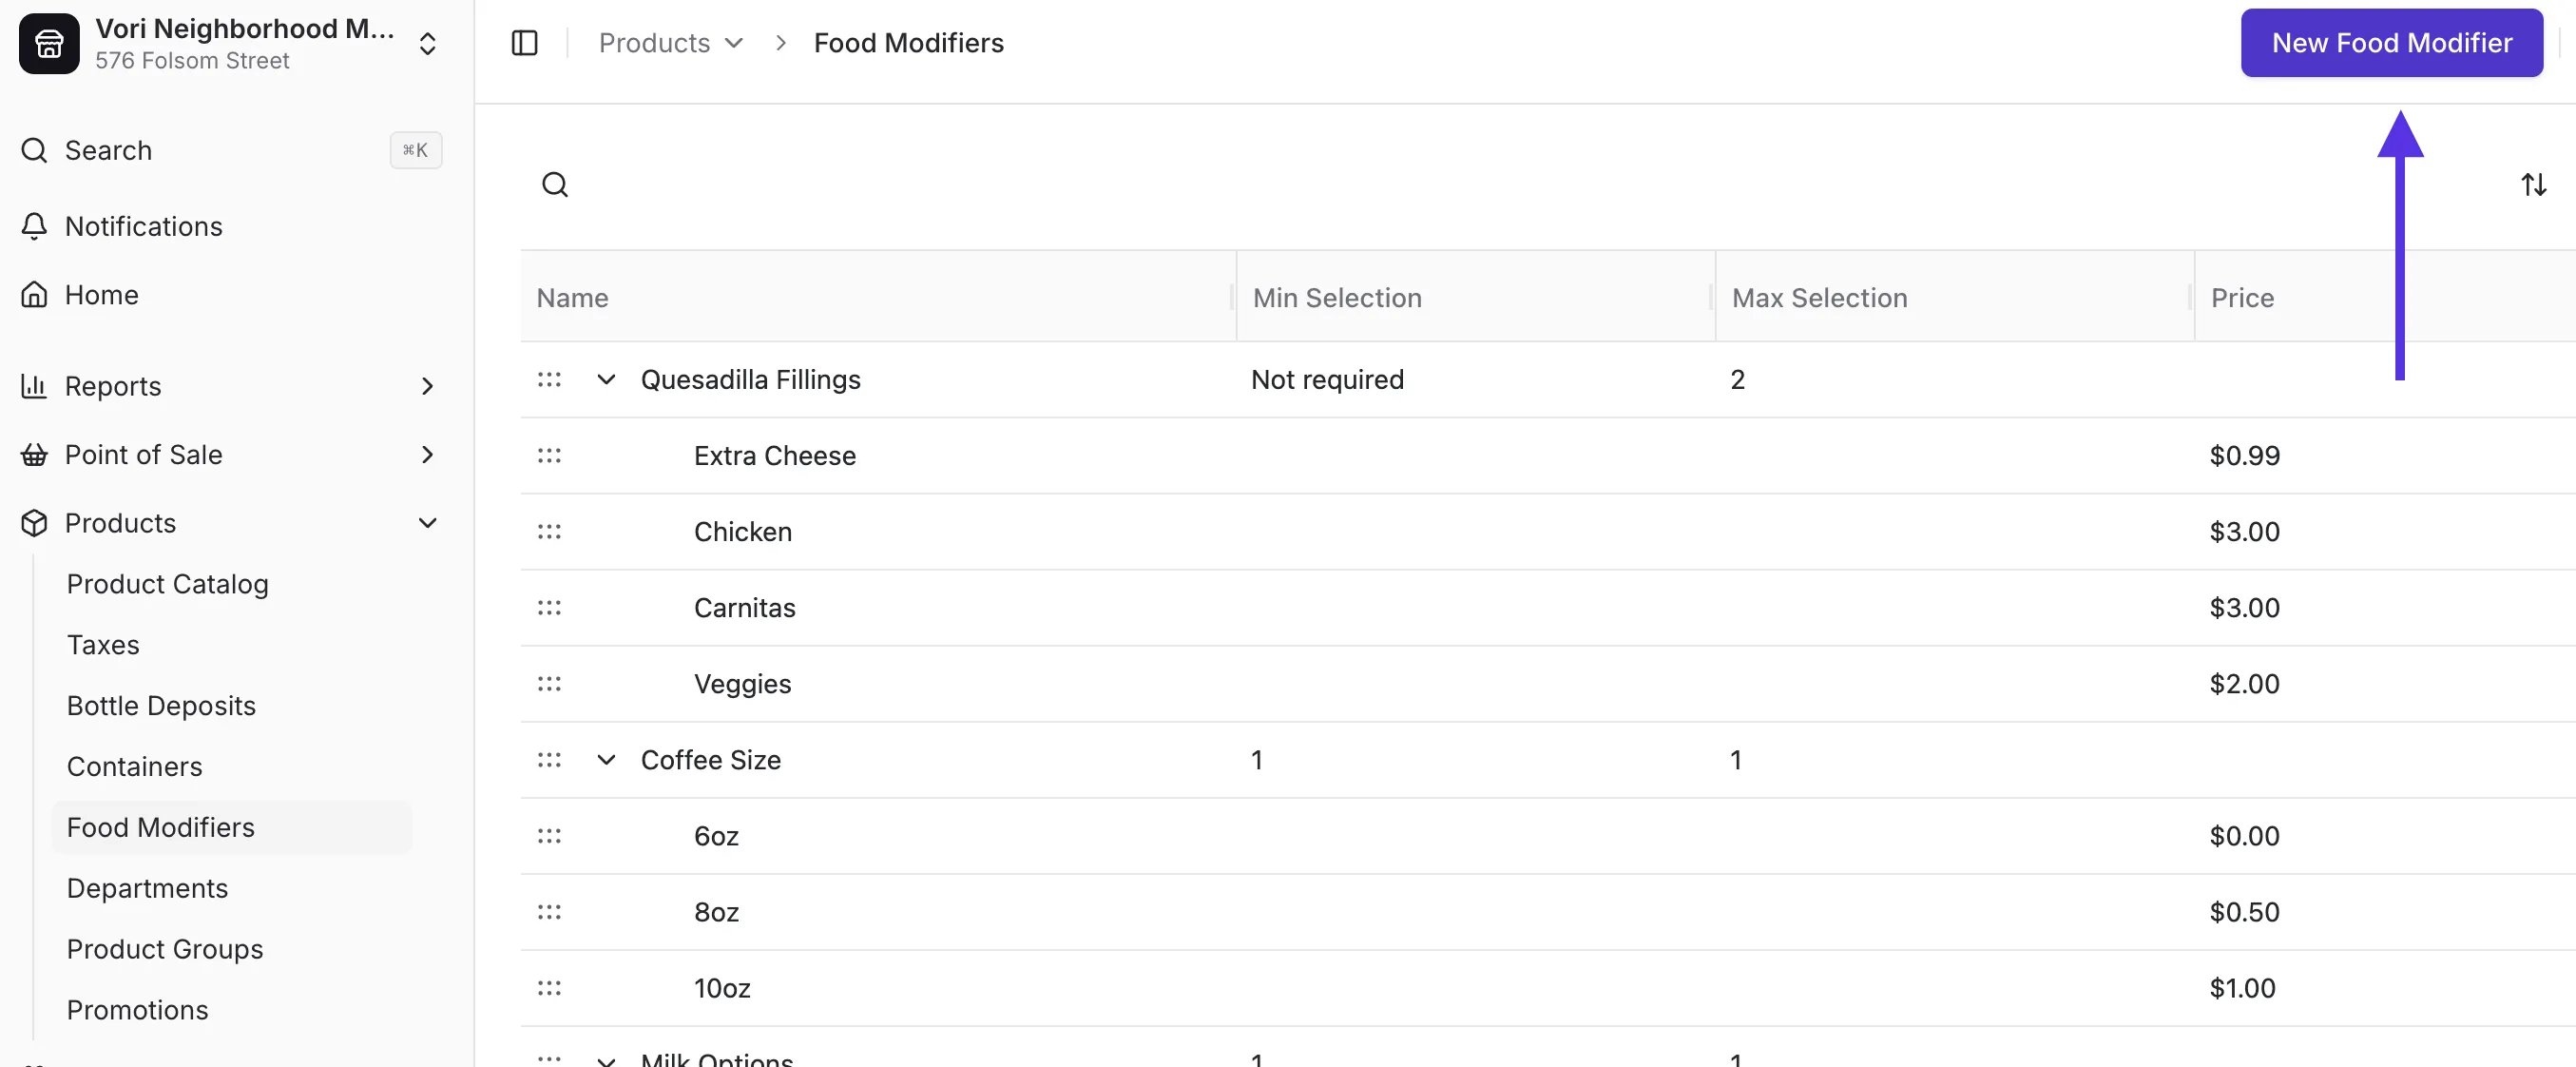
3. Create a **Modifier Category** (e.g., Quesadilla Fillings).
4. Set **Minimum and Maximum Selections**for that category *(optional)* to control how many modifiers ashopper can choose.
5. Create each selectable option your team can ring up as a Modifier (e.g., Carnitas).
1. Assign a price or leave it at \$0.00.
2. Use the **Create More** toggle to add multiple modifiers at once.
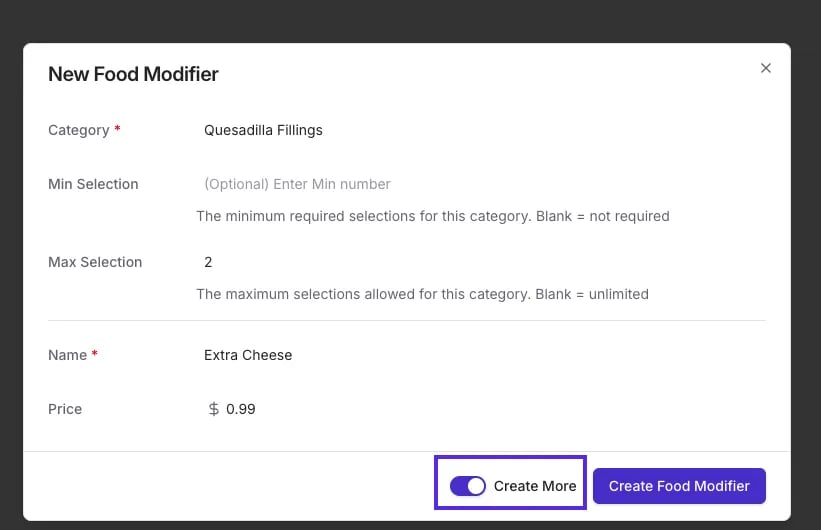
6. Use the drag-and-drop "grabbers" to arrange the order in which these options appear on **the POS** screen.\\
💡 **Pro-Tip:** Use the **AI Menu Builder** to set up new modifiers fast. Simply describe the item and its modifiers, and Vori will recommend a structured menu setup for you to review and save.
#### Use the AI Menu Builder
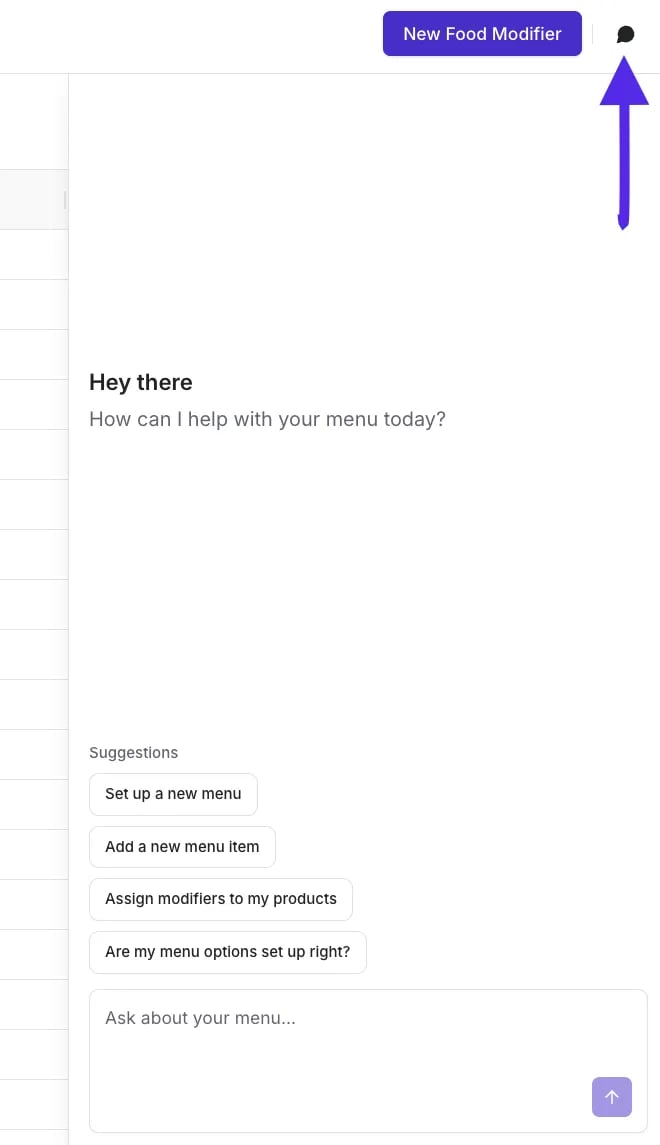
For a faster setup, you can use the **AI Menu Builder** to build your menu using natural language.
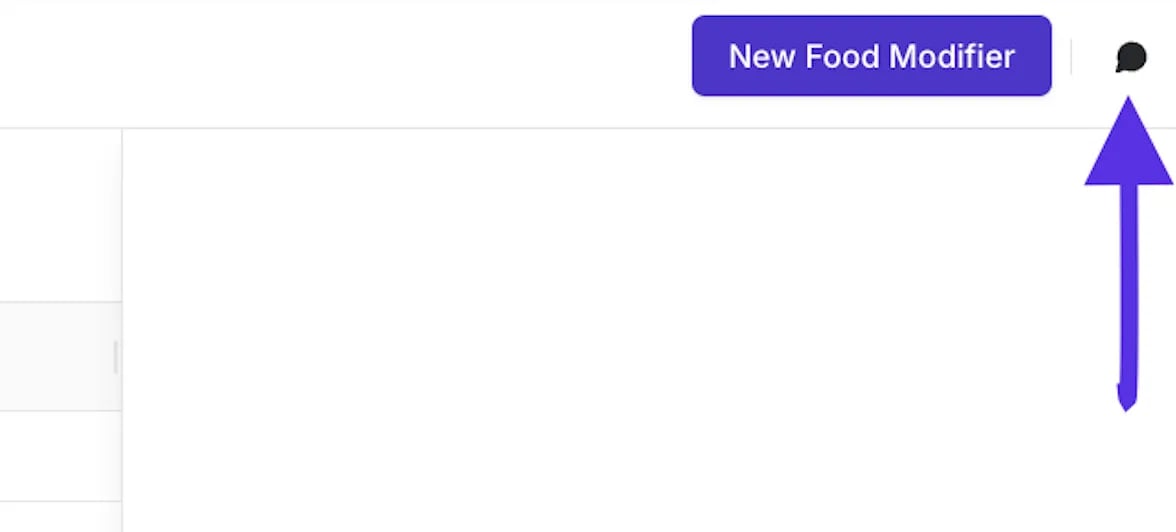
1. Click the **AI Menu Builder chat icon** in the top right of the Back Office.
2. Tell the AI Menu Builder what you want to add (e.g., "Help me add Boba items to my menu").
3. Follow the prompts to provide the **price**, **barcode/PLU**, and **department**.
4. The assistant will suggest common modifier categories (e.g., "Sweetness Level"). Confirm if they look correct.
5. Review your plan, then click **Allow** to let Vori create your new products and modifiers automatically.
#### Edit a Food Modifier in New Back Office
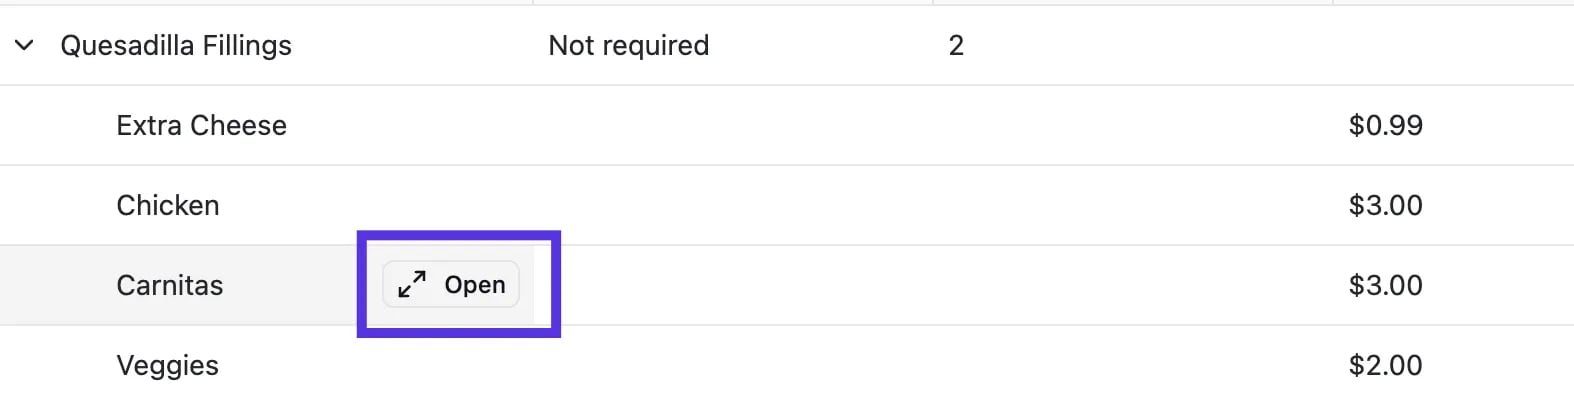
1. Locate the modifier or category you want to update, **h\*\*\*\*over over the modifier name,** and click **Open**.
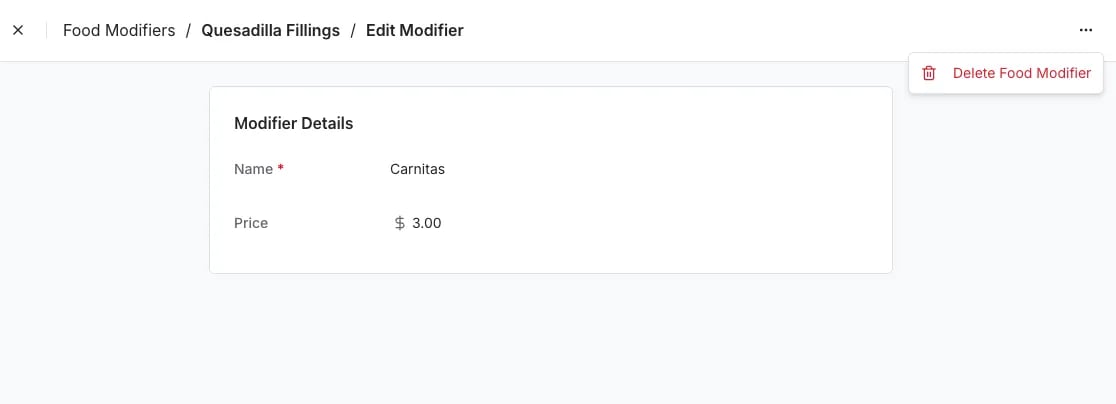
2. Update the **Modifier Name** and **Price**, or the **Category Name** and **Min/Max Selection**.
3. To delete a modifier, click the **three dots (•••)** in the edit view and select **Delete**.
4. Changes save instantly and will reflect at the POS.
***
### Set Up Your Quick Food Service Departments
To keep your POS interface organized and reporting clean, create a dedicated department hierarchy.
1. Create **parent departments** for your counter service (e.g., "Cafe" or "Deli").
2. Create **sub-departments** within that parent department for different menu types (e.g., Sandwiches, Smoothies, Coffee).
3. This setup creates easy-to-navigate tabs on the POS instead of cluttering your screen with multiple top-level buttons.
4. Ensure this parent department is added as a **Quick Action button** on your POS.
**✏️Note:** To add or update a Quick Action button (the main tile on the POS home screen), please contact **Vori Support**. Learn more in the article **[Customize Your POS With Quick Action Buttons and Manual Items](/point-of-sale-pos/pos-customization-and-setup/customize-your-pos-with-quick-action-buttons-and-manual-items)**.
### Assign Food Modifiers to Products
Once your modifiers are created, you must link them to the products you sell.
1. **Open** your product (e.g., Quesadilla) in the **[Product Catalog](https://app.vori.com/retail/products)**.
2. Assign the appropriate modifier categories to that item in the **Product Attributes** section.
3. Changes save instantly and will reflect at the POS.
#### Bulk Update Food Modifiers
You can select multiple items in the Product Catalog and use the bulk edit tool to assign modifier categories to all of them at once.
1. Navigate to the **[Product Catalog](https://app.vori.com/retail/products)** in the left-hand navigation menu.
2. Select the products you want to update by clicking the **checkboxes** next to their names.
3. Click the **More** button at the bottom of the screen.
4. Select **Food Modifiers** from the list of attributes.
5. In the pop-up window, use the **Search food modifiers...** field or the dropdown list to select the **Modifier Categories** you wish to assign.
6. Click **Save** to apply these modifiers to all selected products.
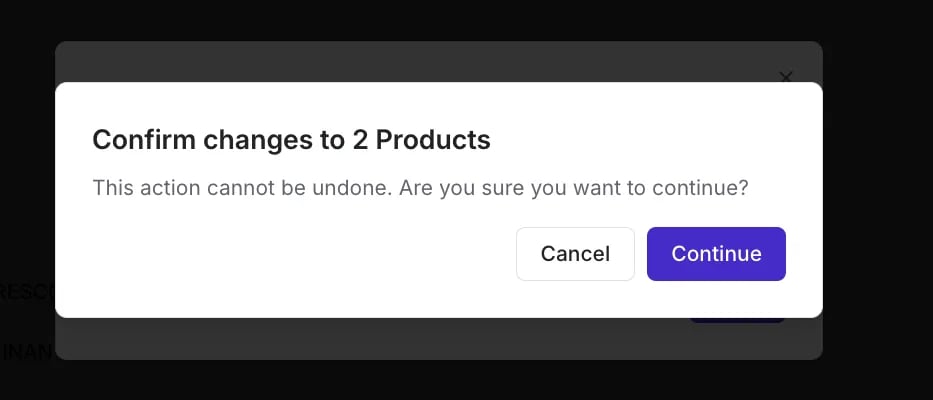
7. A confirmation message will appear. Select **Continue** to finish.
✏️ **Note:** Adding, editing, and viewing Food Modifiers on a product is currently supported in New Back Office only.
***
### Route Tickets to the Right Counter
If your store has more than one food service station—like a coffee bar up front and a deli in the back—Quick Food Service can send each prep ticket to the right kitchen printer automatically. You assign each food service **department** to a kitchen printer, and Vori takes care of the rest. Any lane in the store can ring up the order; the ticket lands at the station that's making it.
Ticket routing is based on the item's department. Stations need to be set up as distinct departments (e.g., "Coffee Bar," "Deli") so the POS knows where to send each ticket.
#### How Routing Works
* **Each department prints to one kitchen printer.** When a cashier rings up an item, Vori looks at its department and sends the prep ticket to that department's printer.
* **Any lane can serve any station.** A cashier at the front lane can ring up a sandwich and the ticket prints at the deli—no need for a dedicated "deli lane."
* **One order, multiple tickets when needed.** If a shopper orders a latte and a sandwich on the same transaction, the coffee bar gets the latte ticket and the deli gets the sandwich ticket. Each station only sees what they need to make.
Keep your department structure simple and station-aligned. One department per kitchen printer is the cleanest setup and makes reporting easier to read later.
#### Before You Start
* Confirm each kitchen printer is **hardwired to your store network via Ethernet.** Quick Food Service kitchen printers do not support Wi-Fi.
* Make sure each printer is plugged into power and reachable on the store network.
* Have your food service departments already created in Back Office (see **Set Up Your Quick Food Service Departments** above).
Initial kitchen printer provisioning is handled by Vori during install. Reach out to **Vori Support** to add a new printer to your store.
#### Add a Kitchen Printer to a Department
Once your printers are installed and on the network, pair each one to the department it serves:
1. On the POS, tap the **date and time** three times fast to open the hidden menu.\\
2. Select **Food Service**, then scroll down to **Add Kitchen Printer**.\\
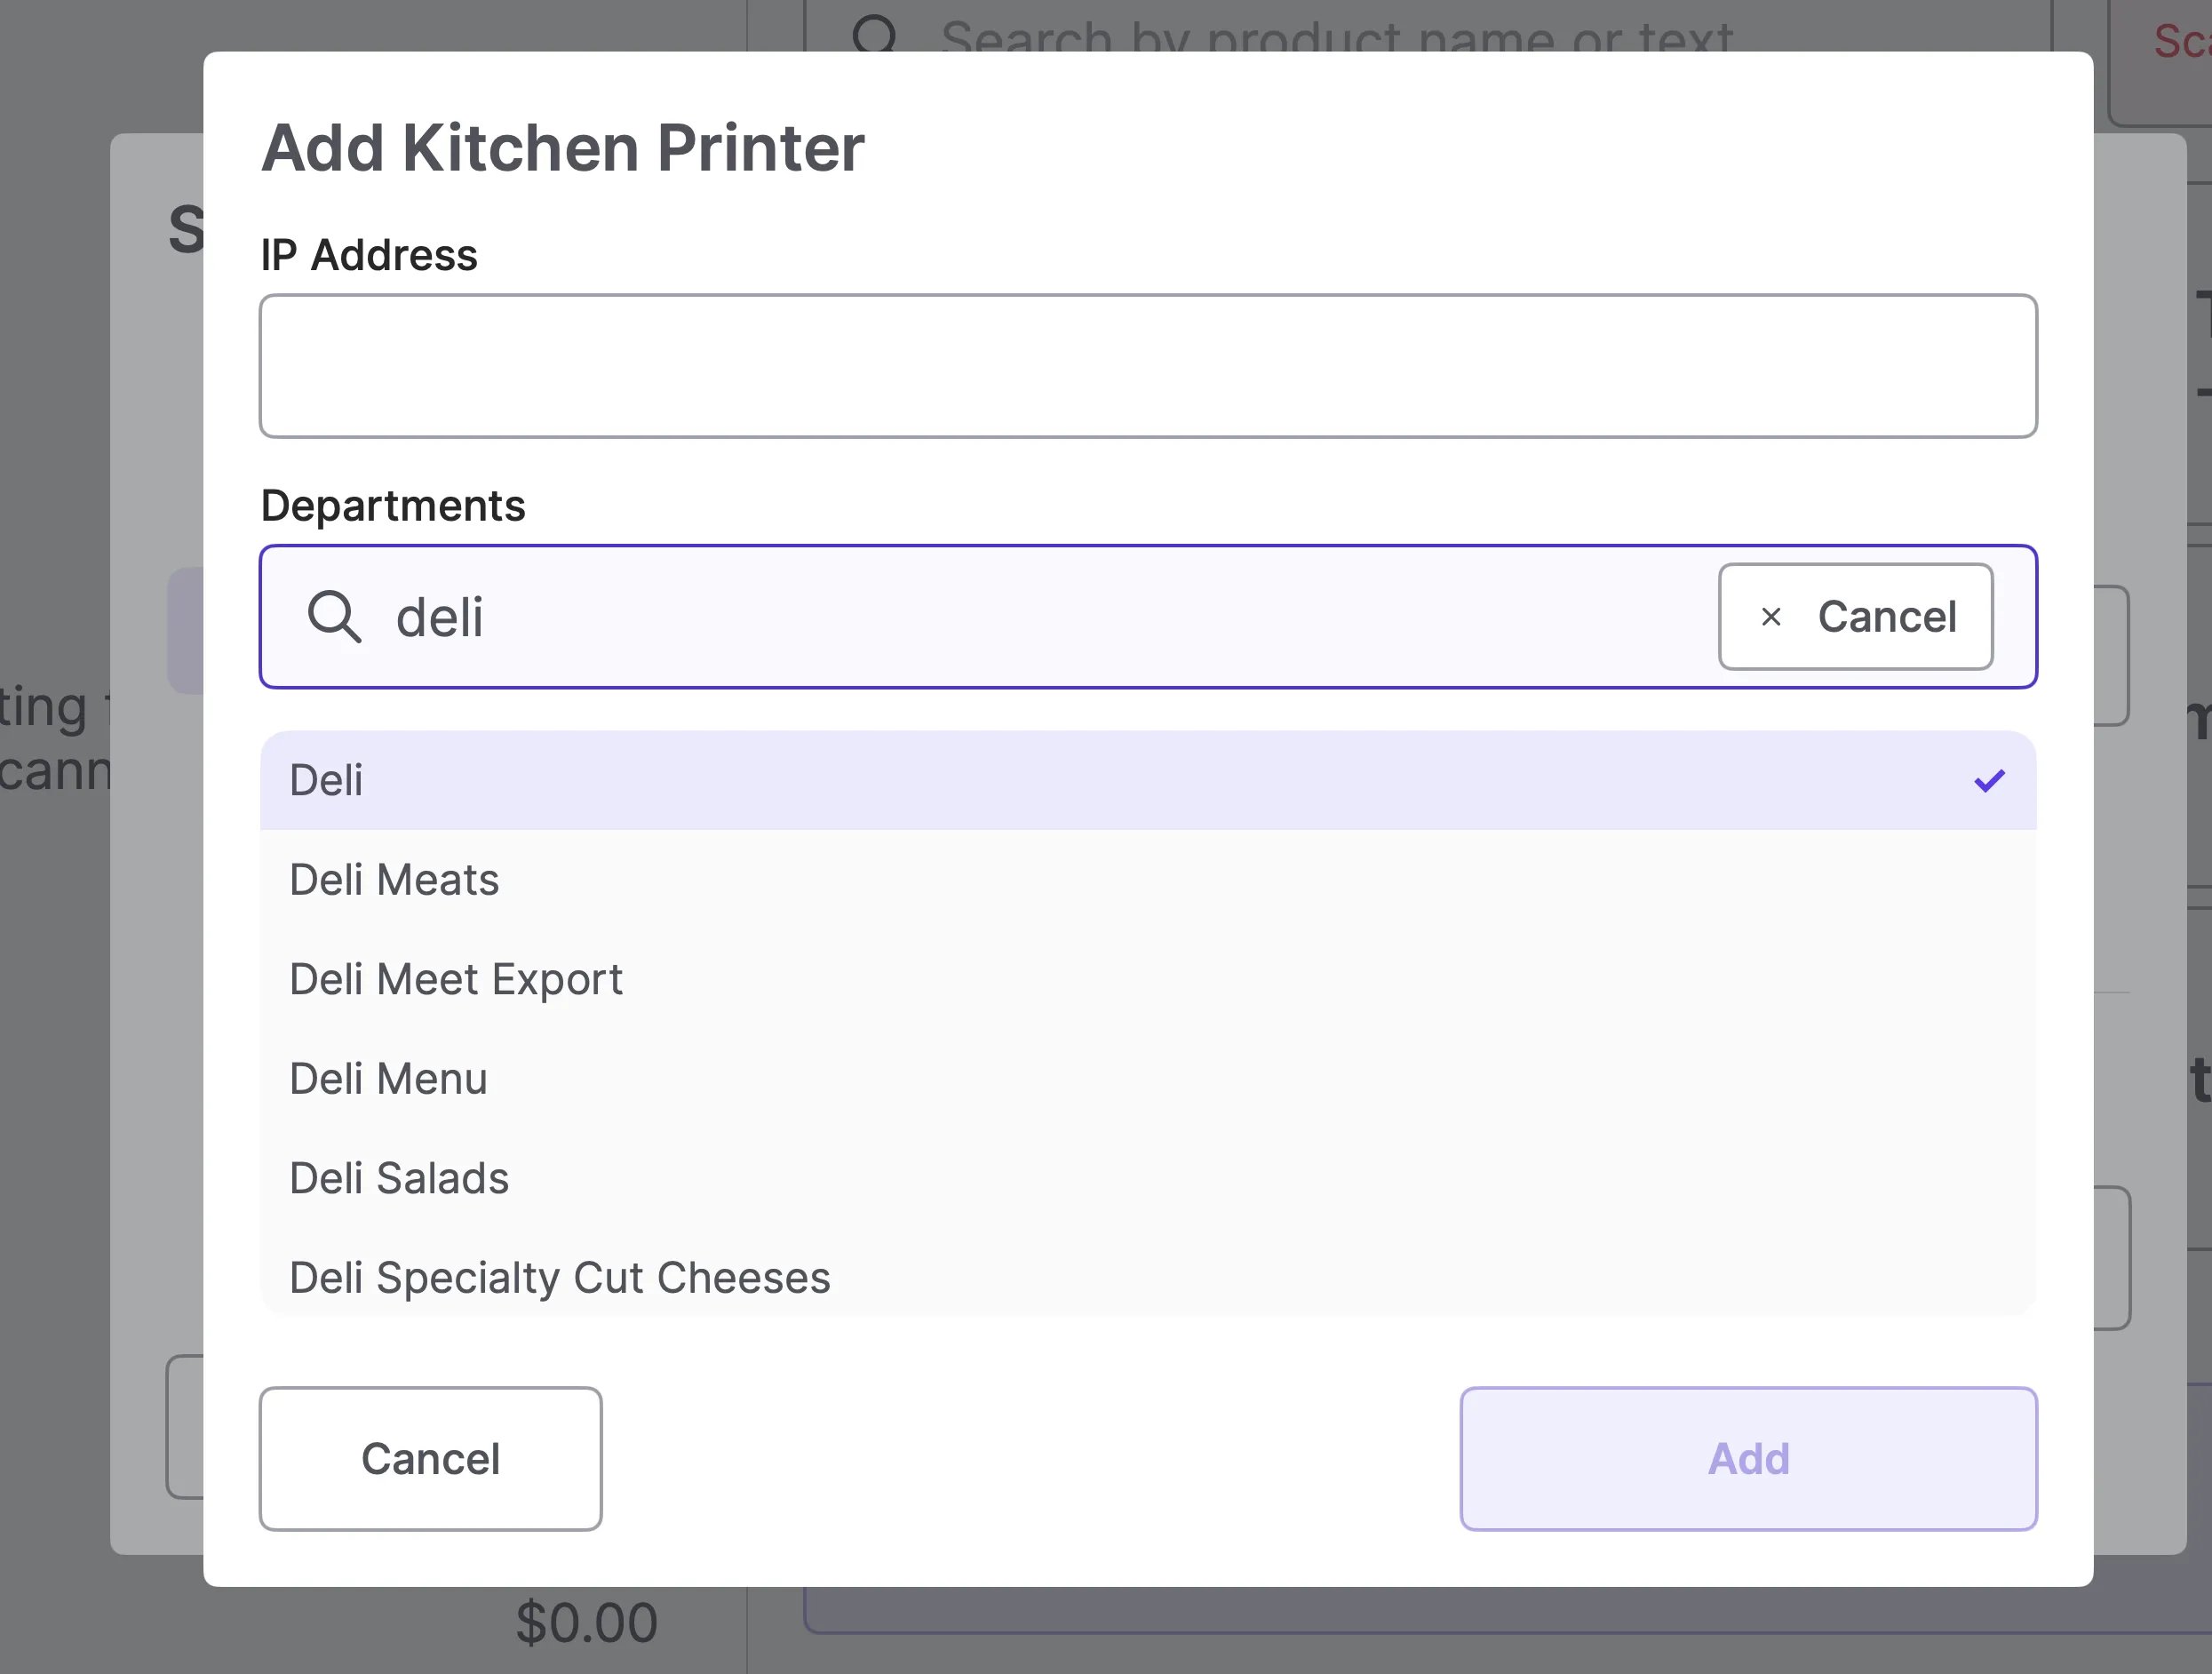
3. Select the kitchen printer from the list of available printers on your network.
4. Choose the **department** this printer should serve (e.g., "Coffee Bar").
5. Tap **Add**.\\
6. Repeat for each additional station and printer.
To test, ring up an item from each department on any lane and confirm the ticket prints at the correct station.
#### Common Setups
* **Single counter (e.g., one deli):** One department, one kitchen printer. Every food service ticket prints at the deli.
* **Coffee bar + deli:** Two departments, two printers. Coffee items print at the coffee bar; deli items print at the deli.
* **Food court with multiple stations:** One department per station, one printer per station. Tickets route automatically based on what the shopper orders.
A department can be assigned to one kitchen printer at a time. If you need an item to print at multiple stations simultaneously (e.g., a prep ticket and a counter pickup ticket), let your Vori contact know—we'll help you find the right setup.
***
### Ring Up Quick Food Service Items at the Counter
At the register, cashiers are guided through a structured workflow to ensure order accuracy.
#### To Ring Up a Quick Food Service Item:
1. Find the item and tap to initiate modifiers.
2. The POS will prompt you for required modifiers.
3. Select the shopper’s choices.
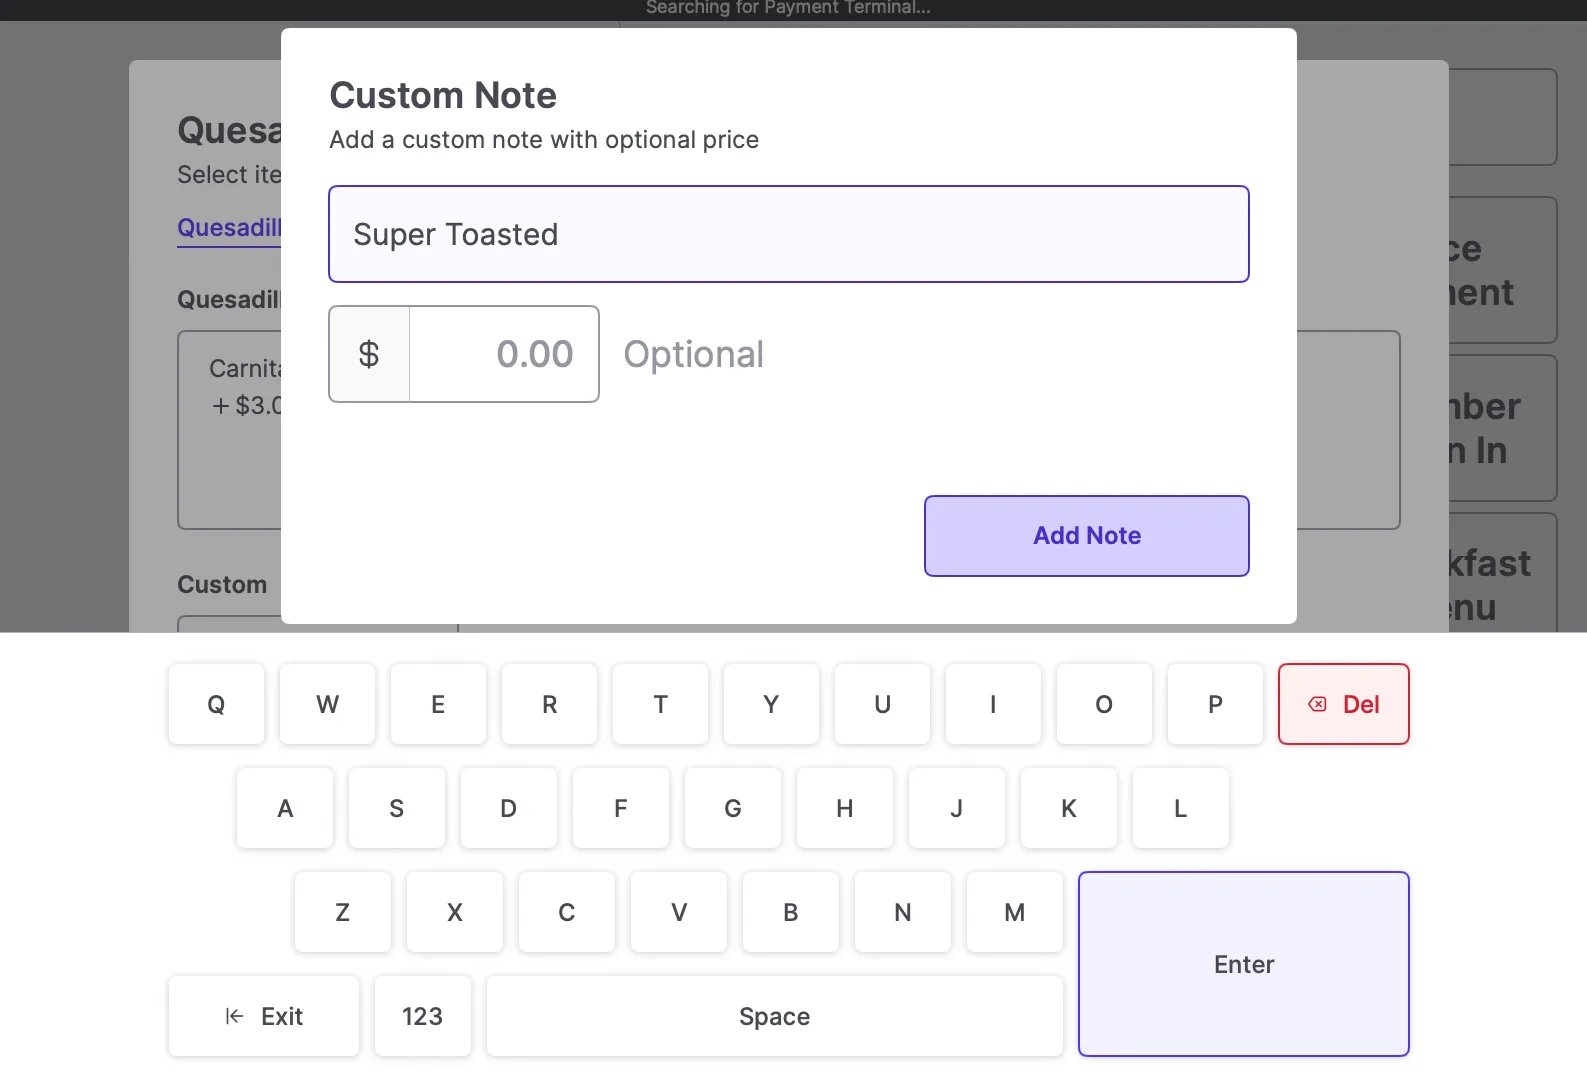
4. To add a special request not listed, tap **Add Custom Note**
* Enter a description and optional price. (custom price or leave blank -emphasize this)
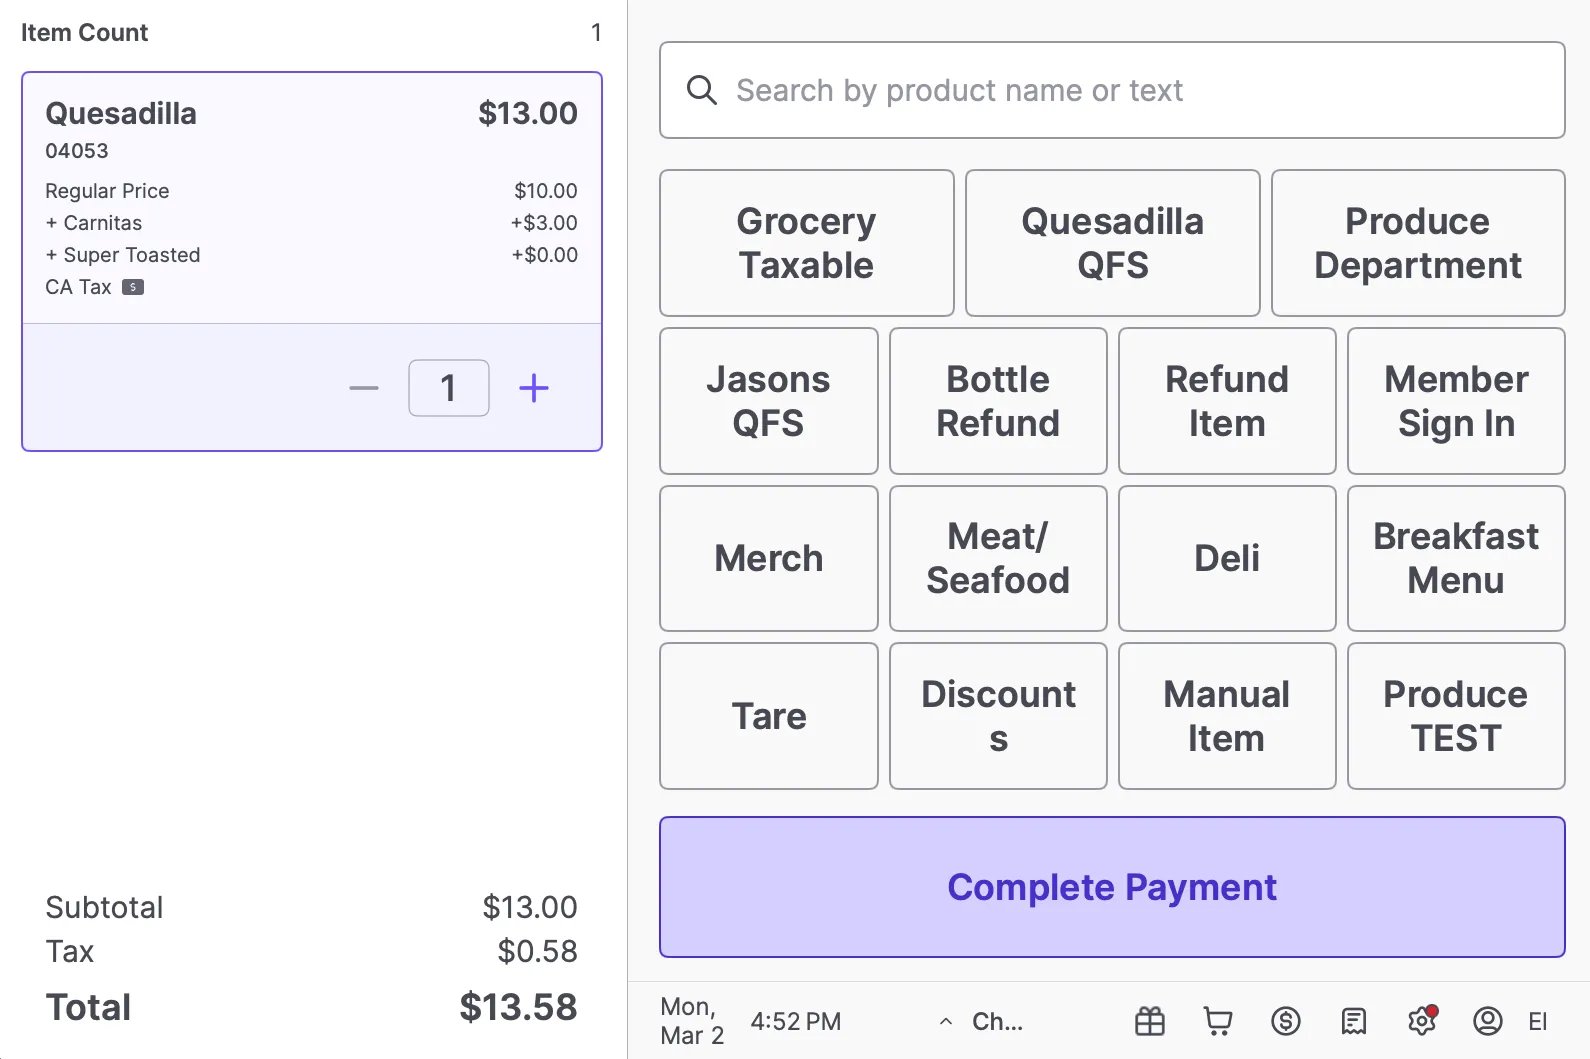
5. Tap **Add to Cart.**
6. The cart clearly displays the item and all selected modifiers so both the cashier and shopper can confirm accuracy.\\
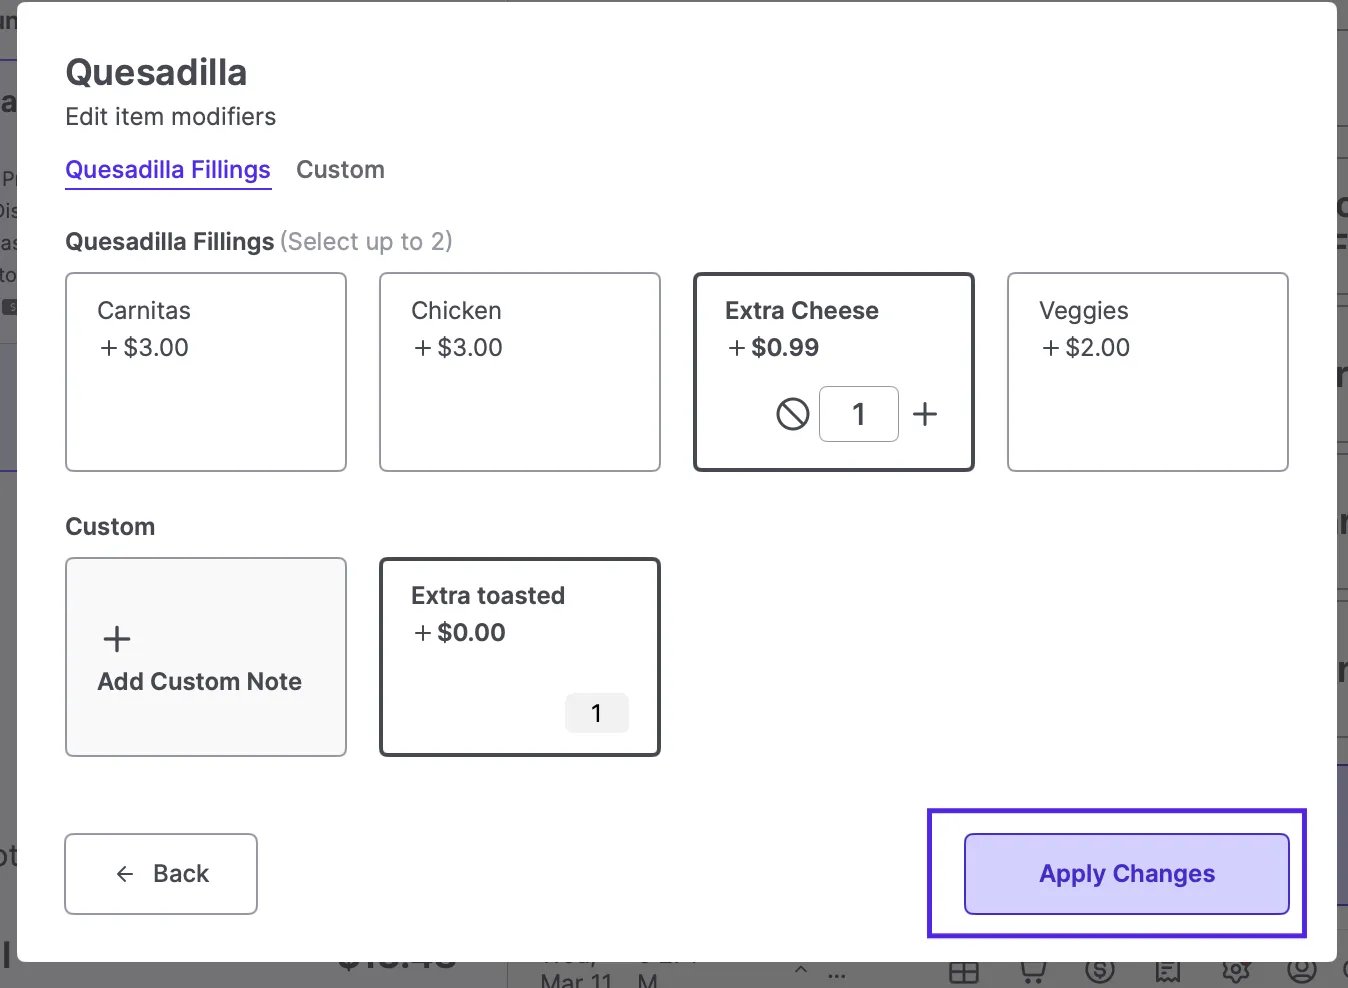
#### Edit a Quick Food Service Item on the POS
If a shopper changes their mind before paying, you can adjust their selections directly in the cart.
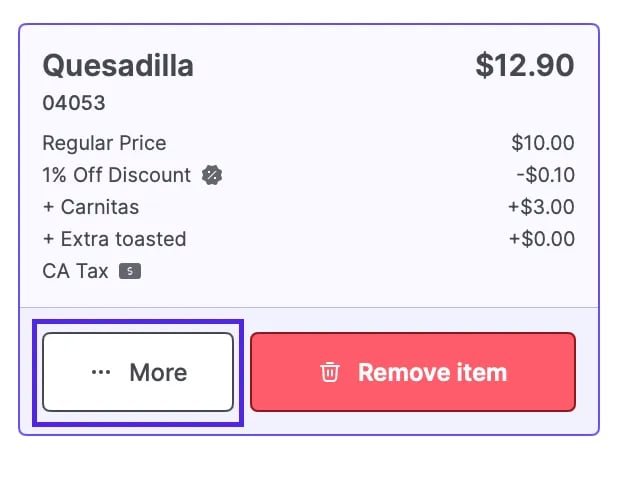
1. Tap the item you would like to edit and select \*\*More.
\*\*
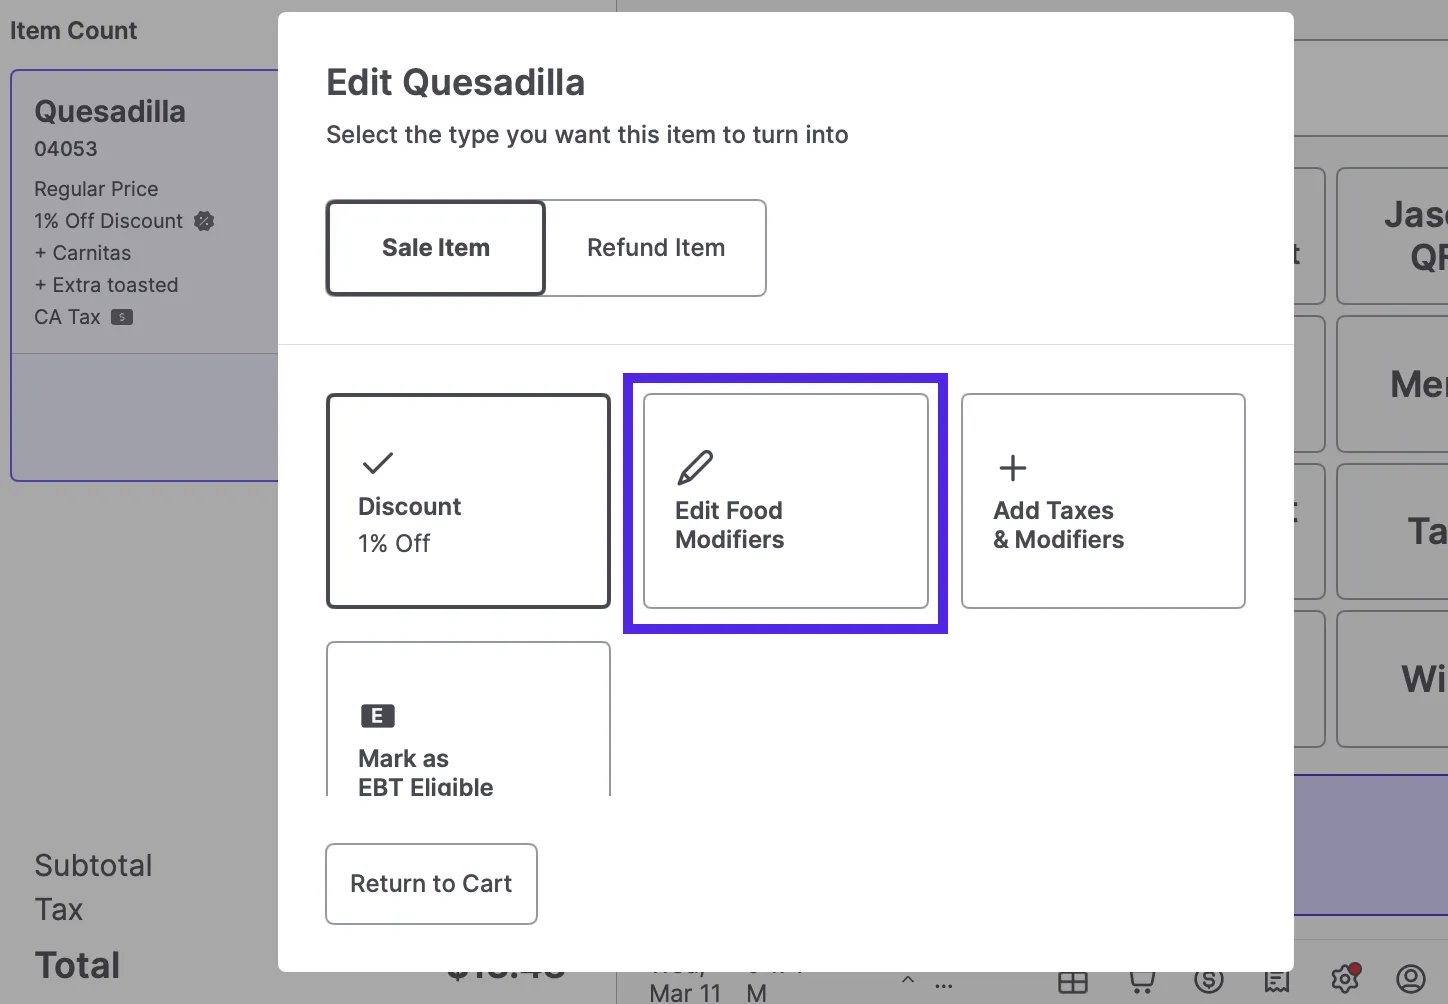
2. From the list select **Edit Food Modifiers**.
3. Select the shopper’s choices.
4. Tap **Apply Changes** to save.
***
### Send Tickets to Prep
Orders can be sent to the kitchen at the end of a sale or mid-transaction.
#### Standard Flow
In a standard checkout flow, the kitchen ticket is generated after payment is finalized.
1. Once all items are in the cart, tap **Complete Payment**.
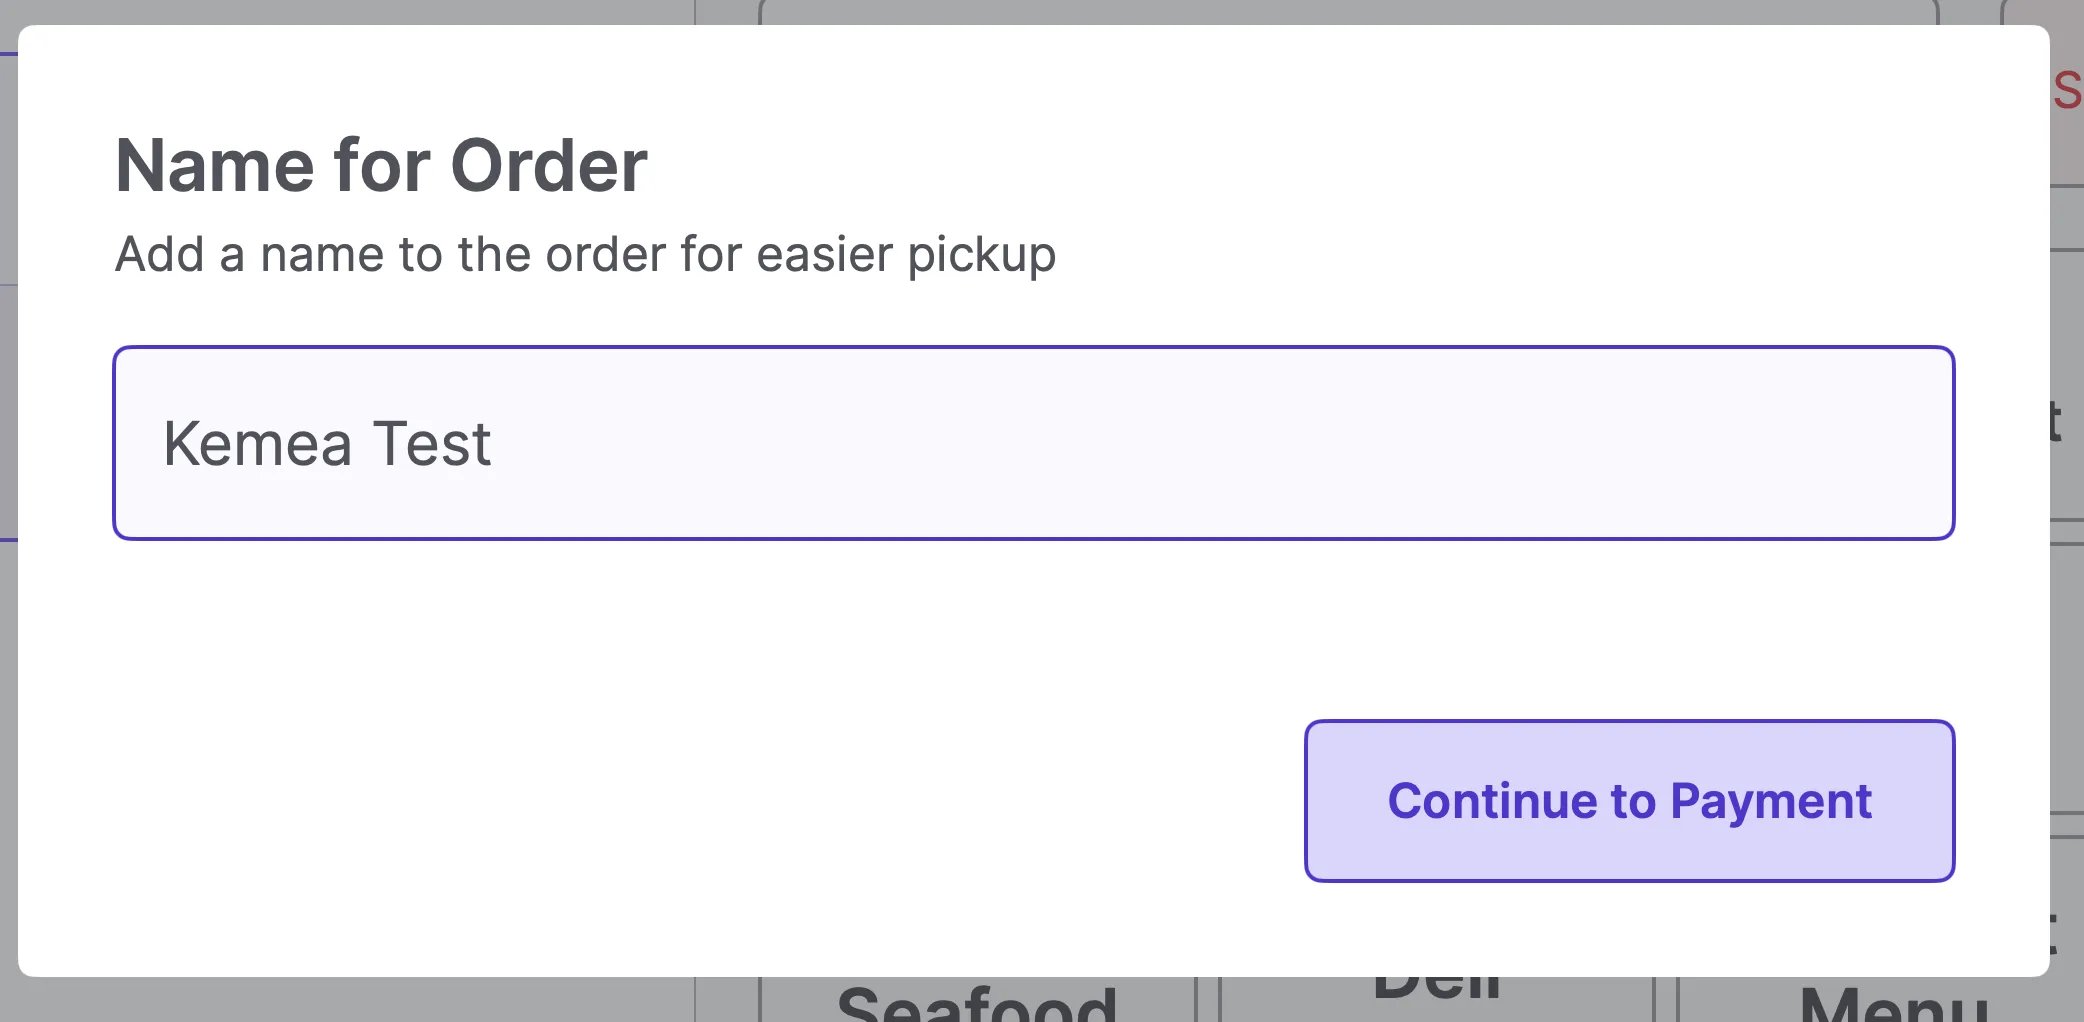
2. Enter a **Name for Order** to help the prep team identify the **shopper**.
3. Tap **Continue to Payment** and process the transaction as usual.
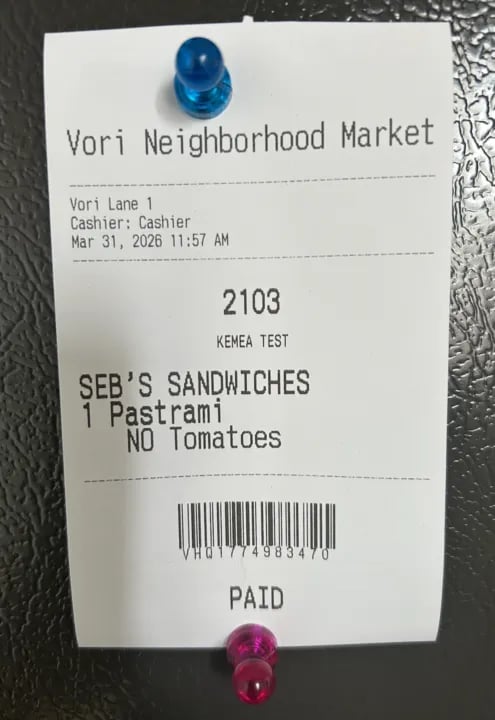
4. Once paid, the POS will automatically print a separate **kitchen ticket**. The **shopper's receipt** is optional.
#### Using Suspended Orders (Pay Later)
Suspended Orders allow shoppers to order at the deli and continue shopping for groceries.
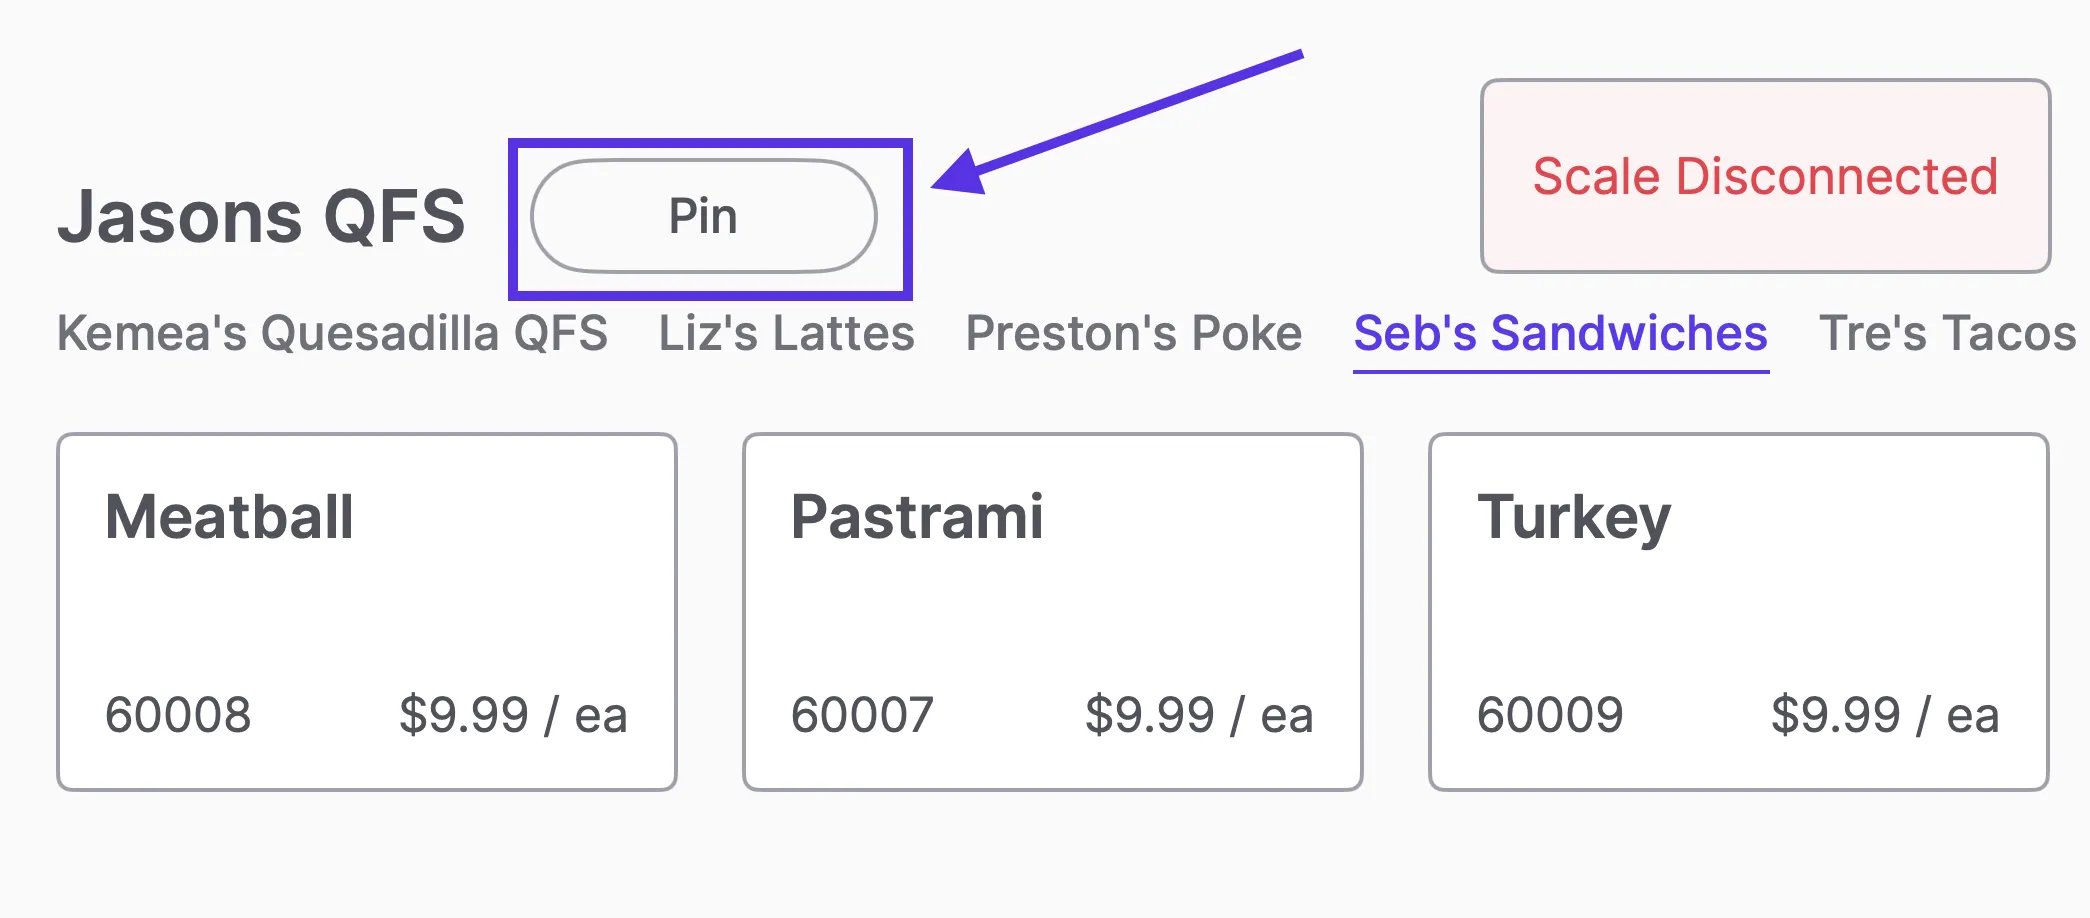
1. Go to your Food Service department and tap the **Pin** button at the top.
2. Add the food item and modifiers to the cart.
3. Tap **Submit Order**.
4. Enter the **shopper's name** for easier pickup and tap **Submit Order** again.
5. **The POS** will print a **Not Paid** receipt for the **shopper** and a prep ticket for the kitchen.
6. To pay, scan the **Not Paid** receipt at any lane.
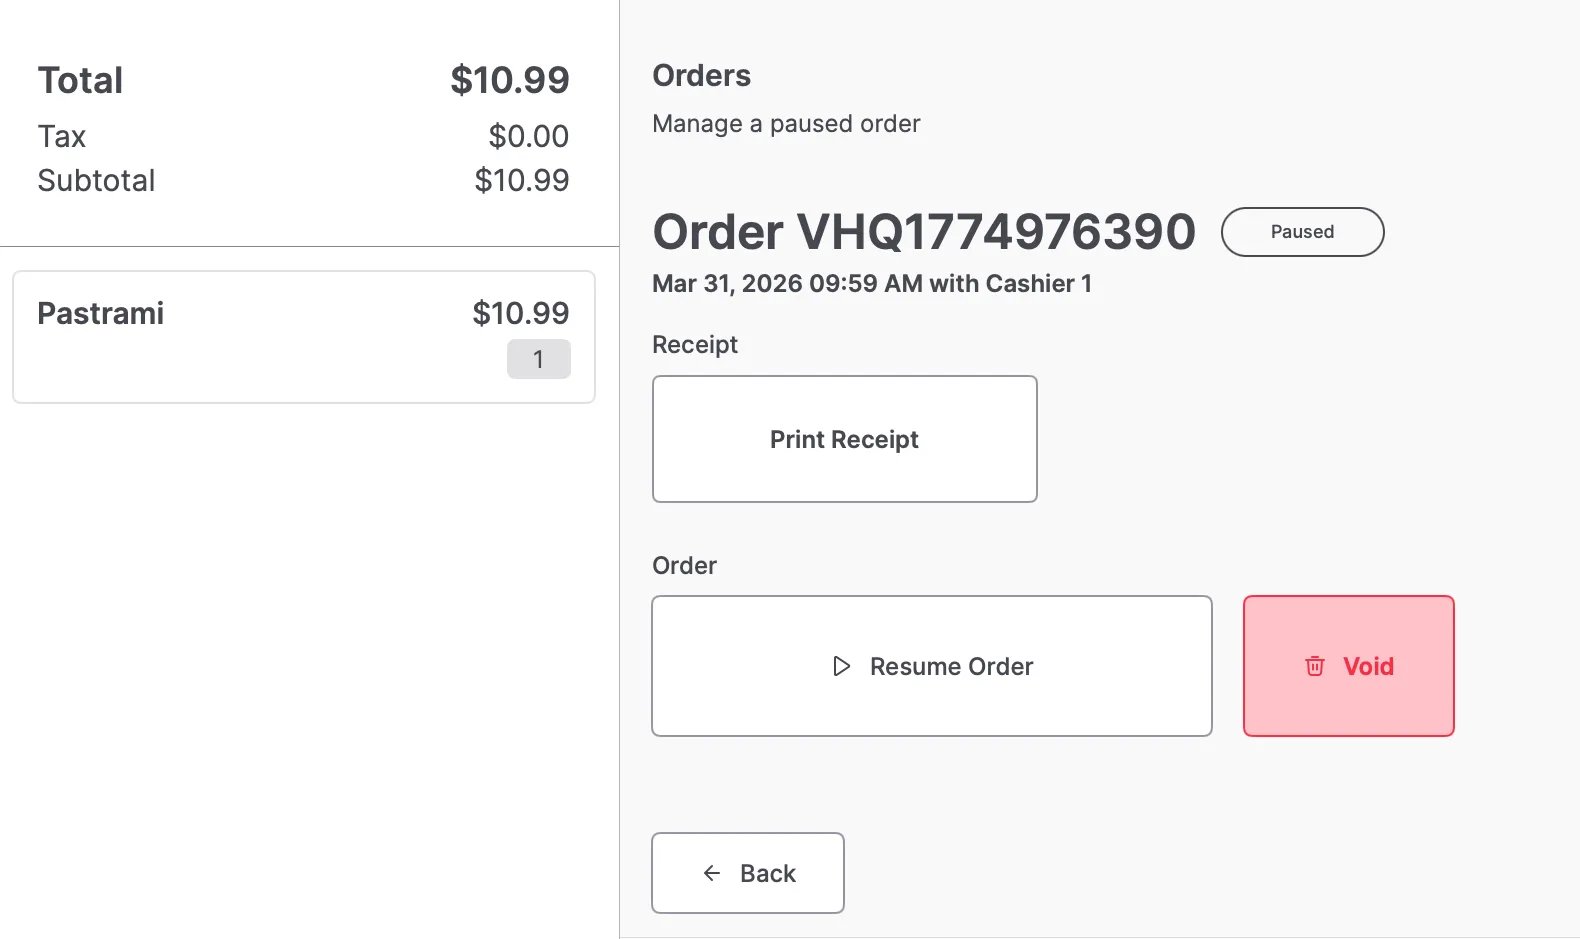
1. Or navigate to the receipt icon, select **View All Orders**, select the **Paused** tab, and tap **Resume Order** to complete checkout.
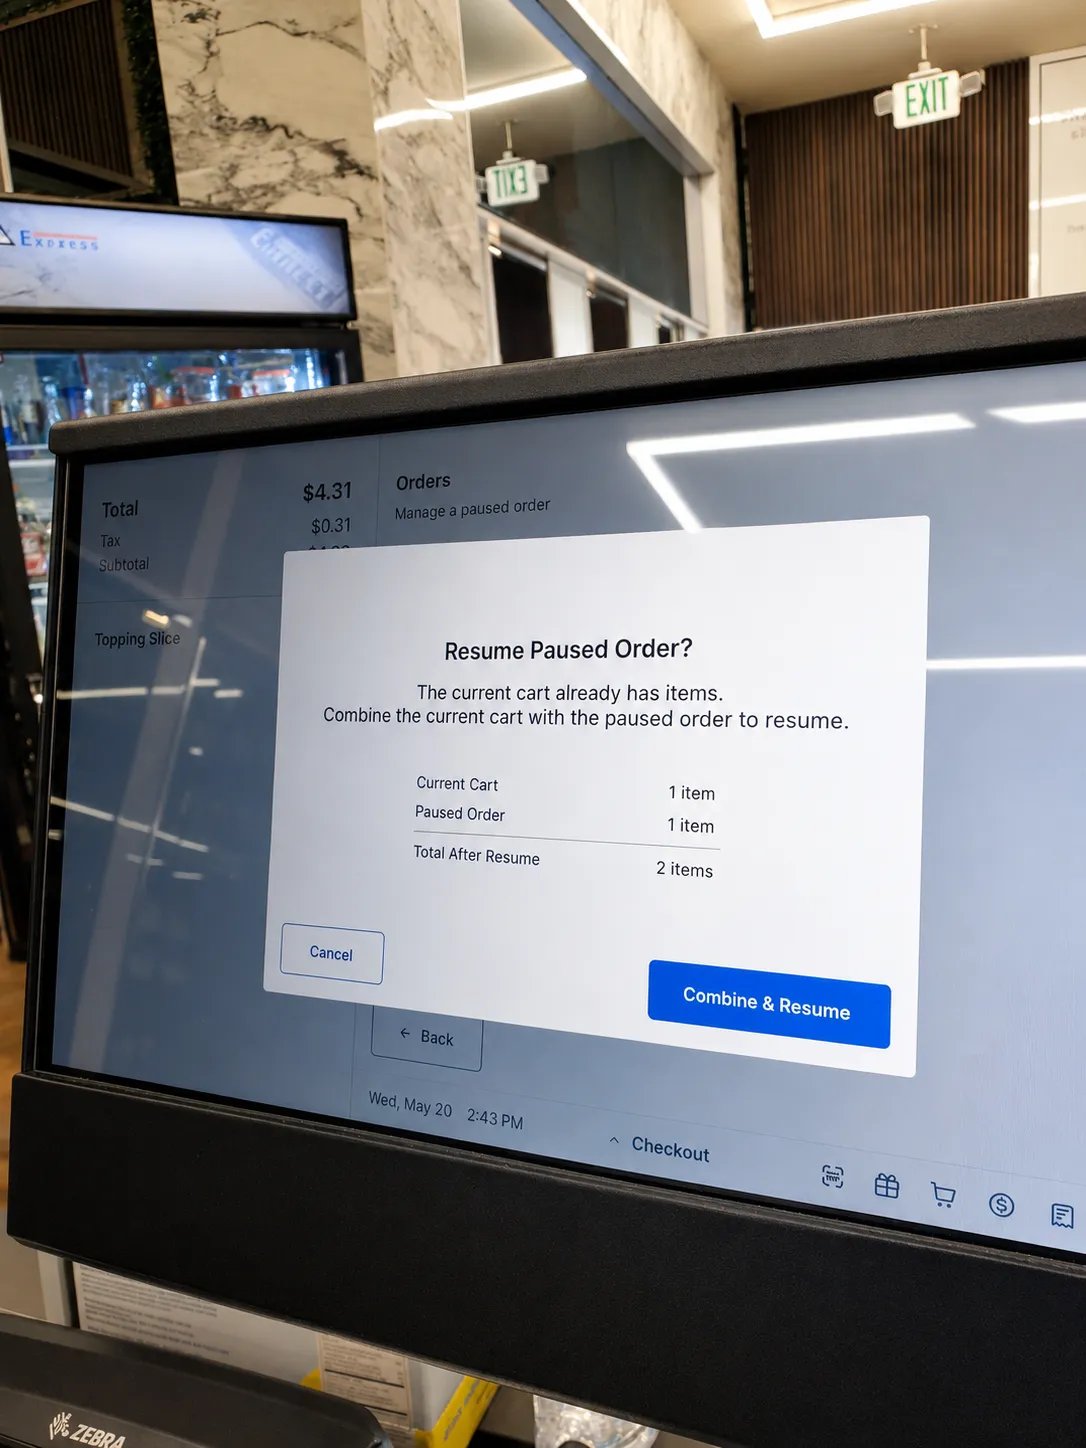
If you scan grocery items into the cart before scanning the shopper's kitchen receipt, the POS prompts you to **Combine & Resume** the two carts together.
#### How to Edit the Number of Printed Kitchen Receipts
If you need to change how many prep tickets print for the kitchen, use the hidden POS configuration menu:
**Steps:**
1. Log in to the POS.
2. Tap the **Date** in the bottom corner three times quickly to open the hidden menu.
3. Select **Food Service**.
4. Select the quantity of kitchen receipts desired.
5. Tap **Return to cart**.
6. Click the **Gear Icon**, then restart the app to apply your changes.
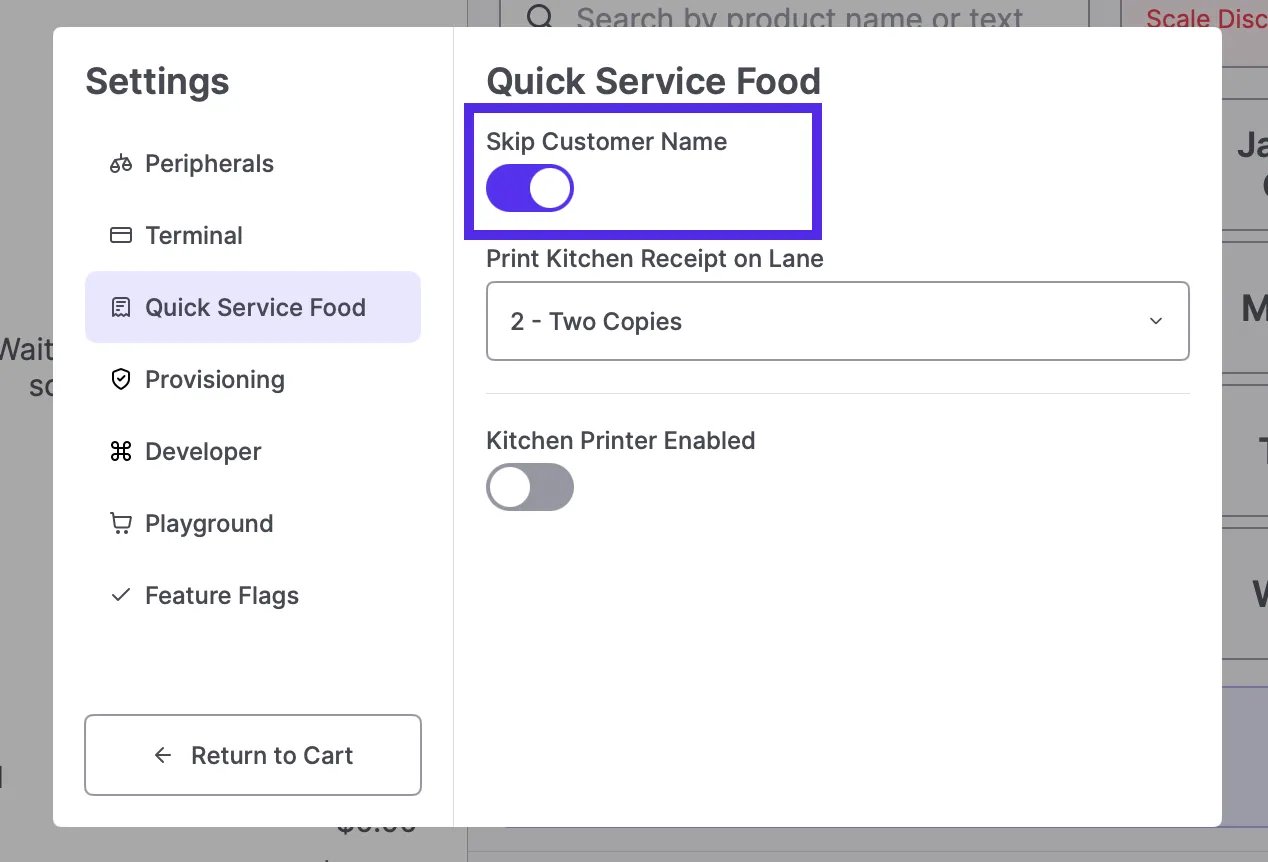
**💡Pro-Tip:** You can disable the customer name requirement on order receipts by turning off Skip Customer Name in the Quick Food Service settings.
***
### Track Food Service Sales in Unified Reporting
Prepared foods are one of the highest-margin areas in your store. Vori provides connected reporting so you can protect those margins without needing a separate restaurant system.
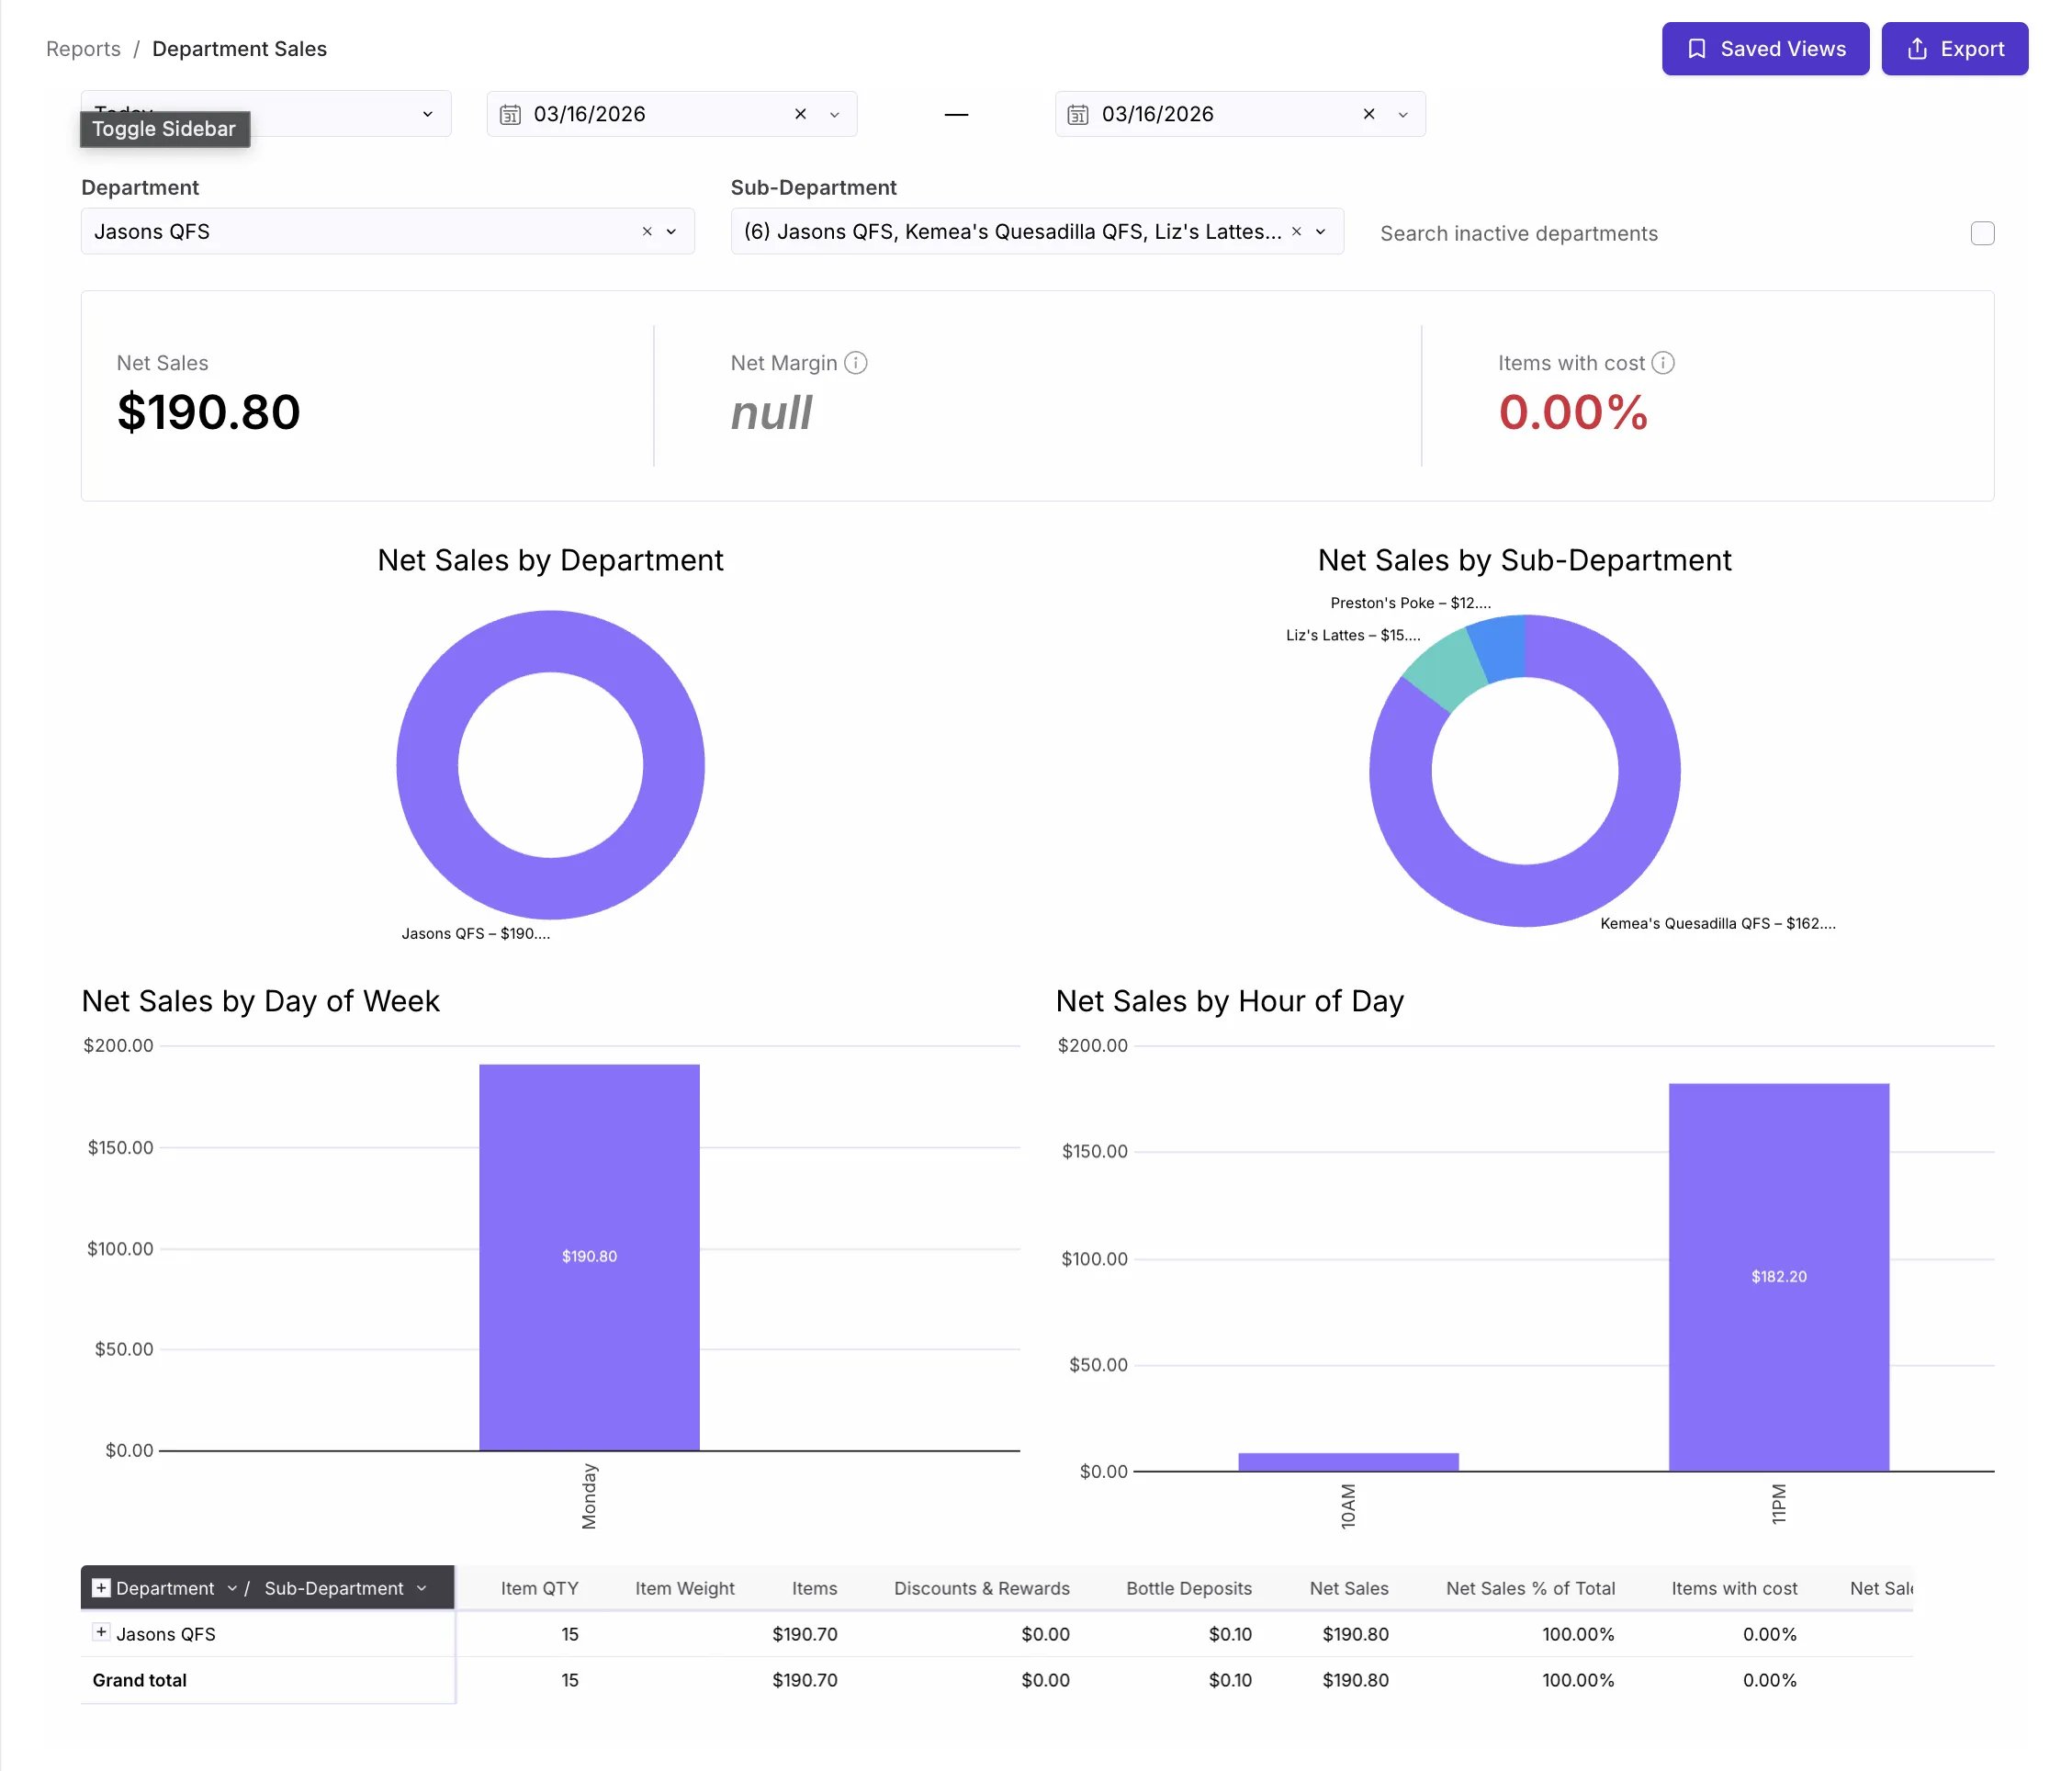
* **Department-Level Tracking:** Use the **Department Sales** report to see exactly how much net sales your Food Service departments are generating.
**✏️ Note:** Recipe-level ingredient tracking isn’t available at this time.
## Related topics
- [Vori Webinar Training Hub](/vori-webinar-training-hub/vori-webinartraining-hub.md)
- [Create Quick Actions in Back Office](/point-of-sale-pos/pos-customization-and-setup/create-quick-actions-in-back-office.md)
- [Double Up Food Bucks (OR, MS, and CA)](/whats-new-in-vori/in-beta-double-up-bucks/in-beta-double-up-food-bucks-or-and-ms-only.md)
 2. Select **New Food Modifier** from the top right corner.
 3. Create a **Modifier Category** (e.g., Quesadilla Fillings).
4. Set **Minimum and Maximum Selections**for that category *(optional)* to control how many modifiers ashopper can choose.
5. Create each selectable option your team can ring up as a Modifier (e.g., Carnitas).
1. Assign a price or leave it at \$0.00.
2. Use the **Create More** toggle to add multiple modifiers at once.
3. Create a **Modifier Category** (e.g., Quesadilla Fillings).
4. Set **Minimum and Maximum Selections**for that category *(optional)* to control how many modifiers ashopper can choose.
5. Create each selectable option your team can ring up as a Modifier (e.g., Carnitas).
1. Assign a price or leave it at \$0.00.
2. Use the **Create More** toggle to add multiple modifiers at once.
 6. Use the drag-and-drop "grabbers" to arrange the order in which these options appear on **the POS** screen.\\
 💡 **Pro-Tip:** Use the **AI Menu Builder** to set up new modifiers fast. Simply describe the item and its modifiers, and Vori will recommend a structured menu setup for you to review and save.
 #### Use the AI Menu Builder
For a faster setup, you can use the **AI Menu Builder** to build your menu using natural language.
1. Click the **AI Menu Builder chat icon** in the top right of the Back Office.
#### Use the AI Menu Builder
For a faster setup, you can use the **AI Menu Builder** to build your menu using natural language.
1. Click the **AI Menu Builder chat icon** in the top right of the Back Office.
 2. Tell the AI Menu Builder what you want to add (e.g., "Help me add Boba items to my menu").
3. Follow the prompts to provide the **price**, **barcode/PLU**, and **department**.
4. The assistant will suggest common modifier categories (e.g., "Sweetness Level"). Confirm if they look correct.
5. Review your plan, then click **Allow** to let Vori create your new products and modifiers automatically.
#### Edit a Food Modifier in New Back Office
1. Locate the modifier or category you want to update, **h\*\*\*\*over over the modifier name,** and click **Open**.
2. Tell the AI Menu Builder what you want to add (e.g., "Help me add Boba items to my menu").
3. Follow the prompts to provide the **price**, **barcode/PLU**, and **department**.
4. The assistant will suggest common modifier categories (e.g., "Sweetness Level"). Confirm if they look correct.
5. Review your plan, then click **Allow** to let Vori create your new products and modifiers automatically.
#### Edit a Food Modifier in New Back Office
1. Locate the modifier or category you want to update, **h\*\*\*\*over over the modifier name,** and click **Open**.
 2. Update the **Modifier Name** and **Price**, or the **Category Name** and **Min/Max Selection**.
3. To delete a modifier, click the **three dots (•••)** in the edit view and select **Delete**.
2. Update the **Modifier Name** and **Price**, or the **Category Name** and **Min/Max Selection**.
3. To delete a modifier, click the **three dots (•••)** in the edit view and select **Delete**.
 4. Changes save instantly and will reflect at the POS.
***
### Set Up Your Quick Food Service Departments
To keep your POS interface organized and reporting clean, create a dedicated department hierarchy.
1. Create **parent departments** for your counter service (e.g., "Cafe" or "Deli").
2. Create **sub-departments** within that parent department for different menu types (e.g., Sandwiches, Smoothies, Coffee).
4. Changes save instantly and will reflect at the POS.
***
### Set Up Your Quick Food Service Departments
To keep your POS interface organized and reporting clean, create a dedicated department hierarchy.
1. Create **parent departments** for your counter service (e.g., "Cafe" or "Deli").
2. Create **sub-departments** within that parent department for different menu types (e.g., Sandwiches, Smoothies, Coffee).
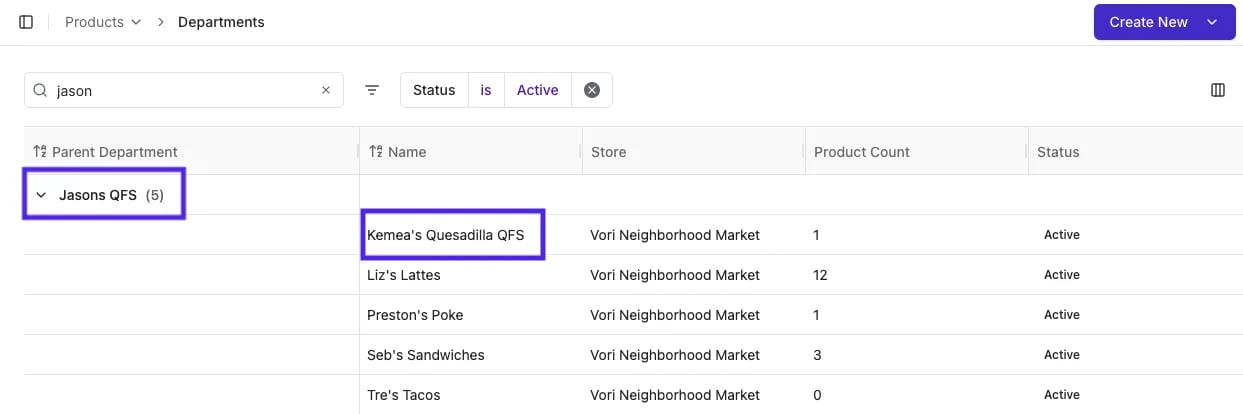 3. This setup creates easy-to-navigate tabs on the POS instead of cluttering your screen with multiple top-level buttons.
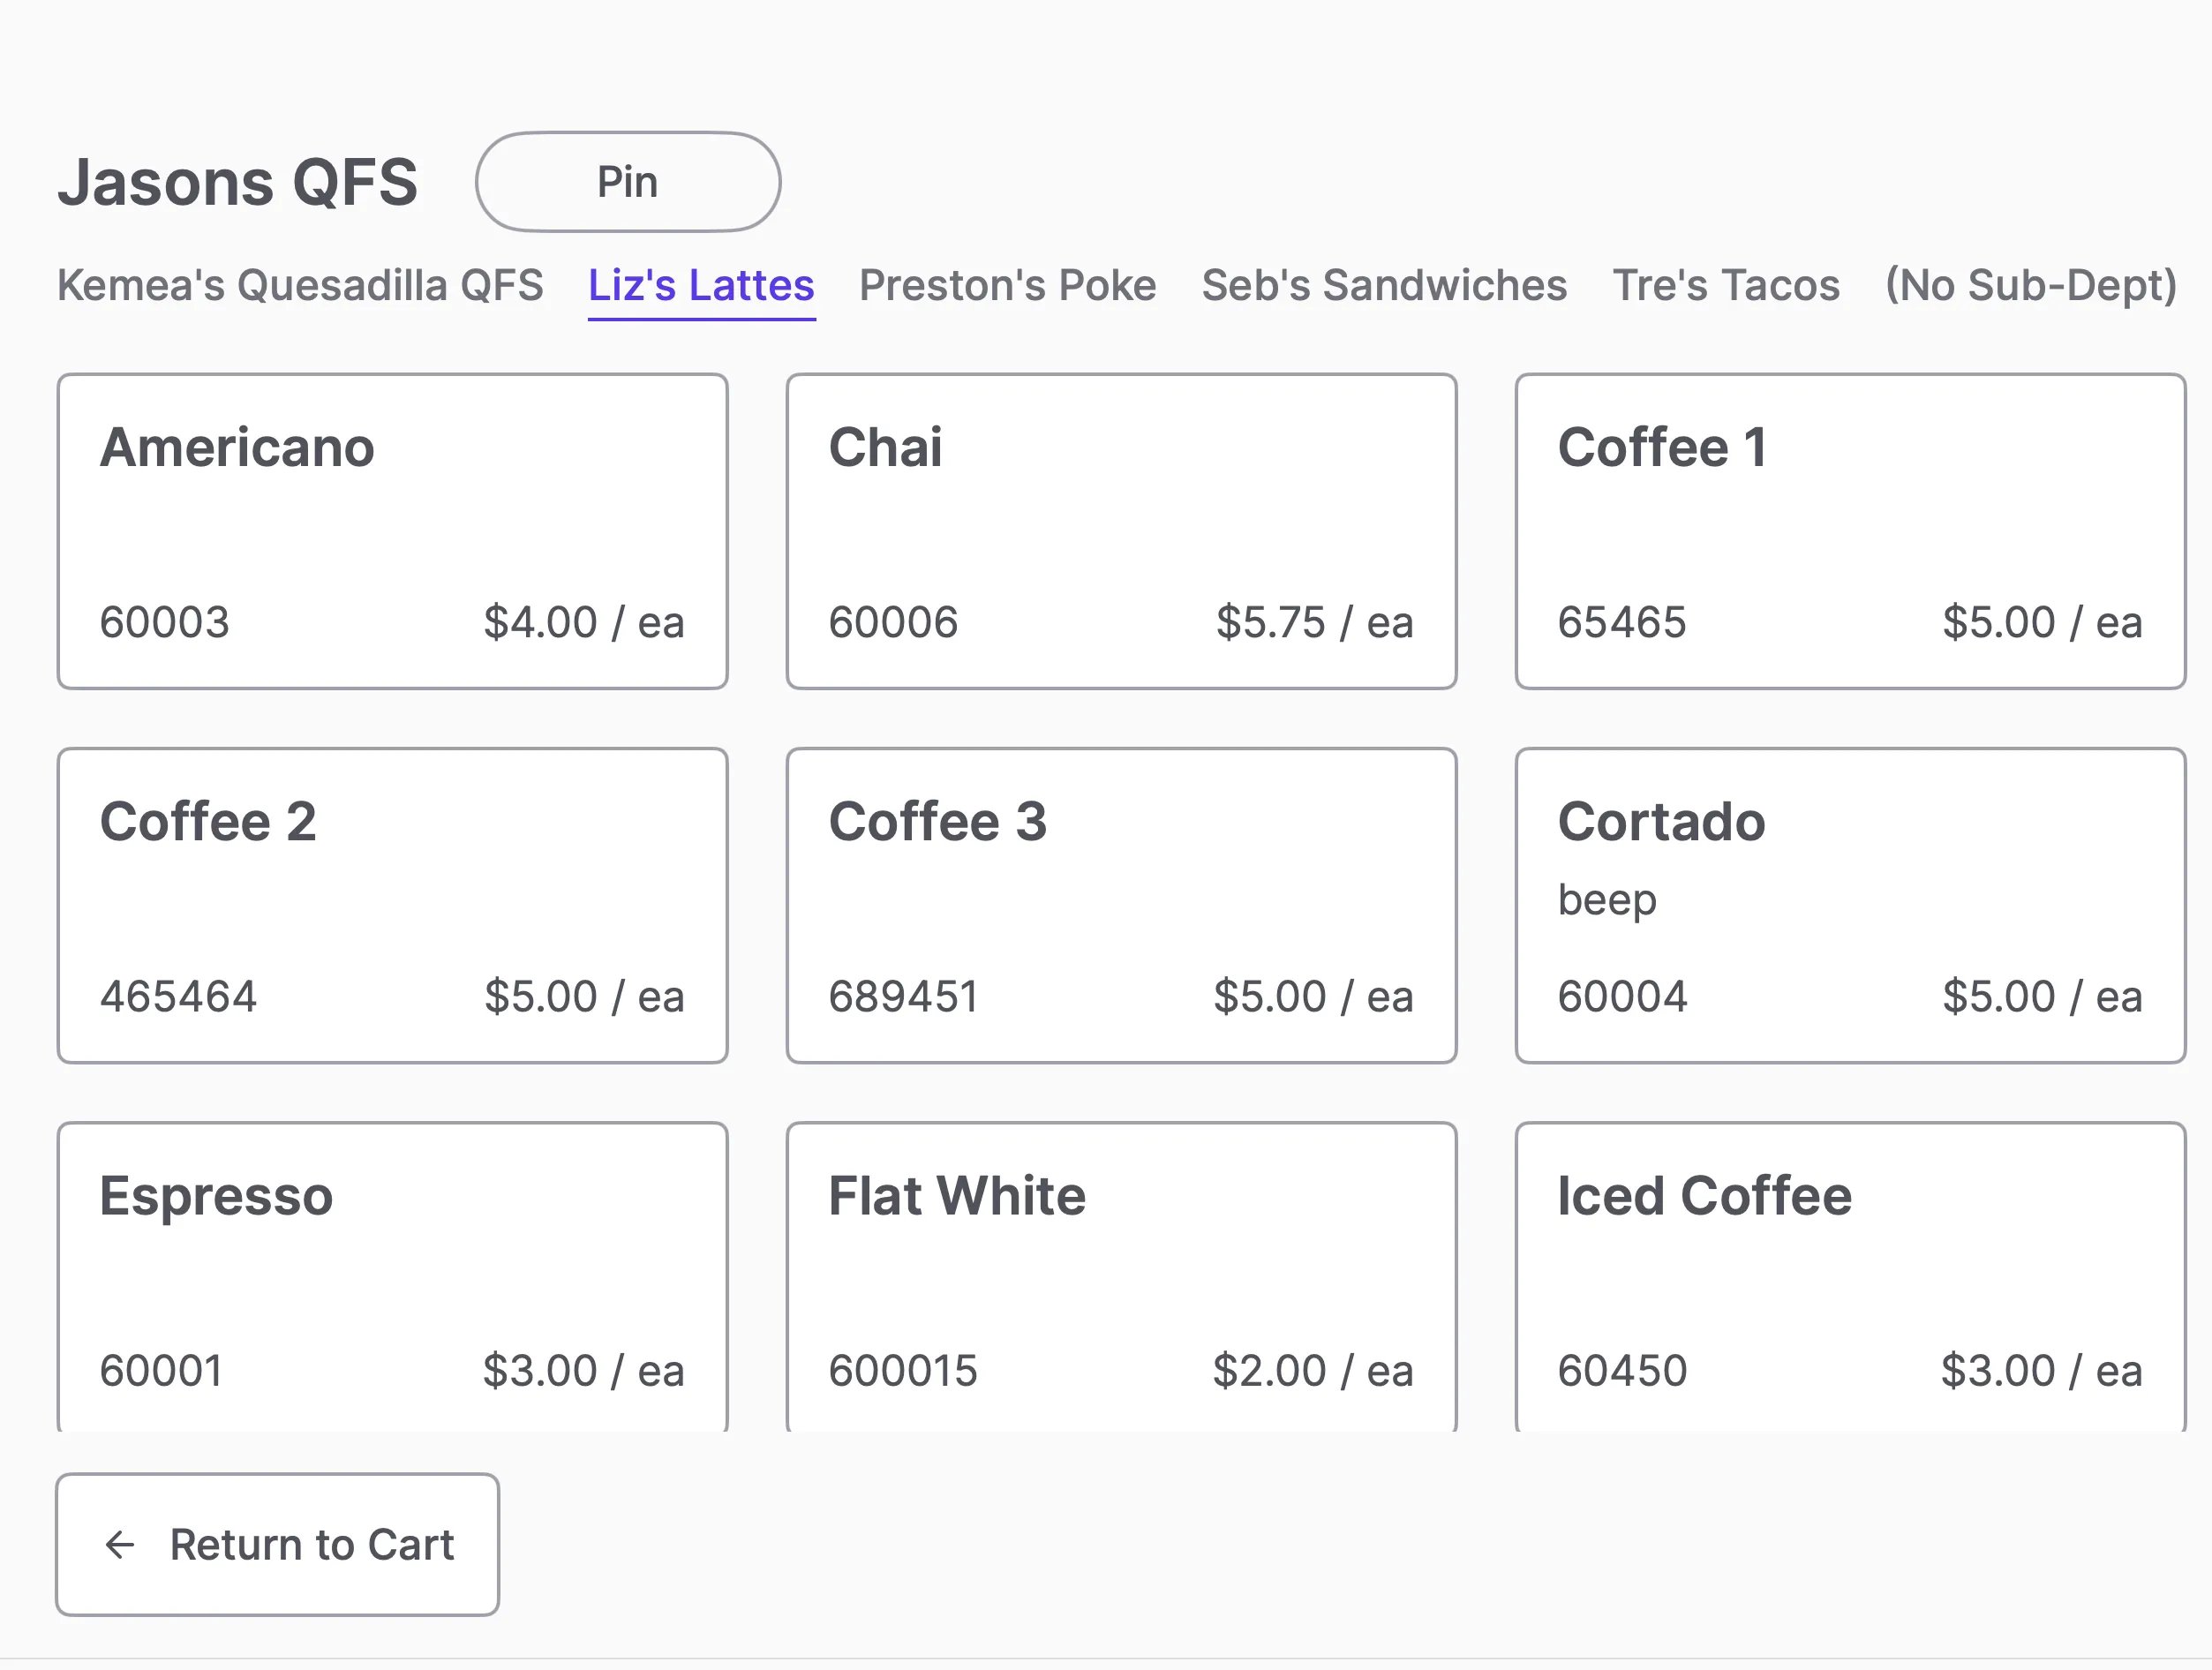 4. Ensure this parent department is added as a **Quick Action button** on your POS.
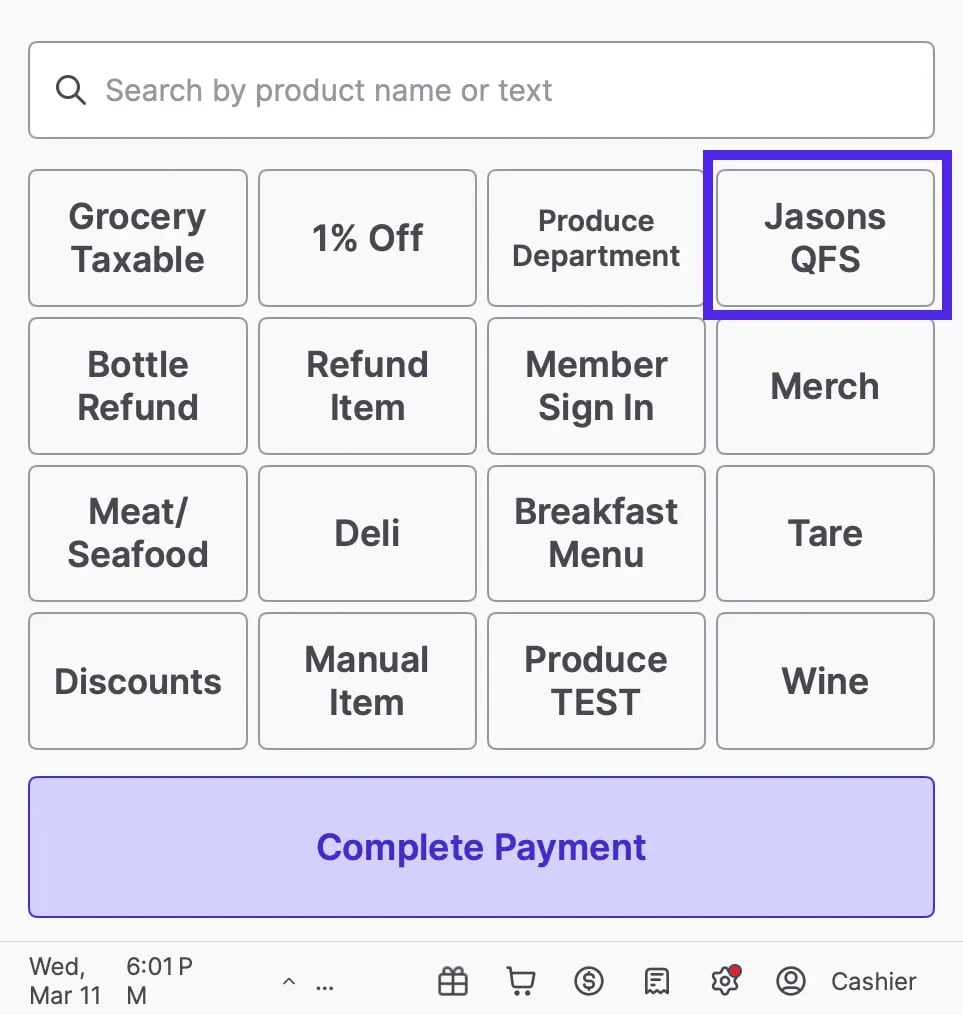 **✏️Note:** To add or update a Quick Action button (the main tile on the POS home screen), please contact **Vori Support**. Learn more in the article **[Customize Your POS With Quick Action Buttons and Manual Items](/point-of-sale-pos/pos-customization-and-setup/customize-your-pos-with-quick-action-buttons-and-manual-items)**.
### Assign Food Modifiers to Products
Once your modifiers are created, you must link them to the products you sell.
1. **Open** your product (e.g., Quesadilla) in the **[Product Catalog](https://app.vori.com/retail/products)**.
**✏️Note:** To add or update a Quick Action button (the main tile on the POS home screen), please contact **Vori Support**. Learn more in the article **[Customize Your POS With Quick Action Buttons and Manual Items](/point-of-sale-pos/pos-customization-and-setup/customize-your-pos-with-quick-action-buttons-and-manual-items)**.
### Assign Food Modifiers to Products
Once your modifiers are created, you must link them to the products you sell.
1. **Open** your product (e.g., Quesadilla) in the **[Product Catalog](https://app.vori.com/retail/products)**.
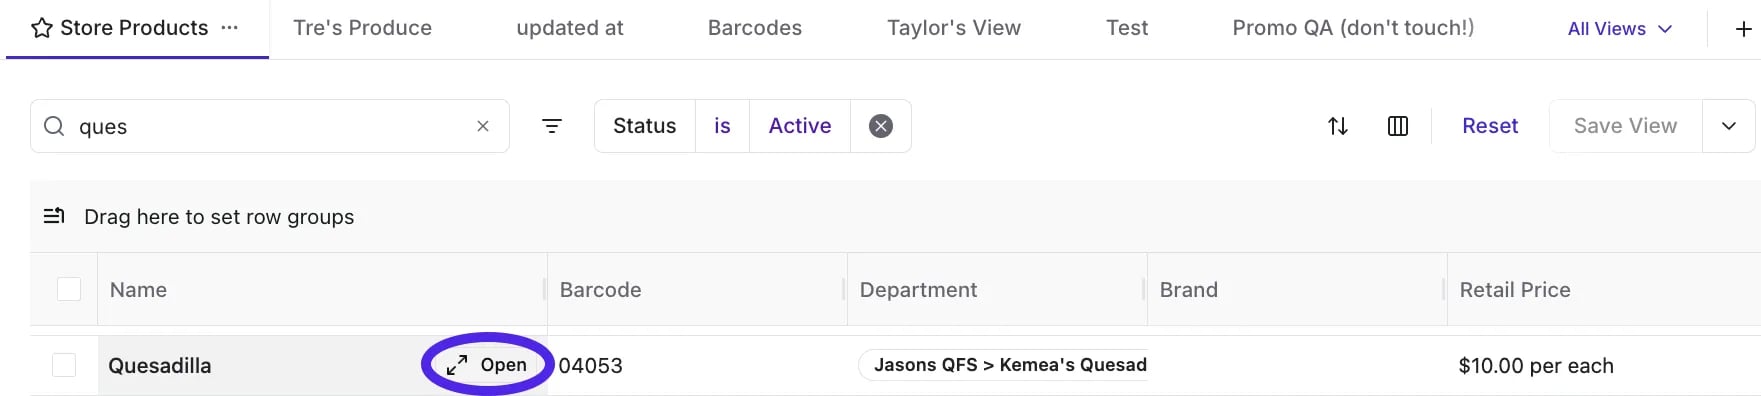 2. Assign the appropriate modifier categories to that item in the **Product Attributes** section.
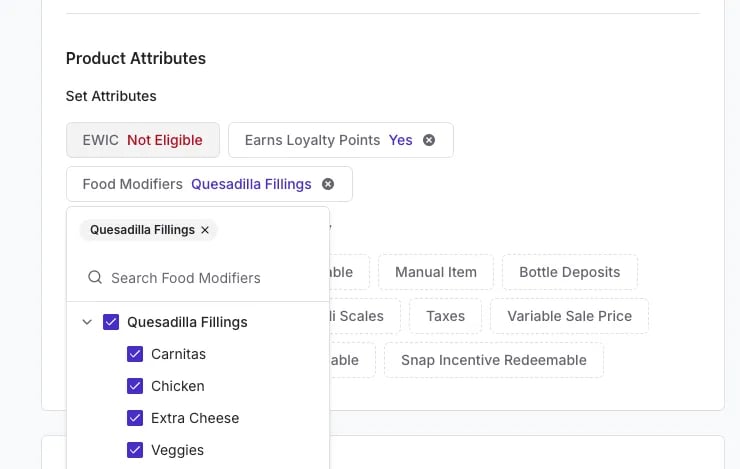 3. Changes save instantly and will reflect at the POS.
#### Bulk Update Food Modifiers
You can select multiple items in the Product Catalog and use the bulk edit tool to assign modifier categories to all of them at once.
1. Navigate to the **[Product Catalog](https://app.vori.com/retail/products)** in the left-hand navigation menu.
2. Select the products you want to update by clicking the **checkboxes** next to their names.
3. Click the **More** button at the bottom of the screen.
3. Changes save instantly and will reflect at the POS.
#### Bulk Update Food Modifiers
You can select multiple items in the Product Catalog and use the bulk edit tool to assign modifier categories to all of them at once.
1. Navigate to the **[Product Catalog](https://app.vori.com/retail/products)** in the left-hand navigation menu.
2. Select the products you want to update by clicking the **checkboxes** next to their names.
3. Click the **More** button at the bottom of the screen.
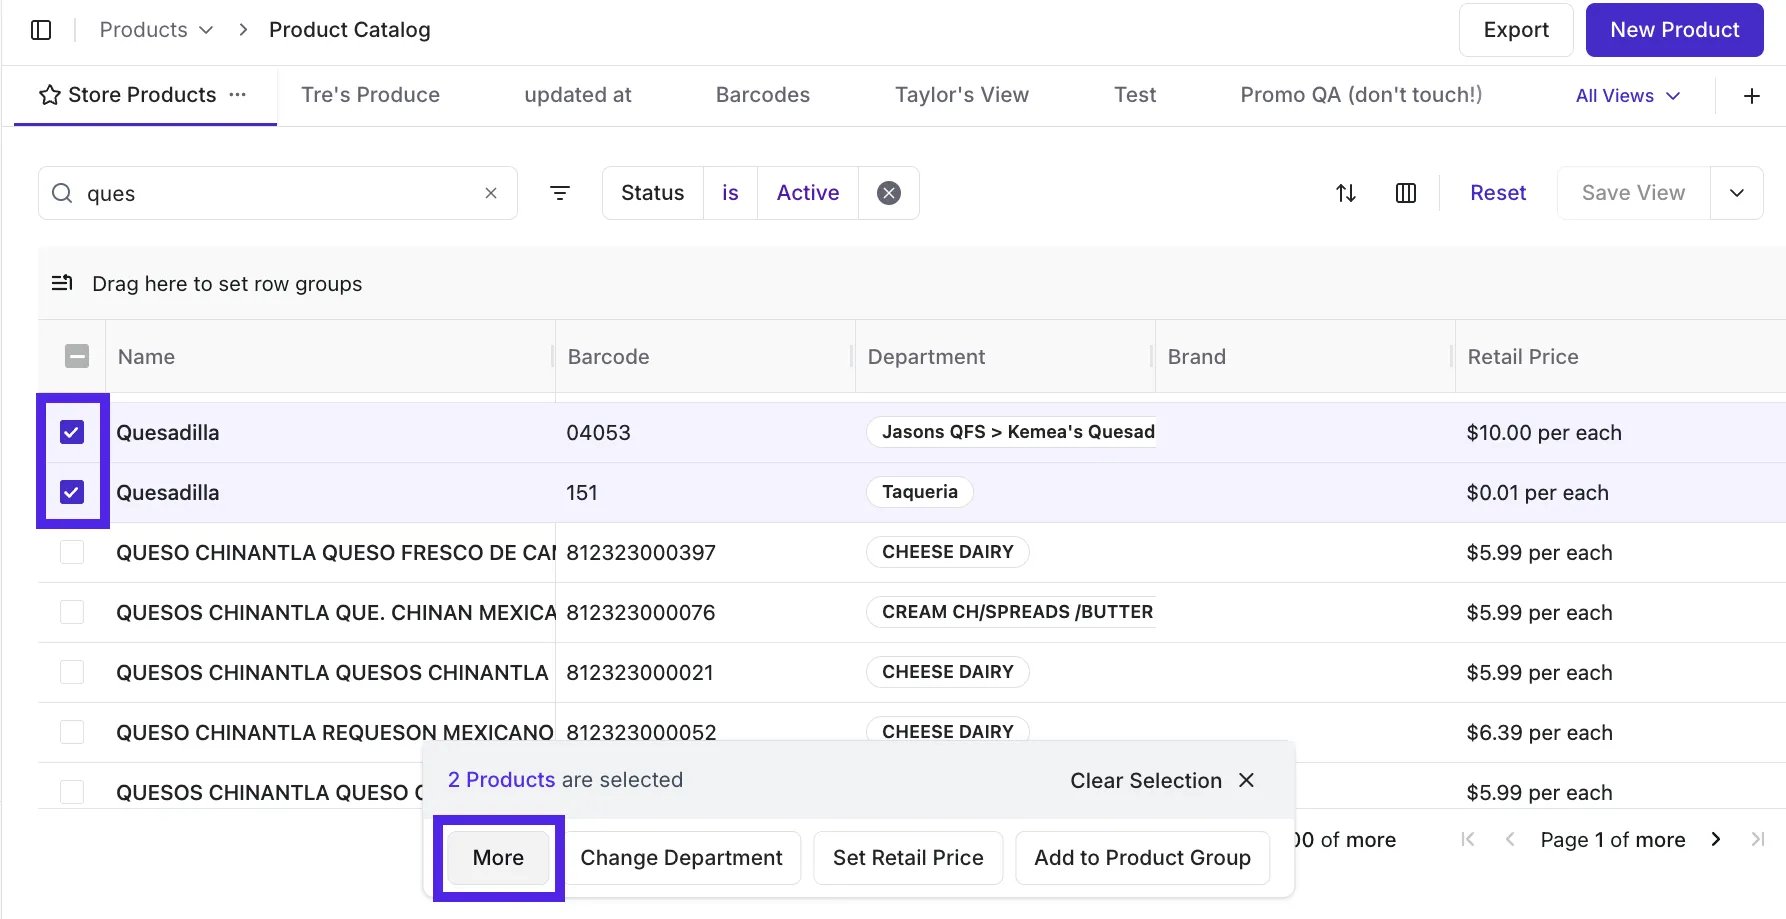 4. Select **Food Modifiers** from the list of attributes.
5. In the pop-up window, use the **Search food modifiers...** field or the dropdown list to select the **Modifier Categories** you wish to assign.
4. Select **Food Modifiers** from the list of attributes.
5. In the pop-up window, use the **Search food modifiers...** field or the dropdown list to select the **Modifier Categories** you wish to assign.
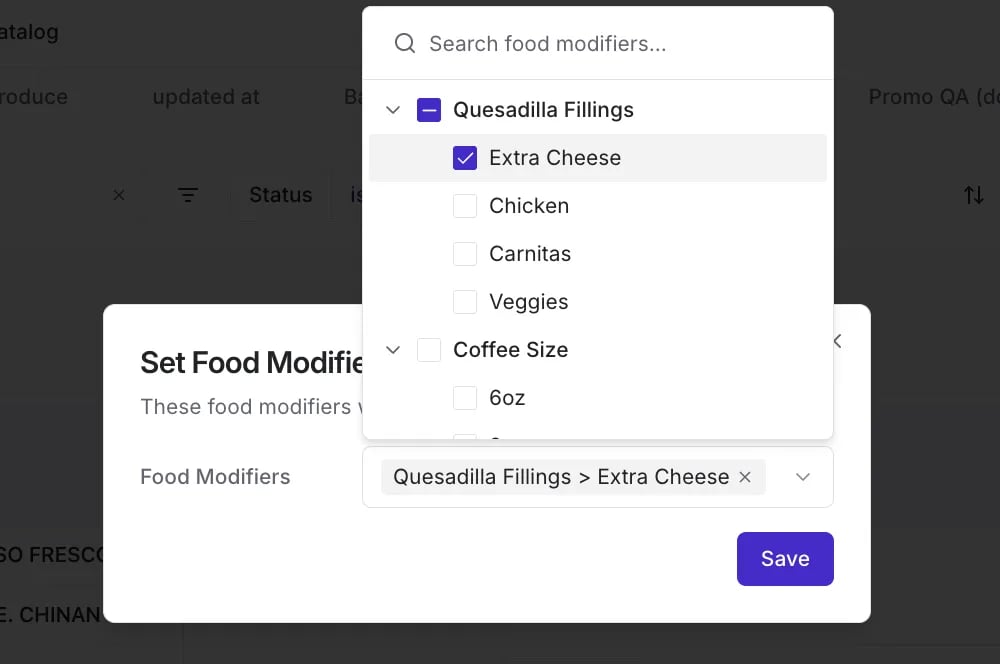 6. Click **Save** to apply these modifiers to all selected products.
7. A confirmation message will appear. Select **Continue** to finish.
6. Click **Save** to apply these modifiers to all selected products.
7. A confirmation message will appear. Select **Continue** to finish.
 ✏️ **Note:** Adding, editing, and viewing Food Modifiers on a product is currently supported in New Back Office only.
***
### Route Tickets to the Right Counter
If your store has more than one food service station—like a coffee bar up front and a deli in the back—Quick Food Service can send each prep ticket to the right kitchen printer automatically. You assign each food service **department** to a kitchen printer, and Vori takes care of the rest. Any lane in the store can ring up the order; the ticket lands at the station that's making it.
✏️ **Note:** Adding, editing, and viewing Food Modifiers on a product is currently supported in New Back Office only.
***
### Route Tickets to the Right Counter
If your store has more than one food service station—like a coffee bar up front and a deli in the back—Quick Food Service can send each prep ticket to the right kitchen printer automatically. You assign each food service **department** to a kitchen printer, and Vori takes care of the rest. Any lane in the store can ring up the order; the ticket lands at the station that's making it.
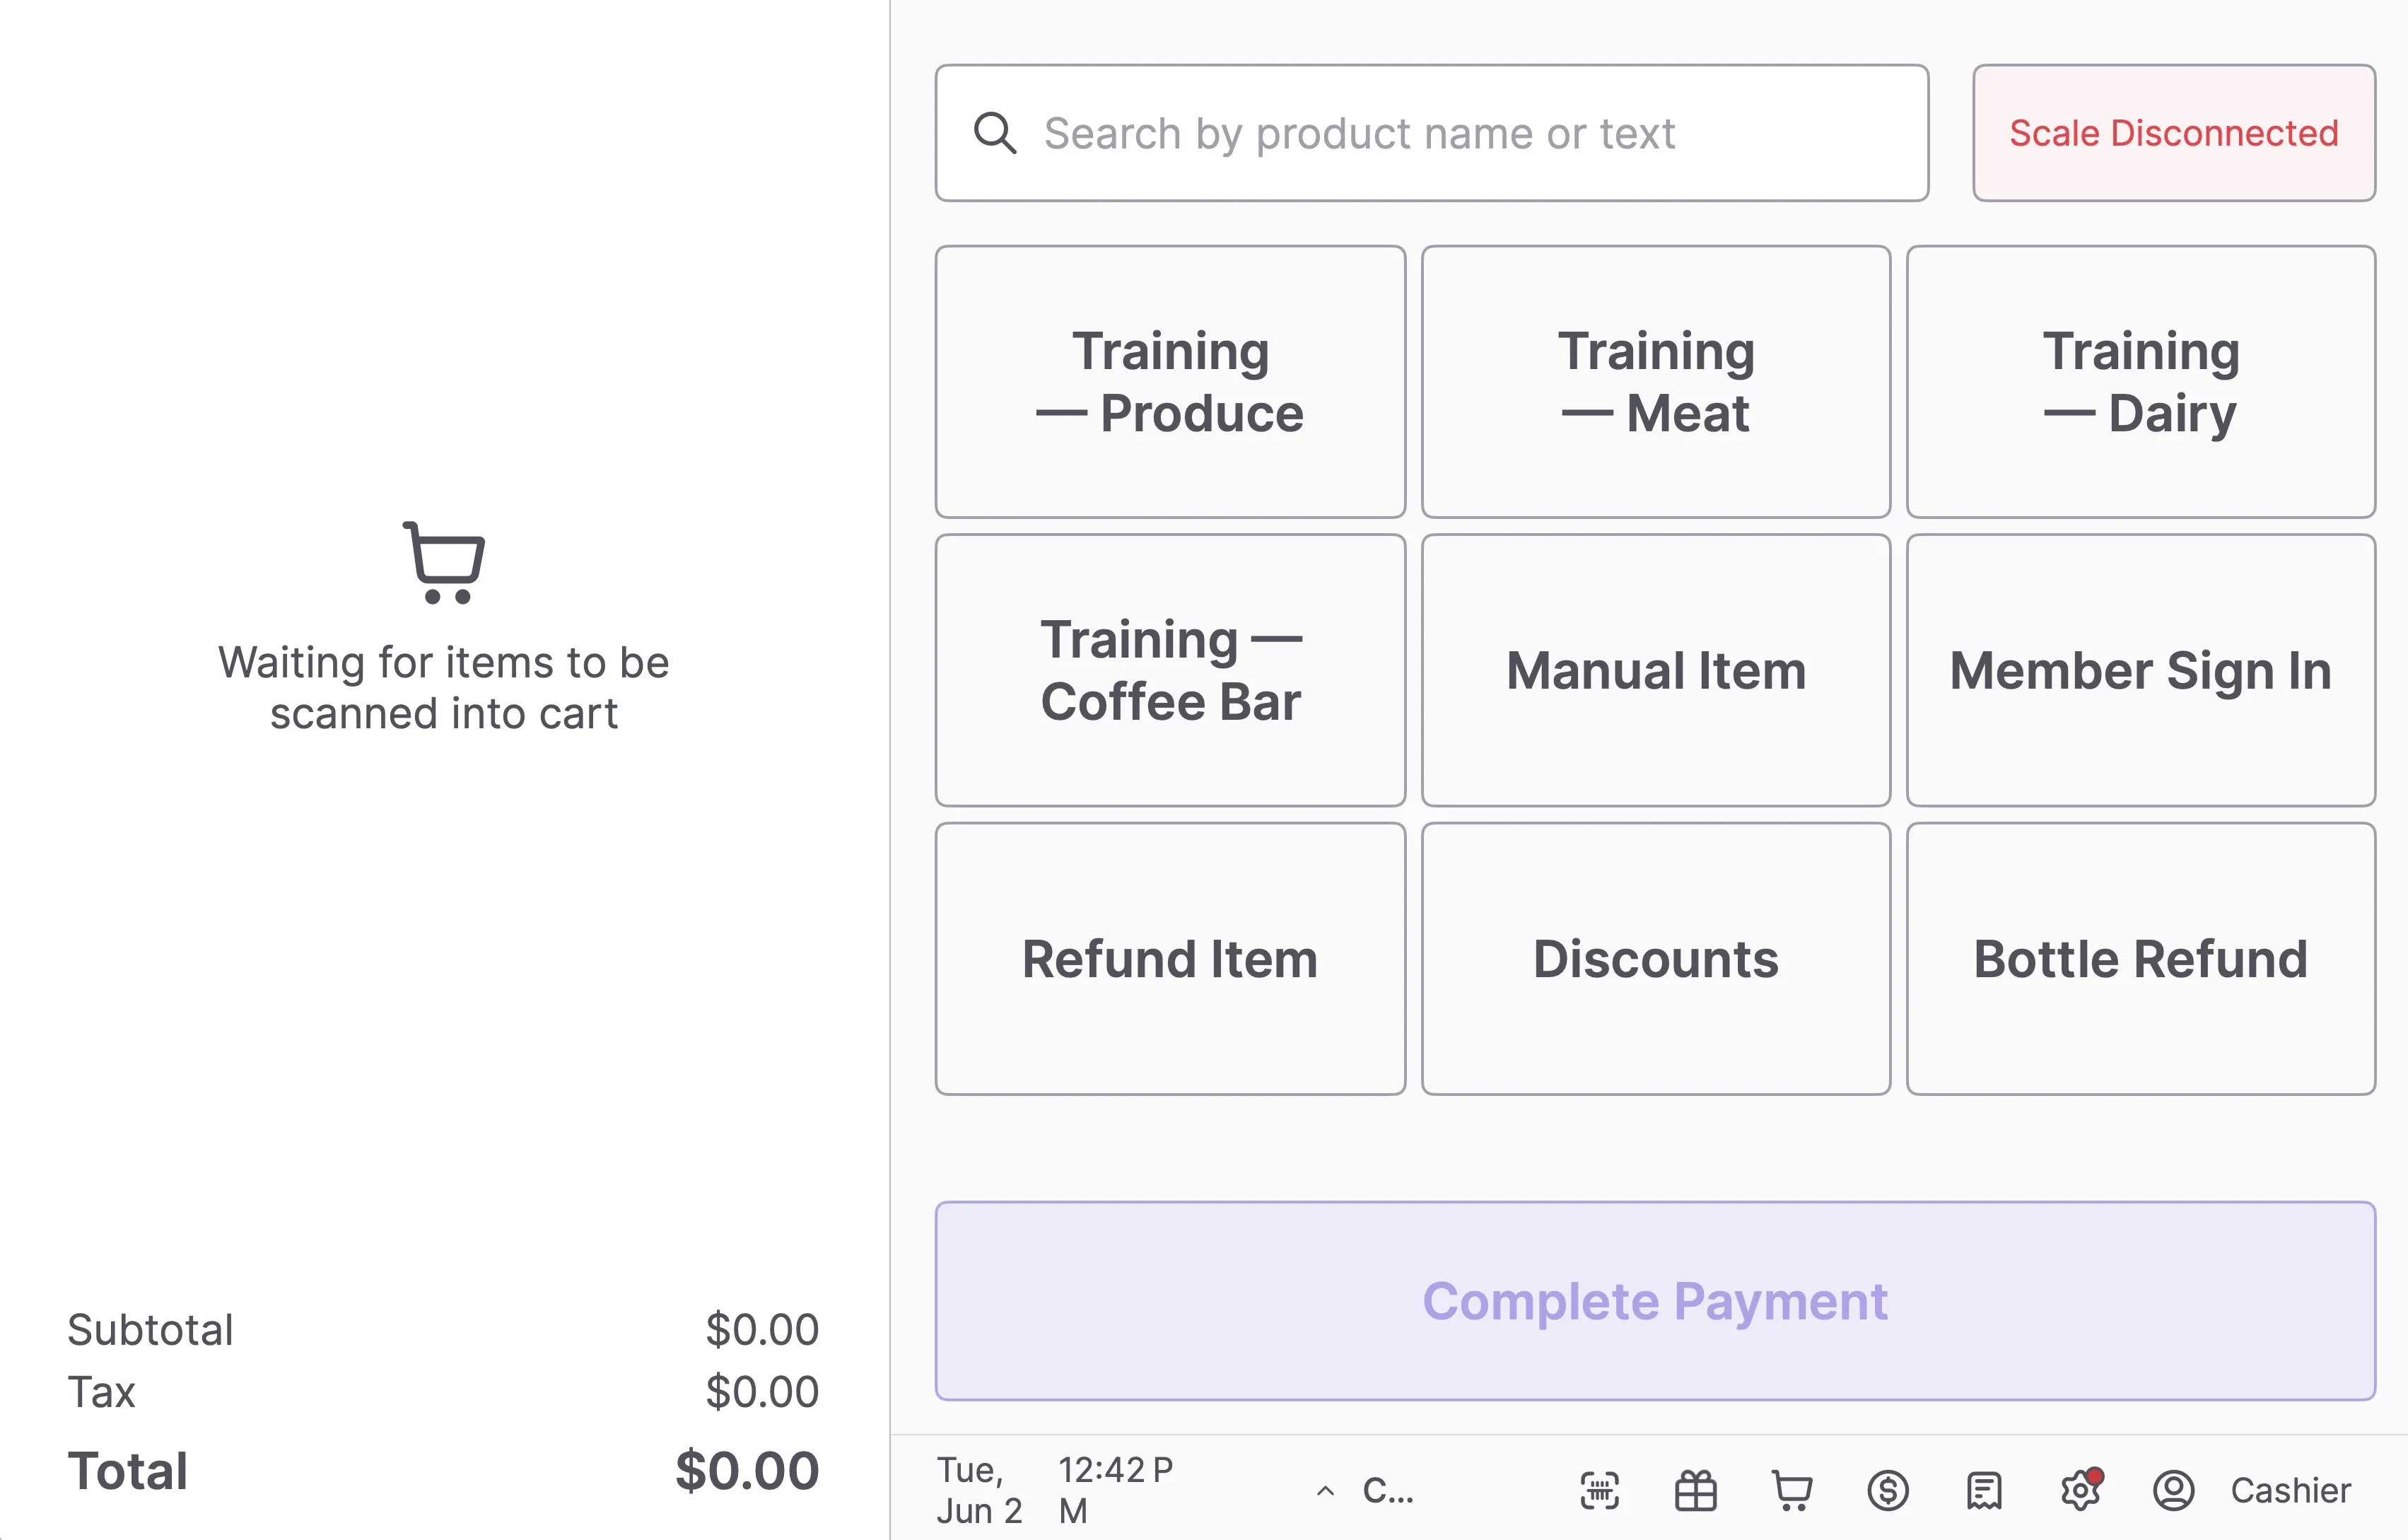 2. Select **Food Service**, then scroll down to **Add Kitchen Printer**.\\
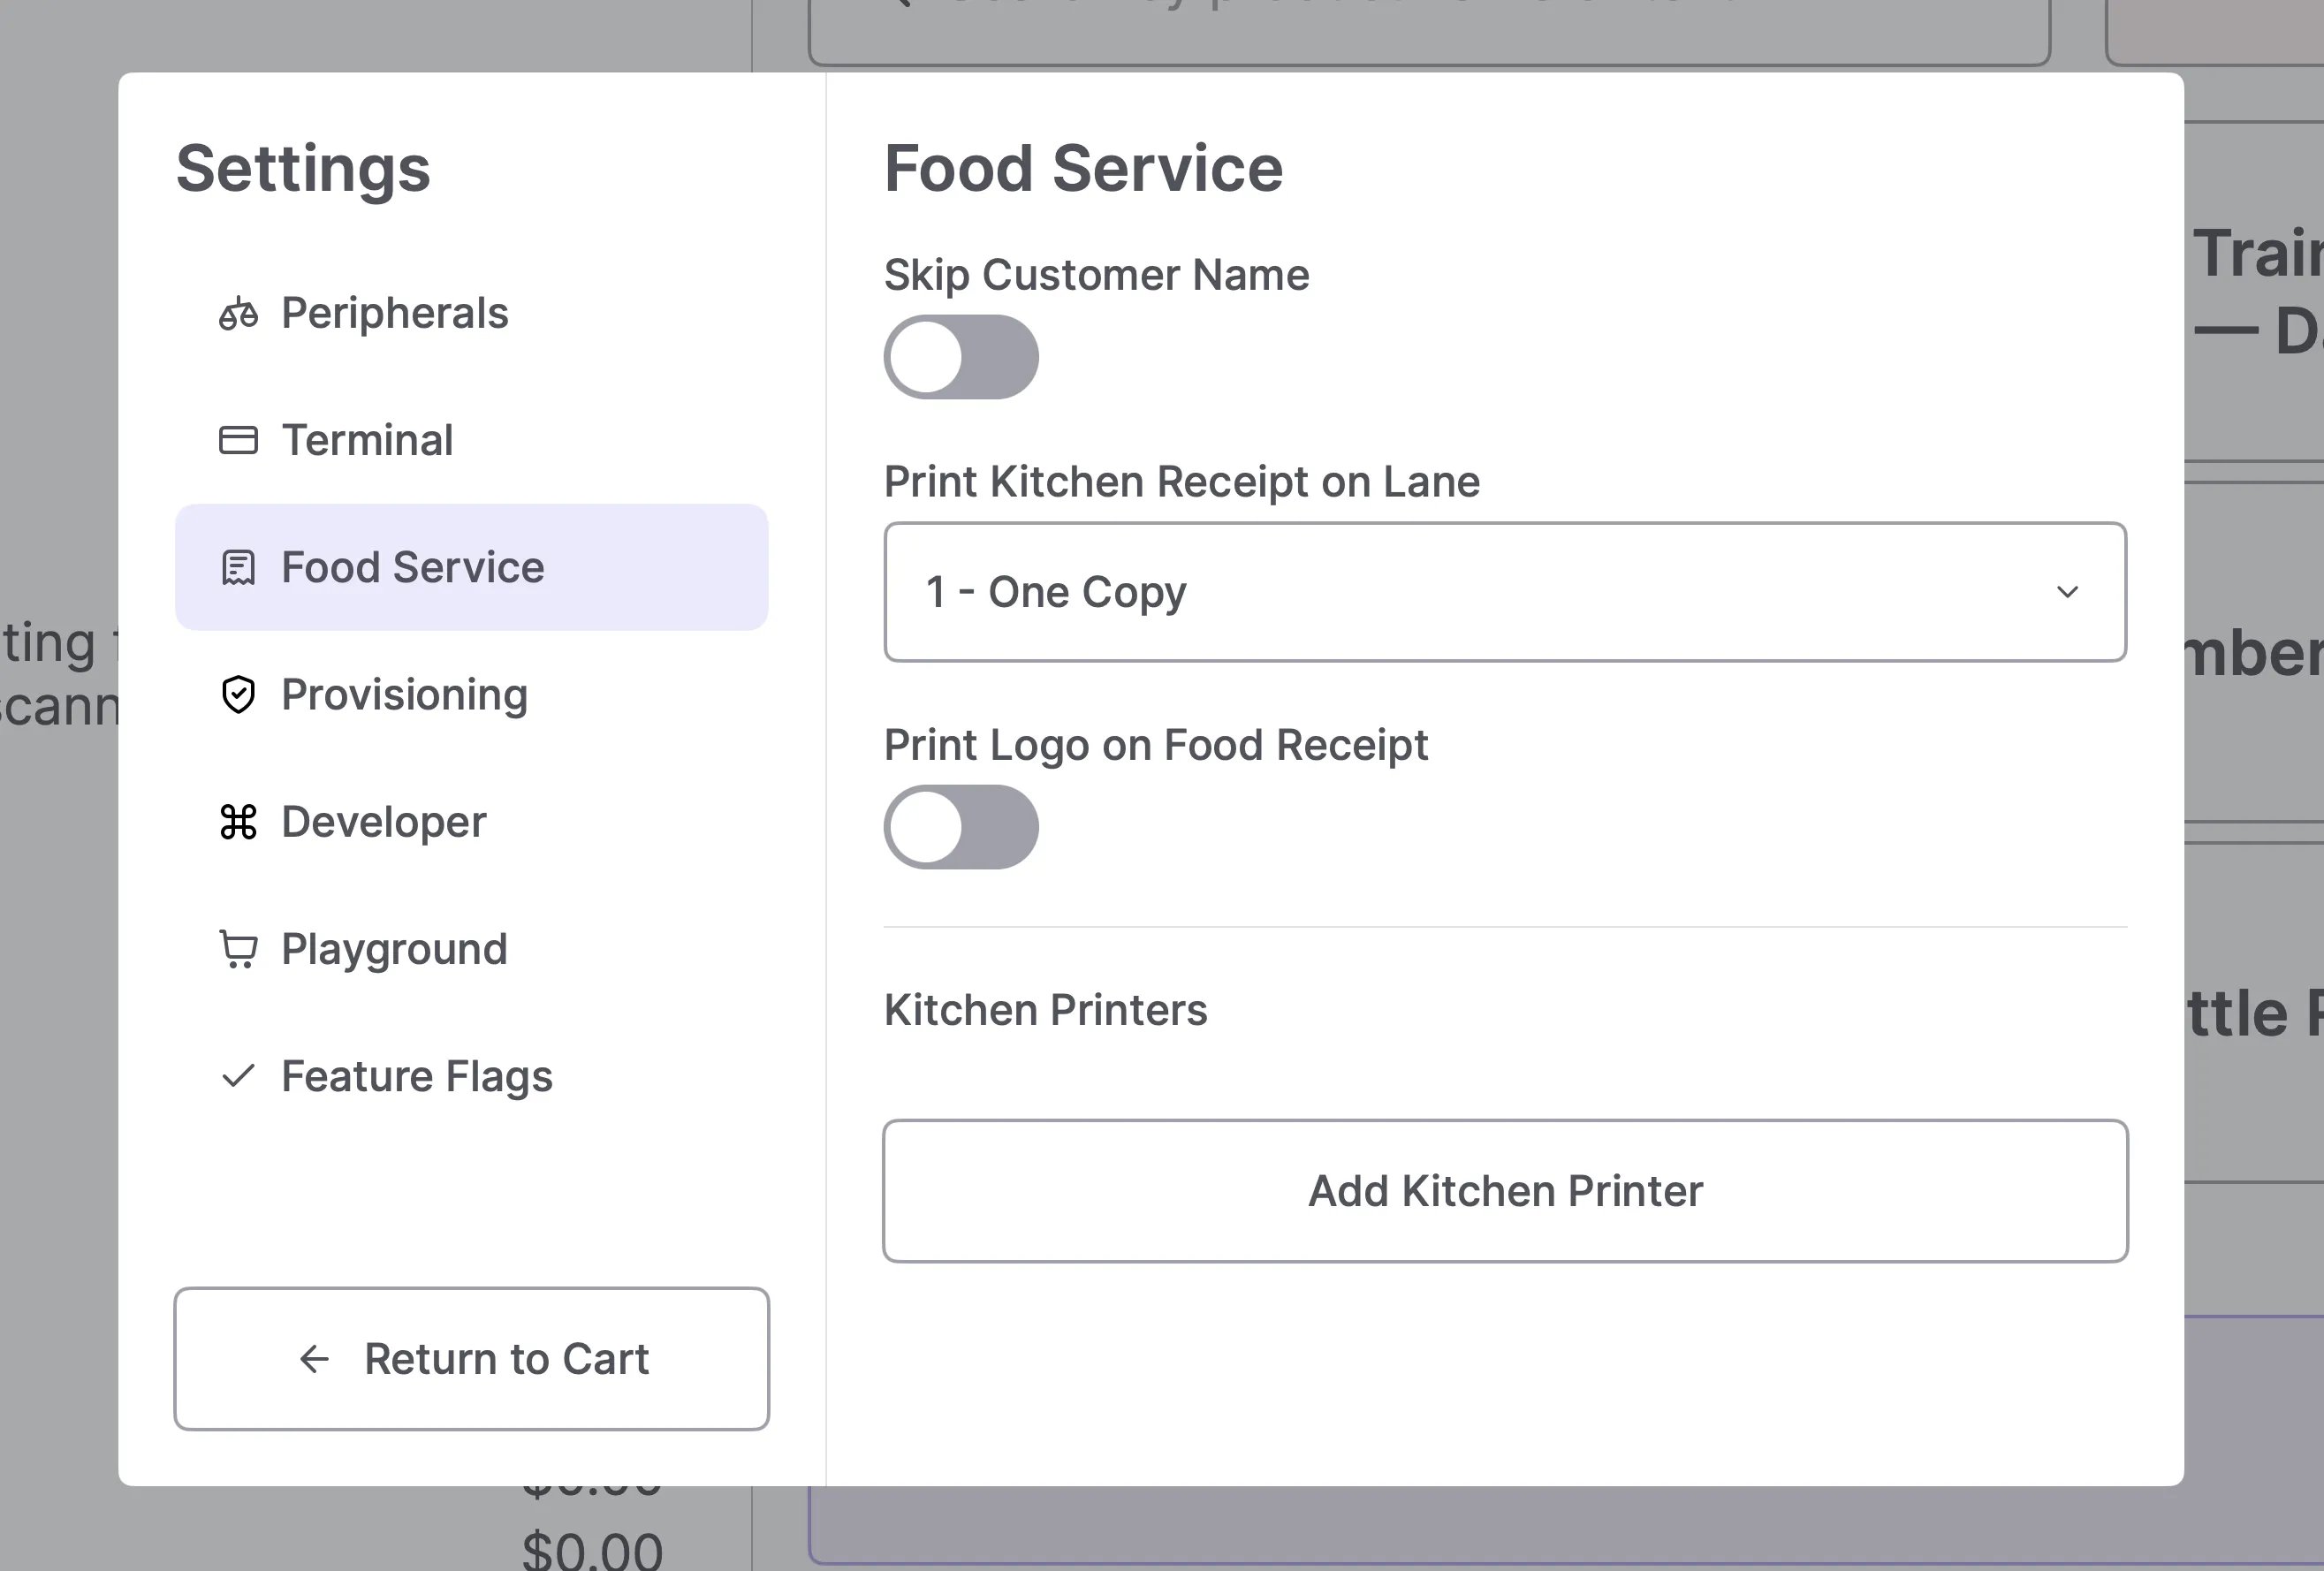 3. Select the kitchen printer from the list of available printers on your network.
4. Choose the **department** this printer should serve (e.g., "Coffee Bar").
5. Tap **Add**.\\
3. Select the kitchen printer from the list of available printers on your network.
4. Choose the **department** this printer should serve (e.g., "Coffee Bar").
5. Tap **Add**.\\
 6. Repeat for each additional station and printer.
To test, ring up an item from each department on any lane and confirm the ticket prints at the correct station.
#### Common Setups
* **Single counter (e.g., one deli):** One department, one kitchen printer. Every food service ticket prints at the deli.
* **Coffee bar + deli:** Two departments, two printers. Coffee items print at the coffee bar; deli items print at the deli.
* **Food court with multiple stations:** One department per station, one printer per station. Tickets route automatically based on what the shopper orders.
6. Repeat for each additional station and printer.
To test, ring up an item from each department on any lane and confirm the ticket prints at the correct station.
#### Common Setups
* **Single counter (e.g., one deli):** One department, one kitchen printer. Every food service ticket prints at the deli.
* **Coffee bar + deli:** Two departments, two printers. Coffee items print at the coffee bar; deli items print at the deli.
* **Food court with multiple stations:** One department per station, one printer per station. Tickets route automatically based on what the shopper orders.
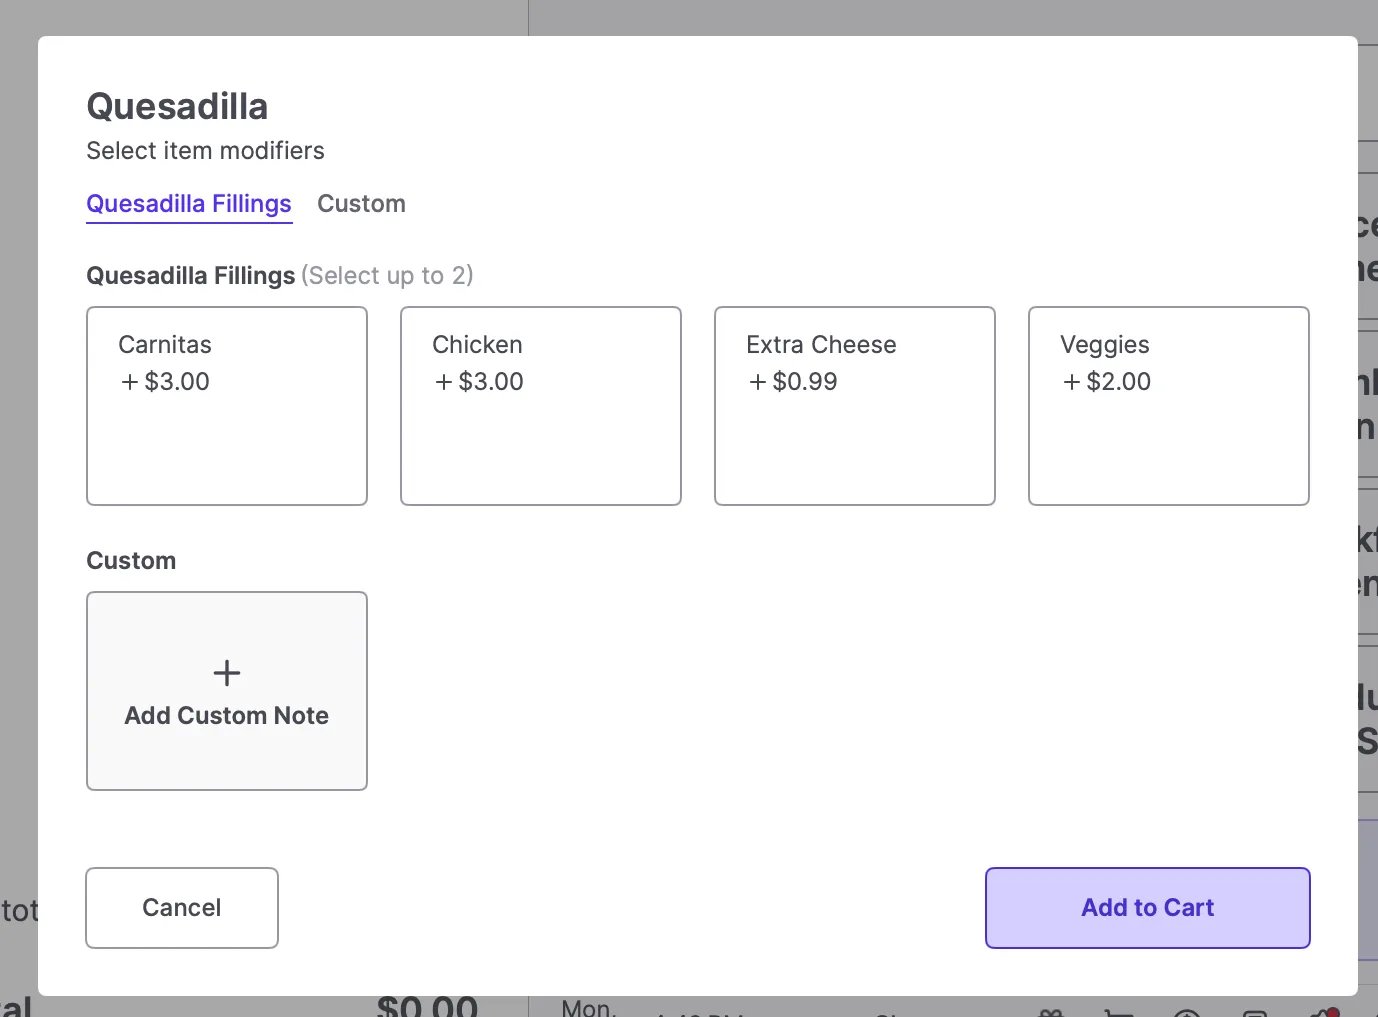 4. To add a special request not listed, tap **Add Custom Note**
* Enter a description and optional price. (custom price or leave blank -emphasize this)
4. To add a special request not listed, tap **Add Custom Note**
* Enter a description and optional price. (custom price or leave blank -emphasize this)
 5. Tap **Add to Cart.**
6. The cart clearly displays the item and all selected modifiers so both the cashier and shopper can confirm accuracy.\\
5. Tap **Add to Cart.**
6. The cart clearly displays the item and all selected modifiers so both the cashier and shopper can confirm accuracy.\\
 #### Edit a Quick Food Service Item on the POS
If a shopper changes their mind before paying, you can adjust their selections directly in the cart.
1. Tap the item you would like to edit and select \*\*More.
#### Edit a Quick Food Service Item on the POS
If a shopper changes their mind before paying, you can adjust their selections directly in the cart.
1. Tap the item you would like to edit and select \*\*More.
 \*\*
2. From the list select **Edit Food Modifiers**.
\*\*
2. From the list select **Edit Food Modifiers**.
 3. Select the shopper’s choices.
4. Tap **Apply Changes** to save.
3. Select the shopper’s choices.
4. Tap **Apply Changes** to save.
 ***
### Send Tickets to Prep
Orders can be sent to the kitchen at the end of a sale or mid-transaction.
#### Standard Flow
In a standard checkout flow, the kitchen ticket is generated after payment is finalized.
1. Once all items are in the cart, tap **Complete Payment**.
2. Enter a **Name for Order** to help the prep team identify the **shopper**.
***
### Send Tickets to Prep
Orders can be sent to the kitchen at the end of a sale or mid-transaction.
#### Standard Flow
In a standard checkout flow, the kitchen ticket is generated after payment is finalized.
1. Once all items are in the cart, tap **Complete Payment**.
2. Enter a **Name for Order** to help the prep team identify the **shopper**.
 3. Tap **Continue to Payment** and process the transaction as usual.
4. Once paid, the POS will automatically print a separate **kitchen ticket**. The **shopper's receipt** is optional.
3. Tap **Continue to Payment** and process the transaction as usual.
4. Once paid, the POS will automatically print a separate **kitchen ticket**. The **shopper's receipt** is optional.
 #### Using Suspended Orders (Pay Later)
Suspended Orders allow shoppers to order at the deli and continue shopping for groceries.
1. Go to your Food Service department and tap the **Pin** button at the top.
#### Using Suspended Orders (Pay Later)
Suspended Orders allow shoppers to order at the deli and continue shopping for groceries.
1. Go to your Food Service department and tap the **Pin** button at the top.
 2. Add the food item and modifiers to the cart.
3. Tap **Submit Order**.
2. Add the food item and modifiers to the cart.
3. Tap **Submit Order**.
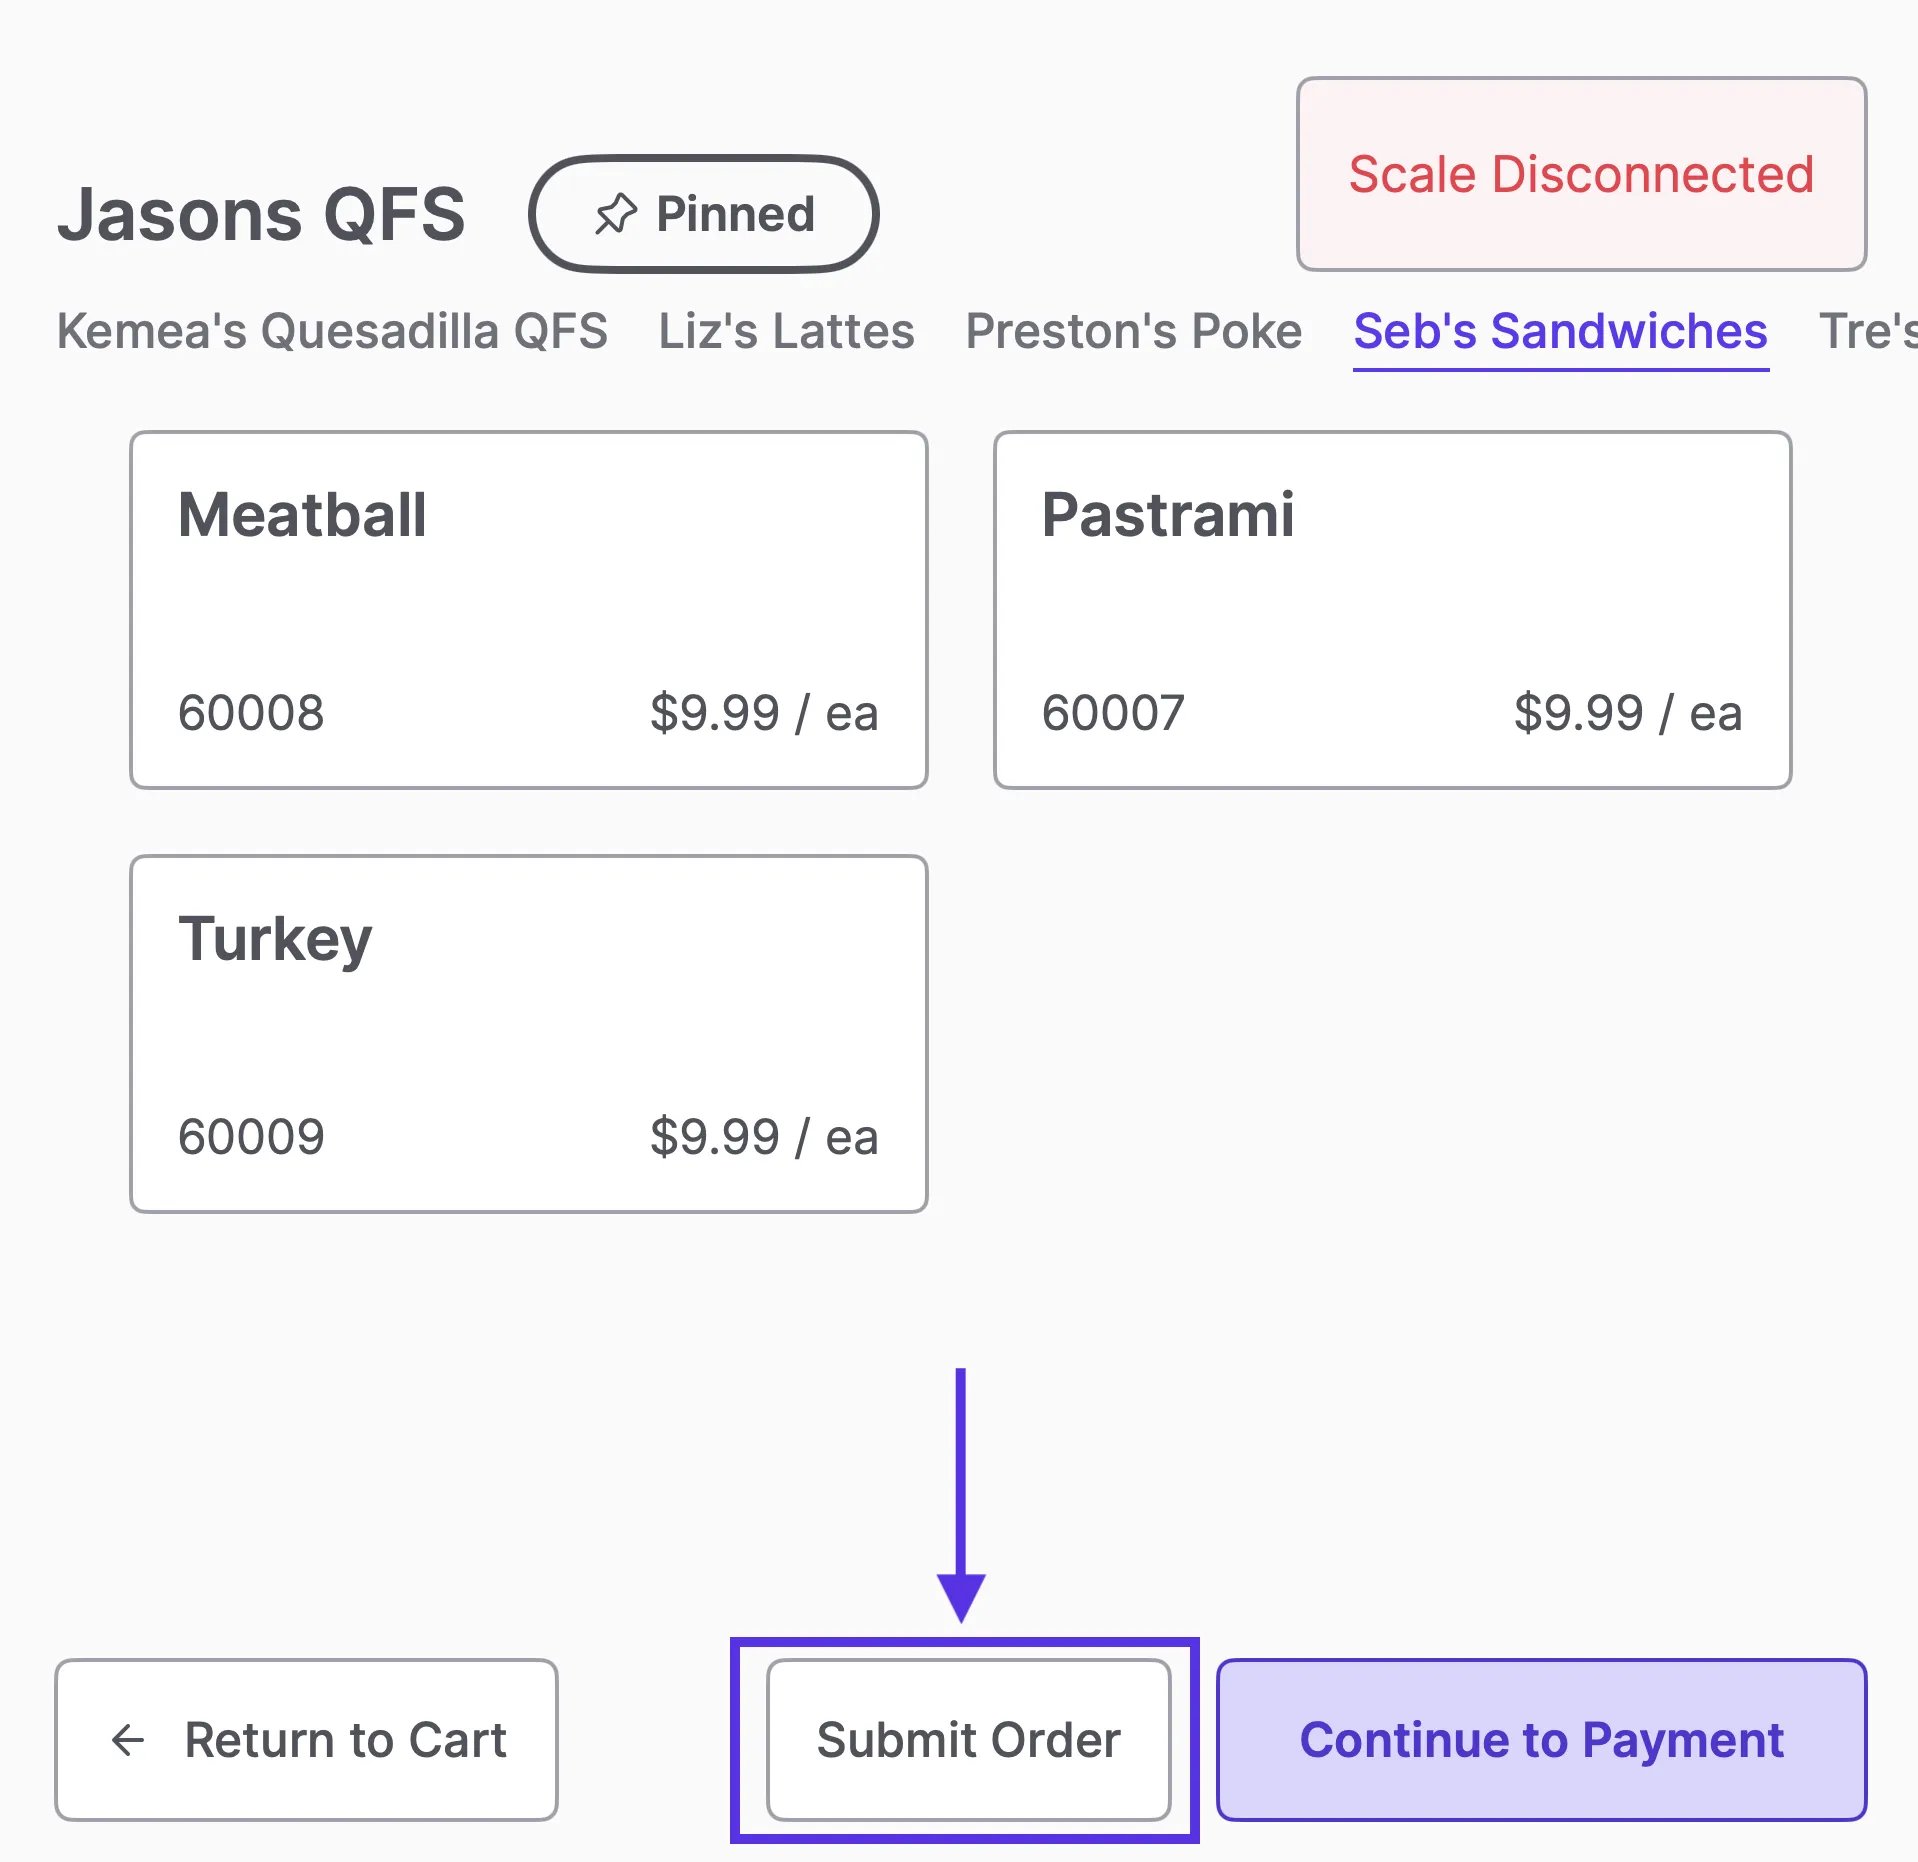 4. Enter the **shopper's name** for easier pickup and tap **Submit Order** again.
5. **The POS** will print a **Not Paid** receipt for the **shopper** and a prep ticket for the kitchen.
4. Enter the **shopper's name** for easier pickup and tap **Submit Order** again.
5. **The POS** will print a **Not Paid** receipt for the **shopper** and a prep ticket for the kitchen.
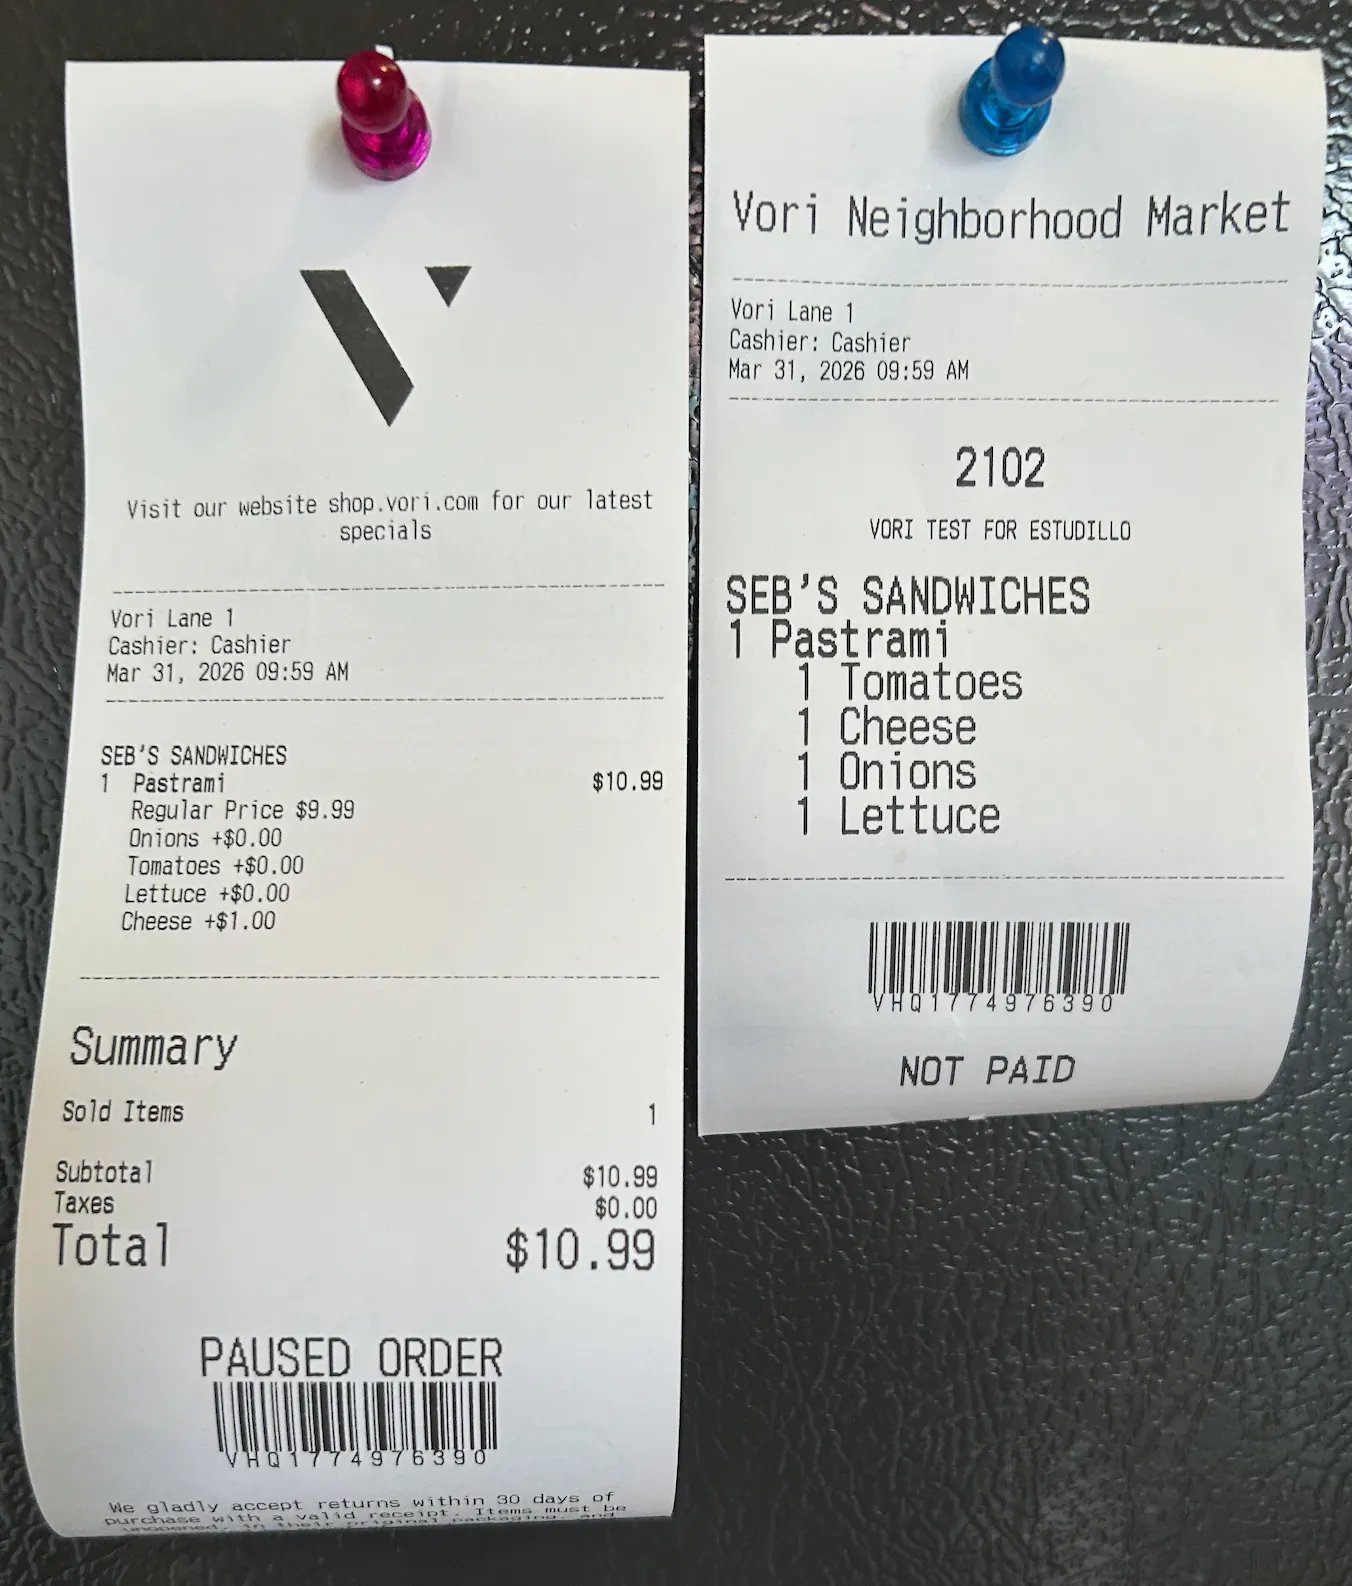 6. To pay, scan the **Not Paid** receipt at any lane.
1. Or navigate to the receipt icon, select **View All Orders**, select the **Paused** tab, and tap **Resume Order** to complete checkout.
6. To pay, scan the **Not Paid** receipt at any lane.
1. Or navigate to the receipt icon, select **View All Orders**, select the **Paused** tab, and tap **Resume Order** to complete checkout.
 If you scan grocery items into the cart before scanning the shopper's kitchen receipt, the POS prompts you to **Combine & Resume** the two carts together.
 #### How to Edit the Number of Printed Kitchen Receipts
If you need to change how many prep tickets print for the kitchen, use the hidden POS configuration menu:
**Steps:**
1. Log in to the POS.
2. Tap the **Date** in the bottom corner three times quickly to open the hidden menu.
3. Select **Food Service**.
4. Select the quantity of kitchen receipts desired.
5. Tap **Return to cart**.
6. Click the **Gear Icon**, then restart the app to apply your changes.
**💡Pro-Tip:** You can disable the customer name requirement on order receipts by turning off Skip Customer Name in the Quick Food Service settings.
#### How to Edit the Number of Printed Kitchen Receipts
If you need to change how many prep tickets print for the kitchen, use the hidden POS configuration menu:
**Steps:**
1. Log in to the POS.
2. Tap the **Date** in the bottom corner three times quickly to open the hidden menu.
3. Select **Food Service**.
4. Select the quantity of kitchen receipts desired.
5. Tap **Return to cart**.
6. Click the **Gear Icon**, then restart the app to apply your changes.
**💡Pro-Tip:** You can disable the customer name requirement on order receipts by turning off Skip Customer Name in the Quick Food Service settings.
 ***
### Track Food Service Sales in Unified Reporting
Prepared foods are one of the highest-margin areas in your store. Vori provides connected reporting so you can protect those margins without needing a separate restaurant system.
* **Department-Level Tracking:** Use the **Department Sales** report to see exactly how much net sales your Food Service departments are generating.
***
### Track Food Service Sales in Unified Reporting
Prepared foods are one of the highest-margin areas in your store. Vori provides connected reporting so you can protect those margins without needing a separate restaurant system.
* **Department-Level Tracking:** Use the **Department Sales** report to see exactly how much net sales your Food Service departments are generating.
 **✏️ Note:** Recipe-level ingredient tracking isn’t available at this time.
## Related topics
- [Vori Webinar Training Hub](/vori-webinar-training-hub/vori-webinartraining-hub.md)
- [Create Quick Actions in Back Office](/point-of-sale-pos/pos-customization-and-setup/create-quick-actions-in-back-office.md)
- [Double Up Food Bucks (OR, MS, and CA)](/whats-new-in-vori/in-beta-double-up-bucks/in-beta-double-up-food-bucks-or-and-ms-only.md)
**✏️ Note:** Recipe-level ingredient tracking isn’t available at this time.
## Related topics
- [Vori Webinar Training Hub](/vori-webinar-training-hub/vori-webinartraining-hub.md)
- [Create Quick Actions in Back Office](/point-of-sale-pos/pos-customization-and-setup/create-quick-actions-in-back-office.md)
- [Double Up Food Bucks (OR, MS, and CA)](/whats-new-in-vori/in-beta-double-up-bucks/in-beta-double-up-food-bucks-or-and-ms-only.md)