> ## Documentation Index
> Fetch the complete documentation index at: https://help.vori.com/llms.txt
> Use this file to discover all available pages before exploring further.
# Map Store Vendors to Vori Global Vendors
> Learn how to map vendors during cost changes
## Connect your store’s vendors to the Vori network to enable ordering and cleaner data.
To prevent duplicate entries and incorrect mapping when processing invoices, you can now manually map your store’s local vendor profiles to Vori’s global vendor network.
### Understanding Vori Global Vendors
A **Vori Vendor** (or **Vori Network Vendor**) is a universal representation of a supplier shared across all retailers on the Vori network. Mapping your local store vendor to a Vori Global Vendor is important for several reasons:
* **Enhanced Data:** Access to global catalogs helps identify items and fill in missing product details during invoice processing.
* **Discovery:** Makes it easier to find new items and specialized brands for ordering.
* **Accuracy:** Ensures that "Dairy Delivery" and "Dairy Delivery Inc." are recognized as the same entity, preventing data fragmentation.
***
### Map Your Own Vendors
Previously, if a vendor name on an invoice was slightly different (e.g., "Dairy Delivery" vs. "Dairy Delivery Inc."), the system might have created a duplicate. Now, you control the data.
By mapping your store vendor to a **Vori Vendor**, you ensure:
* **No duplicate vendor entries:** Keep your vendor list clean.
* **Shorter processing times:** The system learns to recognize the vendor automatically for future uploads.
***
### Option 1: Map on the Vendor Page
You can map vendors ahead of time, before you even receive an invoice.
1. Navigate to the **[Vendors](https://app.vori.com/retail/vendors)** page in the Back Office.
2. Select a vendor from your list.
3. Find the **Vori Vendor** field to link your vendor.
4. Search for the global vendor name (e.g., UNFI, KeHE, Chex).
5. **Save** the mapping.
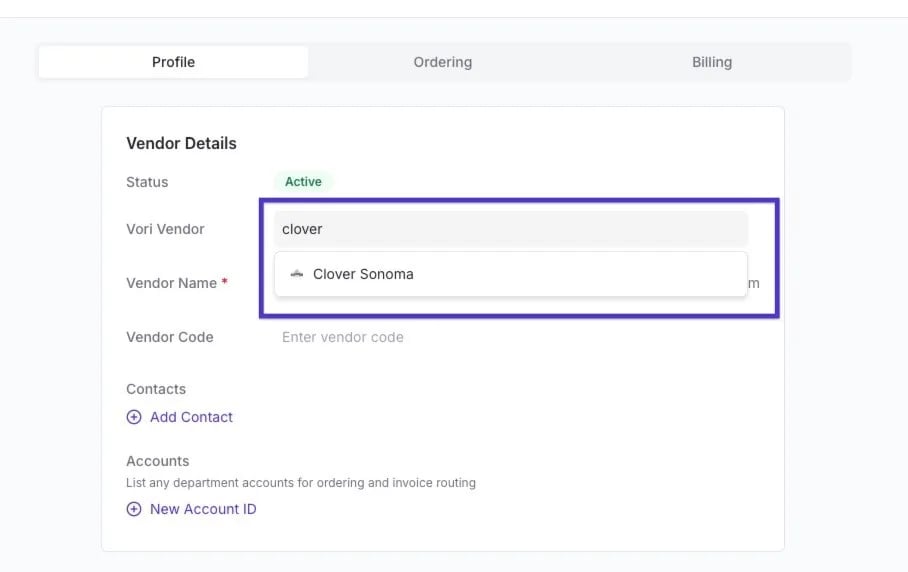 ✏️ **Note:** If you cannot find a matching global vendor, the vendor might not exist in our network yet. Please contact support so we can add it for you.
***
### Option 2: Map from the Invoice Dashboard
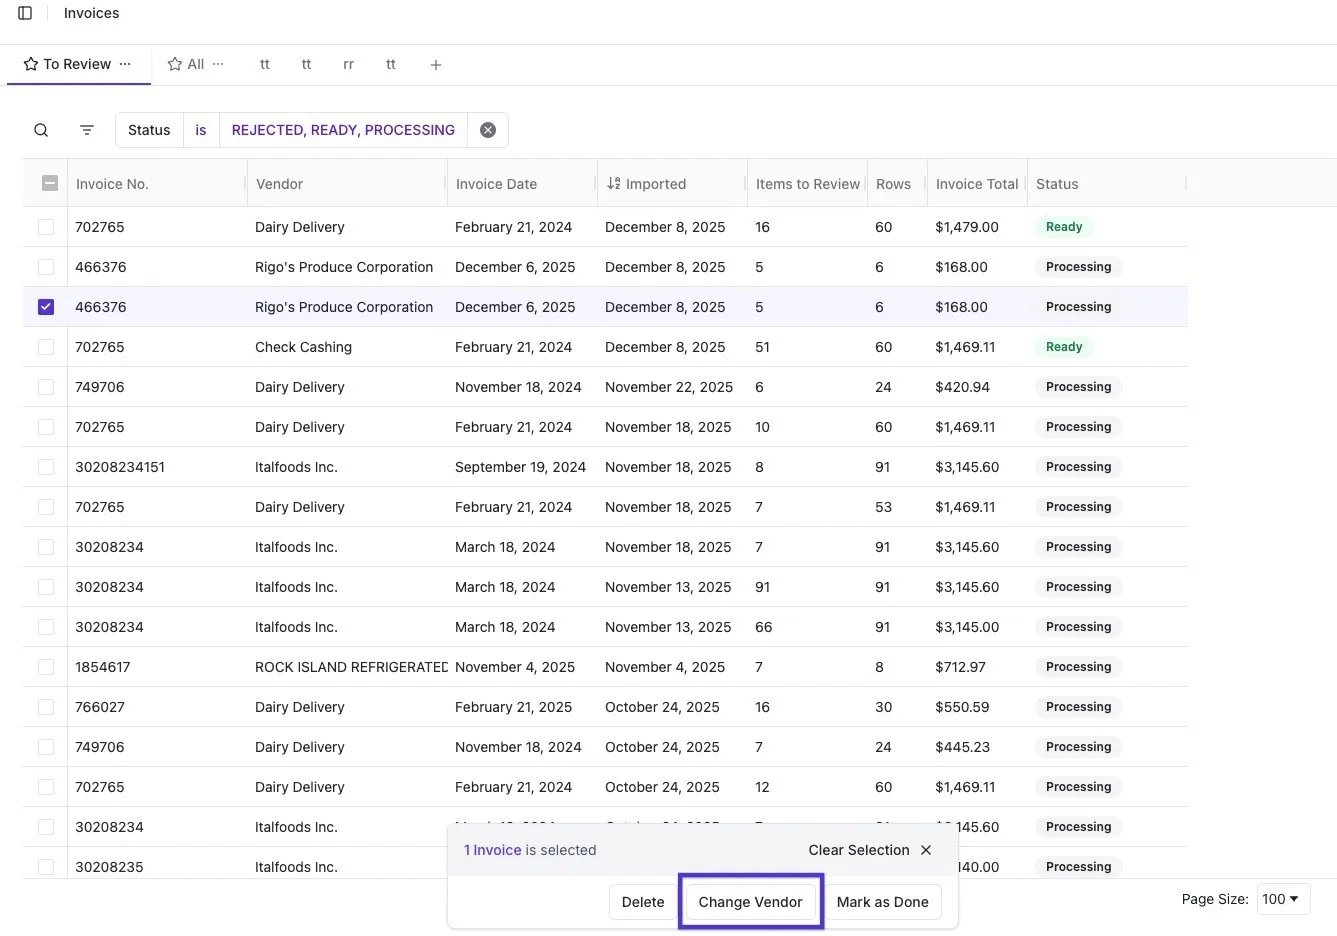
If you upload an invoice and the system hasn't matched it to a global vendor, or if you notice Vori matched the vendor incorrectly, you can fix it directly from the main invoice list.
1. Select the checkbox next to the invoice(s) on the dashboard list.
2. Click **Change Vendor** from the menu that appears at the bottom of the screen.
✏️ **Note:** If you cannot find a matching global vendor, the vendor might not exist in our network yet. Please contact support so we can add it for you.
***
### Option 2: Map from the Invoice Dashboard
If you upload an invoice and the system hasn't matched it to a global vendor, or if you notice Vori matched the vendor incorrectly, you can fix it directly from the main invoice list.
1. Select the checkbox next to the invoice(s) on the dashboard list.
2. Click **Change Vendor** from the menu that appears at the bottom of the screen.
 3. Search for the correct vendor from your existing vendor list.
4. Click **Change Vendor** to apply the update.
3. Search for the correct vendor from your existing vendor list.
4. Click **Change Vendor** to apply the update.
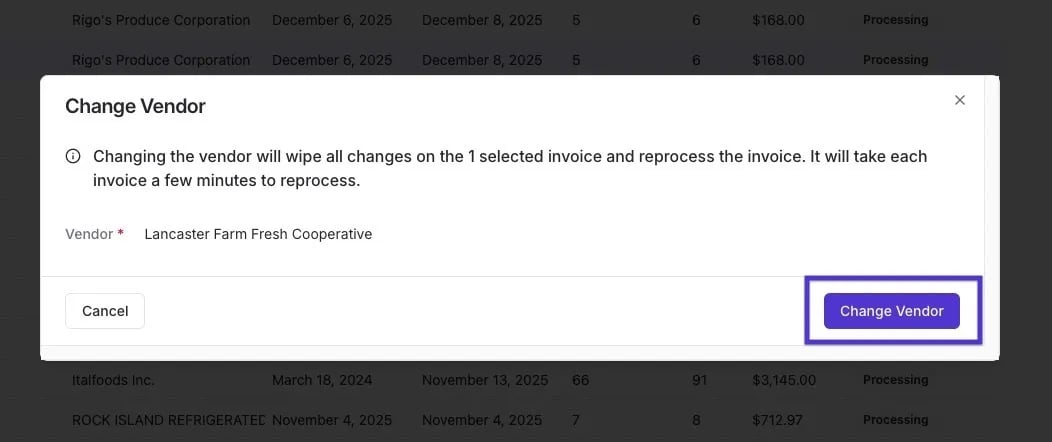 💡 **Tip:** You can do this in bulk! Select multiple invoices from the same vendor to update them all at once.
Once you map a vendor, the system will remember the association for future invoices.
***
### Option 3: Map or Change Vendor Within an Invoice
If you are already reviewing an invoice and notice the vendor is incorrect, you can change it without leaving the page.
1. Open the specific invoice.
2. Click the **Change Vendor** button on the left-hand side next to the vendor name.
💡 **Tip:** You can do this in bulk! Select multiple invoices from the same vendor to update them all at once.
Once you map a vendor, the system will remember the association for future invoices.
***
### Option 3: Map or Change Vendor Within an Invoice
If you are already reviewing an invoice and notice the vendor is incorrect, you can change it without leaving the page.
1. Open the specific invoice.
2. Click the **Change Vendor** button on the left-hand side next to the vendor name.
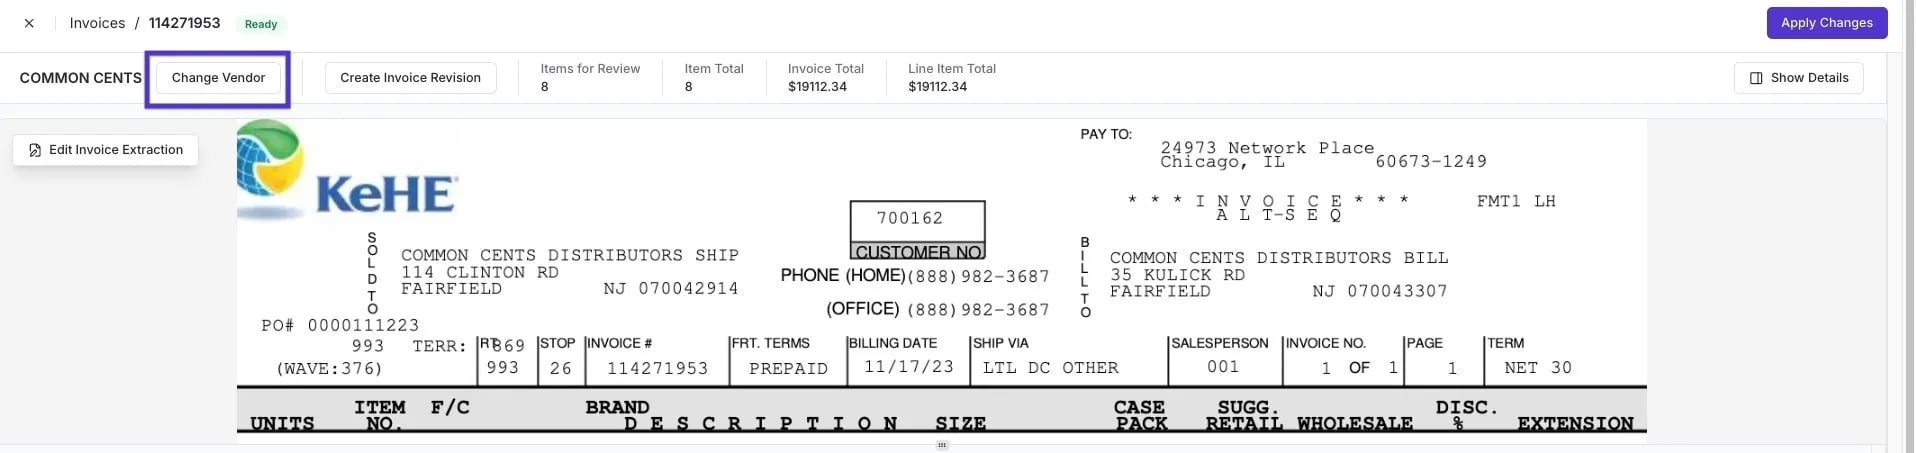 3. View the **Vori Vendor** at the top (this is the global index link).
4. Select the correct local vendor for your store from the dropdown menu.
3. View the **Vori Vendor** at the top (this is the global index link).
4. Select the correct local vendor for your store from the dropdown menu.
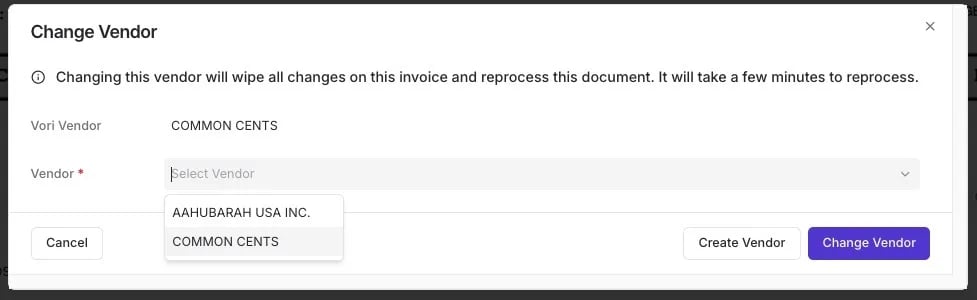 5. Click **Change Vendor** to update.
## Related topics
- [Manage Invoices, New Items, and Cost Changes](/invoicing-cost-changes-and-smart-pricing/cost-changes-and-smart-pricing/manage-invoices-new-items-and-cost-changes.md)
- [Preparing Your Store for Ordering Launch](/inventory-and-ordering/ordering/preparing-your-store-for-ordering-launch.md)
- [Bulk Upload Vendors](/vendors-and-vendor-products/vendor-management/bulk-upload-vendors.md)
5. Click **Change Vendor** to update.
## Related topics
- [Manage Invoices, New Items, and Cost Changes](/invoicing-cost-changes-and-smart-pricing/cost-changes-and-smart-pricing/manage-invoices-new-items-and-cost-changes.md)
- [Preparing Your Store for Ordering Launch](/inventory-and-ordering/ordering/preparing-your-store-for-ordering-launch.md)
- [Bulk Upload Vendors](/vendors-and-vendor-products/vendor-management/bulk-upload-vendors.md)