> ## Documentation Index
> Fetch the complete documentation index at: https://help.vori.com/llms.txt
> Use this file to discover all available pages before exploring further.
# Manage Vendors and Contacts
> Learn how to search, edit, and configure vendors to ensure your orders are accurate and your data is clean
We’ve redesigned the **Vendors** page to give you total control over your supplier relationships, ordering rules, and contact lists.
### Overview and Navigation
The **Vendors** page provides a high-level view of every supplier connected to your store. You can quickly spot duplicate vendors, check active status, and filter by specific criteria.
* Navigate to **Inventory & Supply Chain** in the left-hand menu.
* Click **[Vendors](https://app.vori.com/retail/vendors)**.
* Use the **Search Filters** on the left to refine your list:
* **Name:** Search by vendor name.
* **Vendor Code:** Search by your internal code.
* **Status:** Filter by **Is Active** or **Inactive**.
* **Product Issues:** Quickly identify vendors with catalog errors.
* **[Duplicates](/vendors-and-vendor-products/vendor-management/merging-duplicate-vendors-and-products):** Find vendors that may need merging.
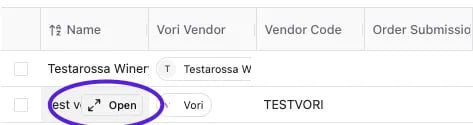
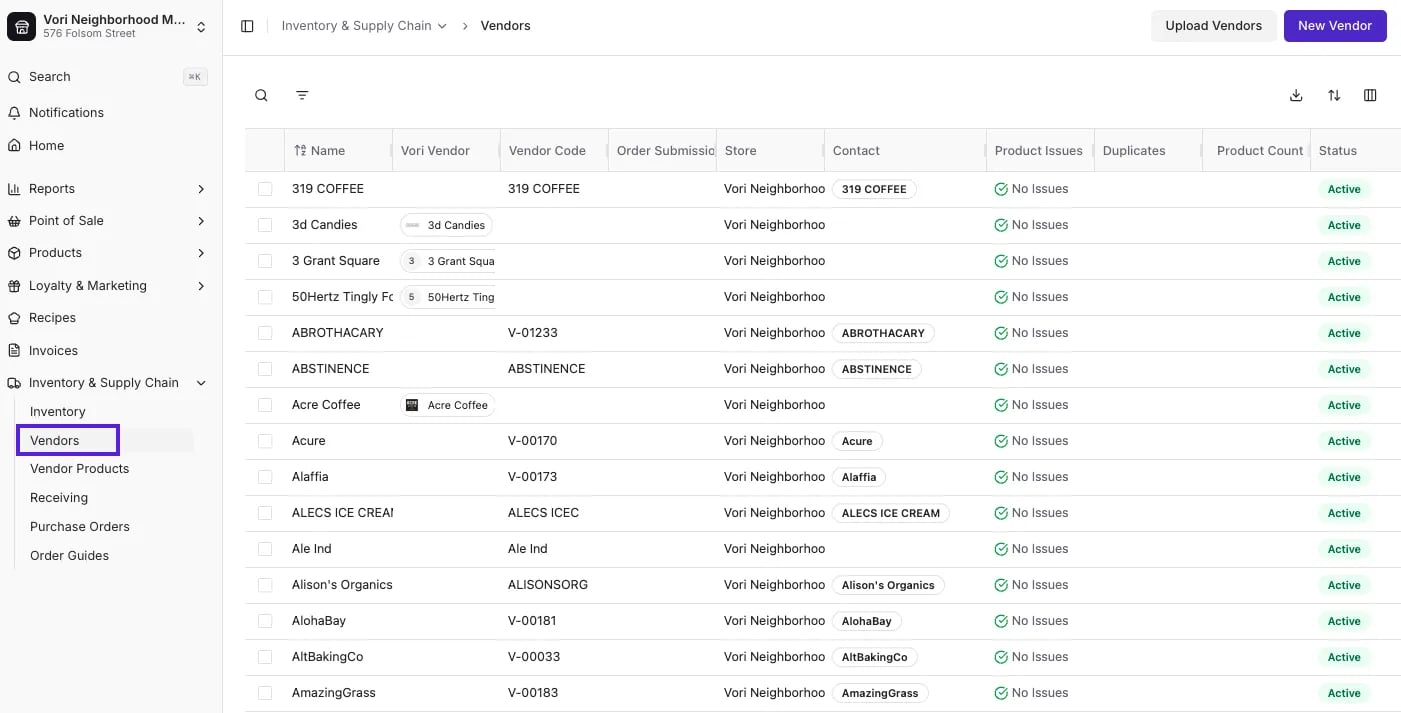 To open a vendor's full settings, simply hover over the vendor's name in the list and select **Open**.
 ***
### Create a New Vendor
Adding a new supplier is fast and flexible. You can use **Quick Create** to get started immediately or **Full Details** to configure complex rules right away.
* Navigate to the **[Vendors](https://app.vori.com/retail/vendors)** page.
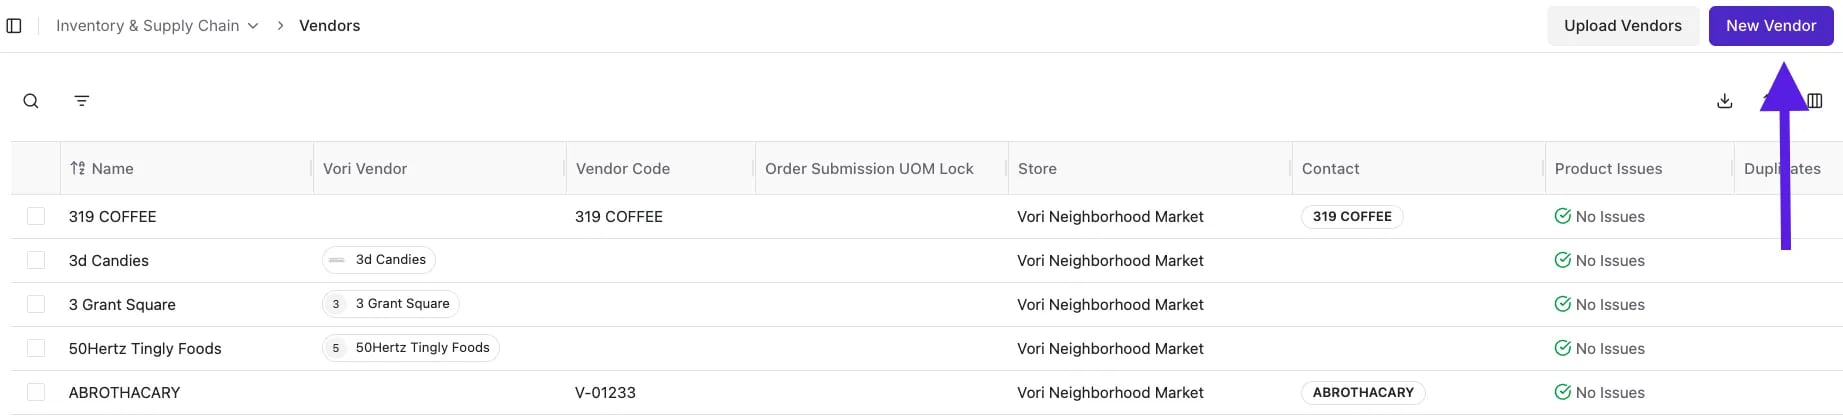
* Click the **New Vendor** button in the top right corner.
***
### Create a New Vendor
Adding a new supplier is fast and flexible. You can use **Quick Create** to get started immediately or **Full Details** to configure complex rules right away.
* Navigate to the **[Vendors](https://app.vori.com/retail/vendors)** page.
* Click the **New Vendor** button in the top right corner.
 * Choose your setup method:
##### Option 1: Quick Create
Ideal for getting a vendor into the system fast.
* Choose your setup method:
##### Option 1: Quick Create
Ideal for getting a vendor into the system fast.
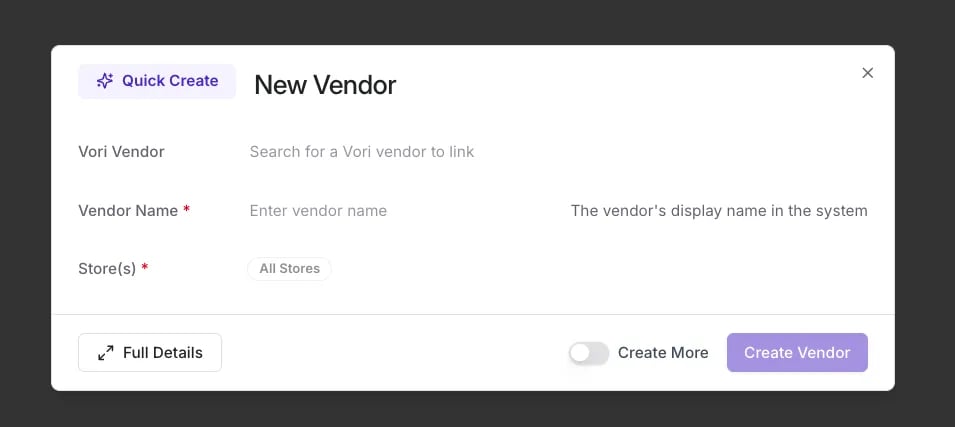 * **Vori Vendor:** Search for the [Vori Network Vendor](/vendors-and-vendor-products/vendor-management/map-store-vendors-to-vori-global-vendors#understanding-vori-global-vendors), the universal representation of a supplier shared across all retailers on the Vori network.
* **Vendor Name:** Enter the display name for the vendor.
* Click **Create Vendor**.
##### Option 2: Full Details
Best when you need to set up contacts, ordering schedules, and billing info immediately.
* From the "Quick Create" popup, click the **Full Details** button in the bottom left corner.
* **Vori Vendor:** Search for the [Vori Network Vendor](/vendors-and-vendor-products/vendor-management/map-store-vendors-to-vori-global-vendors#understanding-vori-global-vendors), the universal representation of a supplier shared across all retailers on the Vori network.
* **Vendor Name:** Enter the display name for the vendor.
* Click **Create Vendor**.
##### Option 2: Full Details
Best when you need to set up contacts, ordering schedules, and billing info immediately.
* From the "Quick Create" popup, click the **Full Details** button in the bottom left corner.
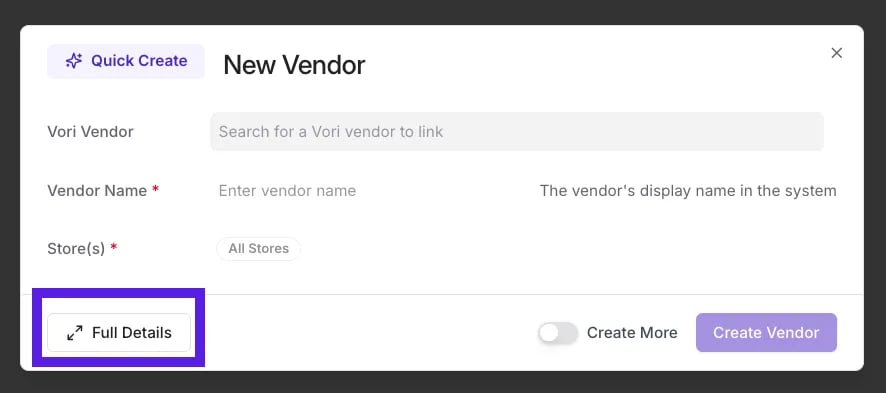 * This opens the full vendor editor where you can add **Contacts**, **Ordering Rules**, and **Account IDs** before saving.
***
### Vendor Profile
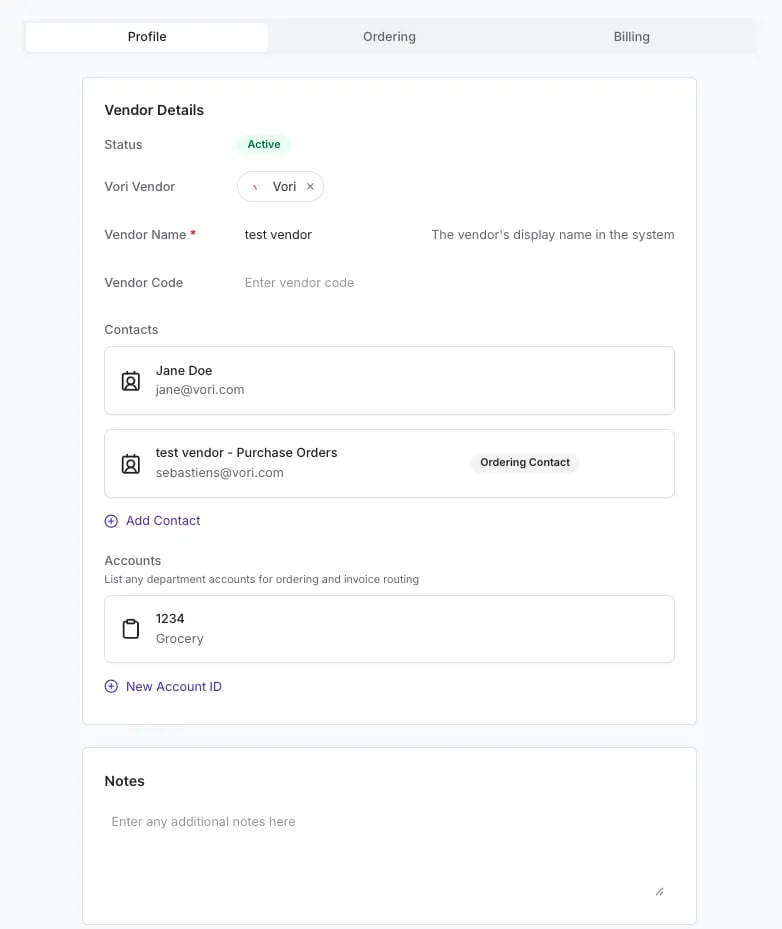
The **Profile** tab is your command center for general vendor information.
* This opens the full vendor editor where you can add **Contacts**, **Ordering Rules**, and **Account IDs** before saving.
***
### Vendor Profile
The **Profile** tab is your command center for general vendor information.
 Edit Profile Details
1. Hover over the vendor's name in the list and select **Open**.
2. Select the **Profile** tab.
3. Update the following fields:
* **Status:** Choose between **Active** or **Inactive**.
* **Vori Vendor:** Search for the [Vori Network Vendor](/vendors-and-vendor-products/vendor-management/map-store-vendors-to-vori-global-vendors#understanding-vori-global-vendors), the universal representation of a supplier shared across all retailers on the Vori network.
4. * **Vendor Name:** Enter the display name for the vendor.
5. * **Vendor Code:** The identifier assigned to the supplier.
#### Managing Vendor Contacts
Ensure purchase orders go to the right people every time. You can manage multiple contacts for a single vendor and designate exactly who should receive order emails.
1. In the **Profile** tab, look for the **Contacts** section.
2. Click **Add Contact**.
3. Enter the contact's **Name**, **Email**, and **Phone**.
4. **Important:** Toggle on **Ordering Contact** if this person should receive purchase order emails automatically.
5. Click **Done**.
✏️ **Note:** You can have multiple **Ordering Contacts**. Vori will email all checked contacts when an order is submitted.
#### Edit Account Details
1. Scroll down to the **Accounts** section to assign Account IDs to specific departments.
* Click **New Account ID**.
* Enter the **Account ID**.
* Select the **Department** from the dropdown.
* Click **Done**.
2. Use the **Notes** section to leave internal comments for your team.
***
### Configure Ordering Rules and Schedules
Stop guessing delivery dates and minimums. The **Ordering** tab allows you to enforce rules that prevent costly mistakes before they happen.
Edit Profile Details
1. Hover over the vendor's name in the list and select **Open**.
2. Select the **Profile** tab.
3. Update the following fields:
* **Status:** Choose between **Active** or **Inactive**.
* **Vori Vendor:** Search for the [Vori Network Vendor](/vendors-and-vendor-products/vendor-management/map-store-vendors-to-vori-global-vendors#understanding-vori-global-vendors), the universal representation of a supplier shared across all retailers on the Vori network.
4. * **Vendor Name:** Enter the display name for the vendor.
5. * **Vendor Code:** The identifier assigned to the supplier.
#### Managing Vendor Contacts
Ensure purchase orders go to the right people every time. You can manage multiple contacts for a single vendor and designate exactly who should receive order emails.
1. In the **Profile** tab, look for the **Contacts** section.
2. Click **Add Contact**.
3. Enter the contact's **Name**, **Email**, and **Phone**.
4. **Important:** Toggle on **Ordering Contact** if this person should receive purchase order emails automatically.
5. Click **Done**.
✏️ **Note:** You can have multiple **Ordering Contacts**. Vori will email all checked contacts when an order is submitted.
#### Edit Account Details
1. Scroll down to the **Accounts** section to assign Account IDs to specific departments.
* Click **New Account ID**.
* Enter the **Account ID**.
* Select the **Department** from the dropdown.
* Click **Done**.
2. Use the **Notes** section to leave internal comments for your team.
***
### Configure Ordering Rules and Schedules
Stop guessing delivery dates and minimums. The **Ordering** tab allows you to enforce rules that prevent costly mistakes before they happen.
 **To set ordering constraints:**
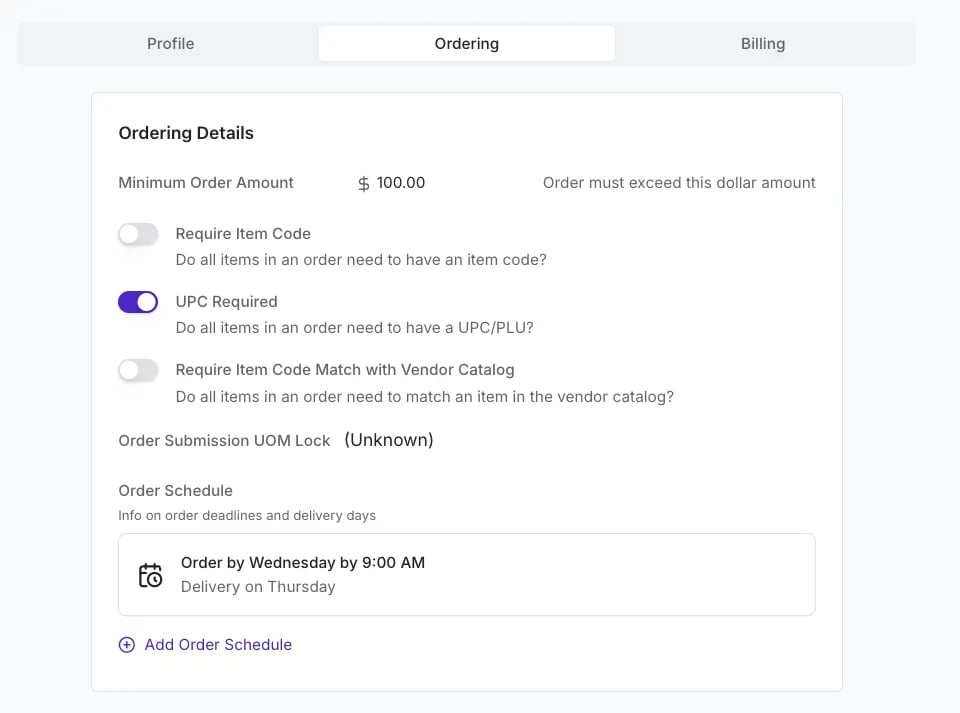
1. Select the **Ordering** tab in the vendor panel.
2. **Minimum Order Amount:** Enter a dollar value. The system will alert you if an order falls below this threshold.
3. **Toggles:**
* **Require Item Code:** Ensures every item on the order has a vendor item code.
* **UPC Required:** Mandates UPCs for all items.
* **Require Item Code Match with Vendor Catalog:** Strict validation against the catalog.
4. **Order Submission UOM Lock:** Use the dropdown to restrict ordering units (e.g., force all orders to be in **Cases** or **Eaches**).
**To add an Order Schedule:**
1. Click **Add Order Schedule**.
2. Select the **Deadline Day** and **Deadline Time** (e.g., Wednesday at 9:00 AM).
3. Select the expected **Delivery Day** (e.g., Thursday).
4. Click **Done**.
💡 **Tip:** Setting a schedule helps your team know exactly when to submit orders to hit your delivery windows.
***
### Billing Information
Keep your financial data organized by maintaining accurate billing addresses and tax IDs.
**To set ordering constraints:**
1. Select the **Ordering** tab in the vendor panel.
2. **Minimum Order Amount:** Enter a dollar value. The system will alert you if an order falls below this threshold.
3. **Toggles:**
* **Require Item Code:** Ensures every item on the order has a vendor item code.
* **UPC Required:** Mandates UPCs for all items.
* **Require Item Code Match with Vendor Catalog:** Strict validation against the catalog.
4. **Order Submission UOM Lock:** Use the dropdown to restrict ordering units (e.g., force all orders to be in **Cases** or **Eaches**).
**To add an Order Schedule:**
1. Click **Add Order Schedule**.
2. Select the **Deadline Day** and **Deadline Time** (e.g., Wednesday at 9:00 AM).
3. Select the expected **Delivery Day** (e.g., Thursday).
4. Click **Done**.
💡 **Tip:** Setting a schedule helps your team know exactly when to submit orders to hit your delivery windows.
***
### Billing Information
Keep your financial data organized by maintaining accurate billing addresses and tax IDs.
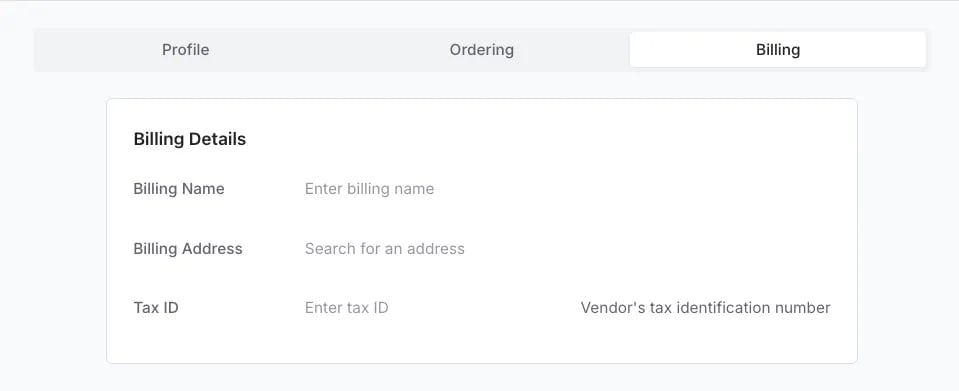 1. Select the **Billing** tab.
2. Enter the **Billing Name** and **Billing Address**.
3. Input the vendor's **Tax ID**.
4. Changes save automatically when you click out of the field or close the panel.
***
### Merge Duplicate Vendors
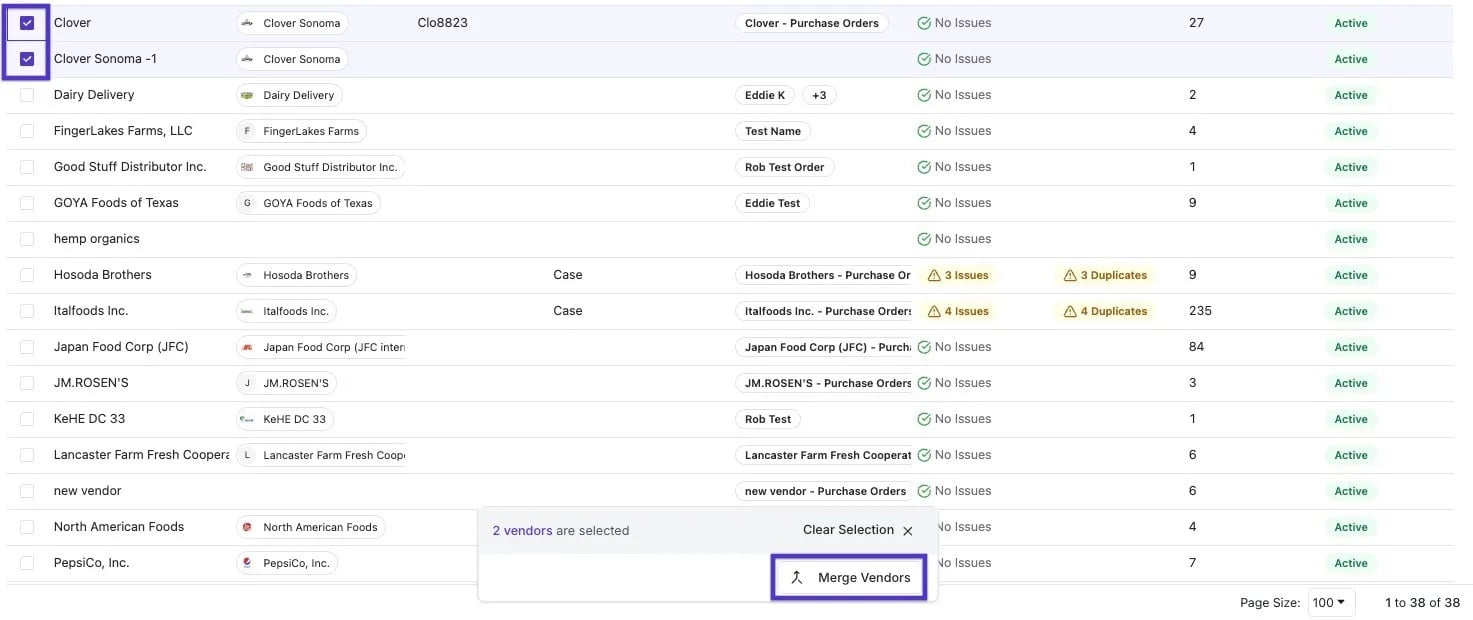
If you find duplicate vendors (e.g., "Dairy Delivery" and "Dairy Deliv"), merge them to keep your data clean. This ensures your purchase history and product catalogs are consolidated into a single, accurate record.
1. Click on **Inventory & Supply Chain** and navigate to **[Vendors](https://app.vori.com/retail/vendors)**.
2. Locate the duplicates using the search bar or the **Duplicates** filter.
3. Select the checkboxes next to the vendors you want to combine.
4. A menu will appear at the bottom of the screen. Click **Merge**.
1. Select the **Billing** tab.
2. Enter the **Billing Name** and **Billing Address**.
3. Input the vendor's **Tax ID**.
4. Changes save automatically when you click out of the field or close the panel.
***
### Merge Duplicate Vendors
If you find duplicate vendors (e.g., "Dairy Delivery" and "Dairy Deliv"), merge them to keep your data clean. This ensures your purchase history and product catalogs are consolidated into a single, accurate record.
1. Click on **Inventory & Supply Chain** and navigate to **[Vendors](https://app.vori.com/retail/vendors)**.
2. Locate the duplicates using the search bar or the **Duplicates** filter.
3. Select the checkboxes next to the vendors you want to combine.
4. A menu will appear at the bottom of the screen. Click **Merge**.
 **➡️ Next Steps:** For detailed steps and best practices, see the [**Merging Duplicate Vendors and Products**](/vendors-and-vendor-products/vendor-management/merging-duplicate-vendors-and-products) guide.
## Related topics
- [Search & Manage the Vendor Products Catalog](/vendors-and-vendor-products/vendor-products/search-and-manage-the-vendor-products-catalog.md)
- [Manage Vendor Costs and Active Suppliers](/vendors-and-vendor-products/vendor-products/manage-vendor-costs-and-active-suppliers.md)
- [Bulk Upload Vendors](/vendors-and-vendor-products/vendor-management/bulk-upload-vendors.md)
**➡️ Next Steps:** For detailed steps and best practices, see the [**Merging Duplicate Vendors and Products**](/vendors-and-vendor-products/vendor-management/merging-duplicate-vendors-and-products) guide.
## Related topics
- [Search & Manage the Vendor Products Catalog](/vendors-and-vendor-products/vendor-products/search-and-manage-the-vendor-products-catalog.md)
- [Manage Vendor Costs and Active Suppliers](/vendors-and-vendor-products/vendor-products/manage-vendor-costs-and-active-suppliers.md)
- [Bulk Upload Vendors](/vendors-and-vendor-products/vendor-management/bulk-upload-vendors.md)