> ## Documentation Index
> Fetch the complete documentation index at: https://help.vori.com/llms.txt
> Use this file to discover all available pages before exploring further.
# Build Your Product List (APL) From Scratch – For New Stores
> Start strong with four required fields. Build a clean, reliable APL that powers your POS and reporting from day one
This guide is designed for **new stores building an APL (Approved Product List) from scratch.**
✏️ **Note:** If you already use a Point of Sale (POS) system and/or a Back Office solution, Vori’s Solutions Engineer will work with you to retrieve and import your existing data. This guide is intended for **new stores only**, not stores migrating from another system.
### What is an APL?
An Approved Product List (APL) is a list of every product your store will carry, including key details that power your **POS**, reporting, and inventory workflows.
**Setting up your APL is one of the first steps to getting started with Vori.**
👉 **Important:** Be sure to **make a copy** of the template before editing. When you finish editing it, download or export the sheet as a CSV file before uploading it to Vori Back Office.
**[Open the Store Product Uploader Template](https://docs.google.com/spreadsheets/d/1npmSoHY5yTRyzXatA1GTq2Whgi3xikpdbFy6yoZ3HL0/edit?gid=1556935337#gid=1556935337)**
***
### Required Fields in APL
You need **four required fields** to build your APL:
| **Field** | **Definition** | **Priority** |
| ----------------------------- | ------------------------------------------------------------------------------------------------------------------------------------------------------------------------------------------------------------------------------------------------------------------------------------------------------------------------------------------------------------------------ | ------------ |
| **Product Name** | The name is what’s displayed on the POS and printed on receipts. | Required |
| **Department** | Vori organizes products into top-level categories [(Departments)](/departments/set-up-departments) to support reporting, apply shared attributes like EBT eligibility or bottle deposits, and keep your store organized for easier sales tracking.
Define and name these in your APL file. They’ll be automatically created in your Back Office after upload. | Required |
| **Retail Price** | The retail price entered as a decimal (e.g., 2.49). | Required |
| **Barcode (UPC / PLU, etc.)** | A unique product code used for scanning at checkout, ideally a GS1-standard code like a UPC, EAN, GTIN, or PLU. **This code cannot be all zeroes.** **Enter barcodes as text to preserve leading zeros** (e.g., by adding a single quote ' at the start). | Required |
⚠️ **Caution — Don't include dollar signs in the Retail Price column.** Enter prices as plain decimal numbers (e.g., `2.49`, not `$2.49`). Adding a `$` symbol will cause an error during import and the row will fail to load.
***
### Additional Fields
Once your required fields are in place, you can include **additional product attributes** to support ordering, inventory, and checkout operations. These fields are optional, but they streamline Vori workflows as your store grows.
**✏️ Note:** If you already have this data on hand, it’s better to include it now rather than waiting to add it later.
#### Product Categories
| **Field** | **Definition** | **Priority** | **Notes** |
| ------------------ | ----------------------------------------------------------------- | ------------ | ------------------------------------------------------------------------------------------------ |
| **Sub Department** | Second-level category for organizing products within departments. | Optional | Vori currently supports only two levels of product organization: departments and subdepartments. |
***
#### Vendor & Cost Details
| **Field** | **Definition** | **Priority** | **Notes** |
| -------------------- | --------------------------------------------------- | -------------------------- | ------------------------------------------------- |
| **Vendor Item Code** | The ordering or reference code used by your vendor. | Critical for Smart Pricing | Often printed on invoices or case labels. |
| **Vendor Name** | The primary vendor for the product. | Critical for Smart Pricing | Vori currently ingests one vendor per product. |
| **Cost** | Vendor cost of the product. | Critical for Smart Pricing | Used to calculate margins and track cost changes. |
| **Case Size** | Number of units per case. | Critical for Smart Pricing | Used for invoice and order accuracy. |
| **Brand** | Product's brand or label name. | Optional | Helpful for inventory search and shelf labeling. |
**⚠️ Important for [Smart Pricing (Cost Changes)](/invoicing-cost-changes-and-smart-pricing/cost-changes-and-smart-pricing/manage-invoices-new-items-and-cost-changes):** Including vendor, cost, and case size info now will significantly improve your ability to manage invoices and track margins.
***
#### Pricing & Sales Settings
| **Field** | **Definition** | **Priority** | **Notes** |
| ----------------------- | -------------------------------------------------------------------------------------------------------------------------------------------------------------------------------------------------------------- | ------------ | ------------------------------------------------------------- |
| **Price Embedded** | Marks products where the barcode includes the price, such as items labeled and weighed in-store using deli or meat scales. These are often pre-printed labels with a Type 2 UPC generated by the scale itself. | Recommended | Applies to printed barcodes from meat/deli department scales. |
| **Manual Price** | Allows cashiers to enter a custom price at checkout. | Optional | Useful for open or flexible-priced items. |
| **Prompt for Quantity** | Triggers POS to ask for quantity input at checkout. | Optional | Good for loose-pack or variable-quantity items. |
| **Sold by Weight** | Marks the product as sold by weight at the register (e.g., \$3.99/lb). | Recommended | Common for produce, bulk items, meat, or deli. |
***
#### Packaging & Size
| **Field** | **Definition** | **Priority** | **Notes** |
| ------------------- | -------------------------------------------------- | ------------ | -------------------------------------- |
| **Pack Size** | Inner pack units per retail product. | Optional | |
| **Unit Volume** | Size of the product (e.g., 16oz, 500g). | Optional | |
| **Unit of Measure** | The unit the item is sold by (e.g., Each, LB, OZ). | Optional | Defaults to “Each” in the Back Office. |
***
#### Compliance & Tax
| **Field** | **Definition** | **Priority** | **Notes** |
| --------------------- | ------------------------------------------------- | ------------ | -------------------------------------------------- |
| **Age Restriction** | Minimum legal age to purchase (e.g., 16, 18, 21). | Recommended | Can be set at the item or department level. |
| **EBT Eligible** | Marks whether the product qualifies for EBT. | Recommended | Can be set at the item or department level. |
| **Country of Origin** | The country where the product was produced. | Optional | Required by law in some states (e.g., California). |
⚠️ **Caution: Compliance Reminder:** Certain fields, such as **Country of Origin** and **Other Tax,** may be required by city, state, or federal regulations (e.g., California law requires Country of Origin labeling on certain products).
*It is the responsibility of each store to ensure compliance with all applicable labeling and regulatory requirements.*
***
### 📤 Upload your APL to Vori Back Office
Once your CSV is ready, you can upload it directly from the Product Catalog.
🚨 **Warning — The uploader overwrites existing product data.** If a barcode in your CSV matches a product already in your catalog, the uploader will *replace* the existing values — including **Retail Price** — with whatever is in your file. Before you upload against a live catalog, double-check every column and use the **Review Linked Data** step to confirm what will change. *If you're a new store with an empty catalog, this doesn't apply to you — new rows will appear under the **Create** tab.*
#### Step 1: Open the product uploader
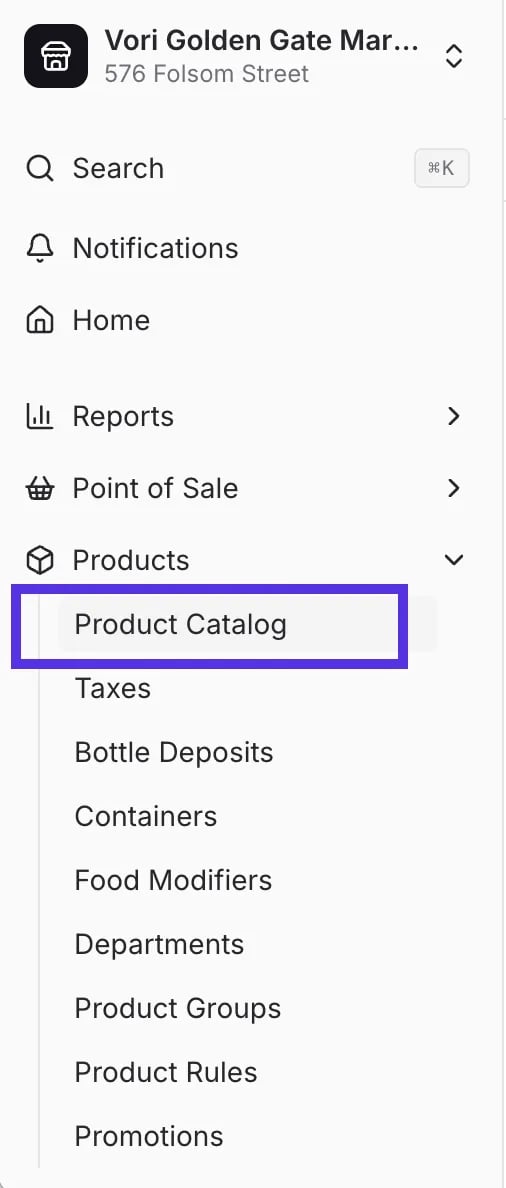
In Vori Back Office, go to **Products** > **Product Catalog**, then click **Upload** in the top-right corner.
 #### Step 2: Upload your CSV
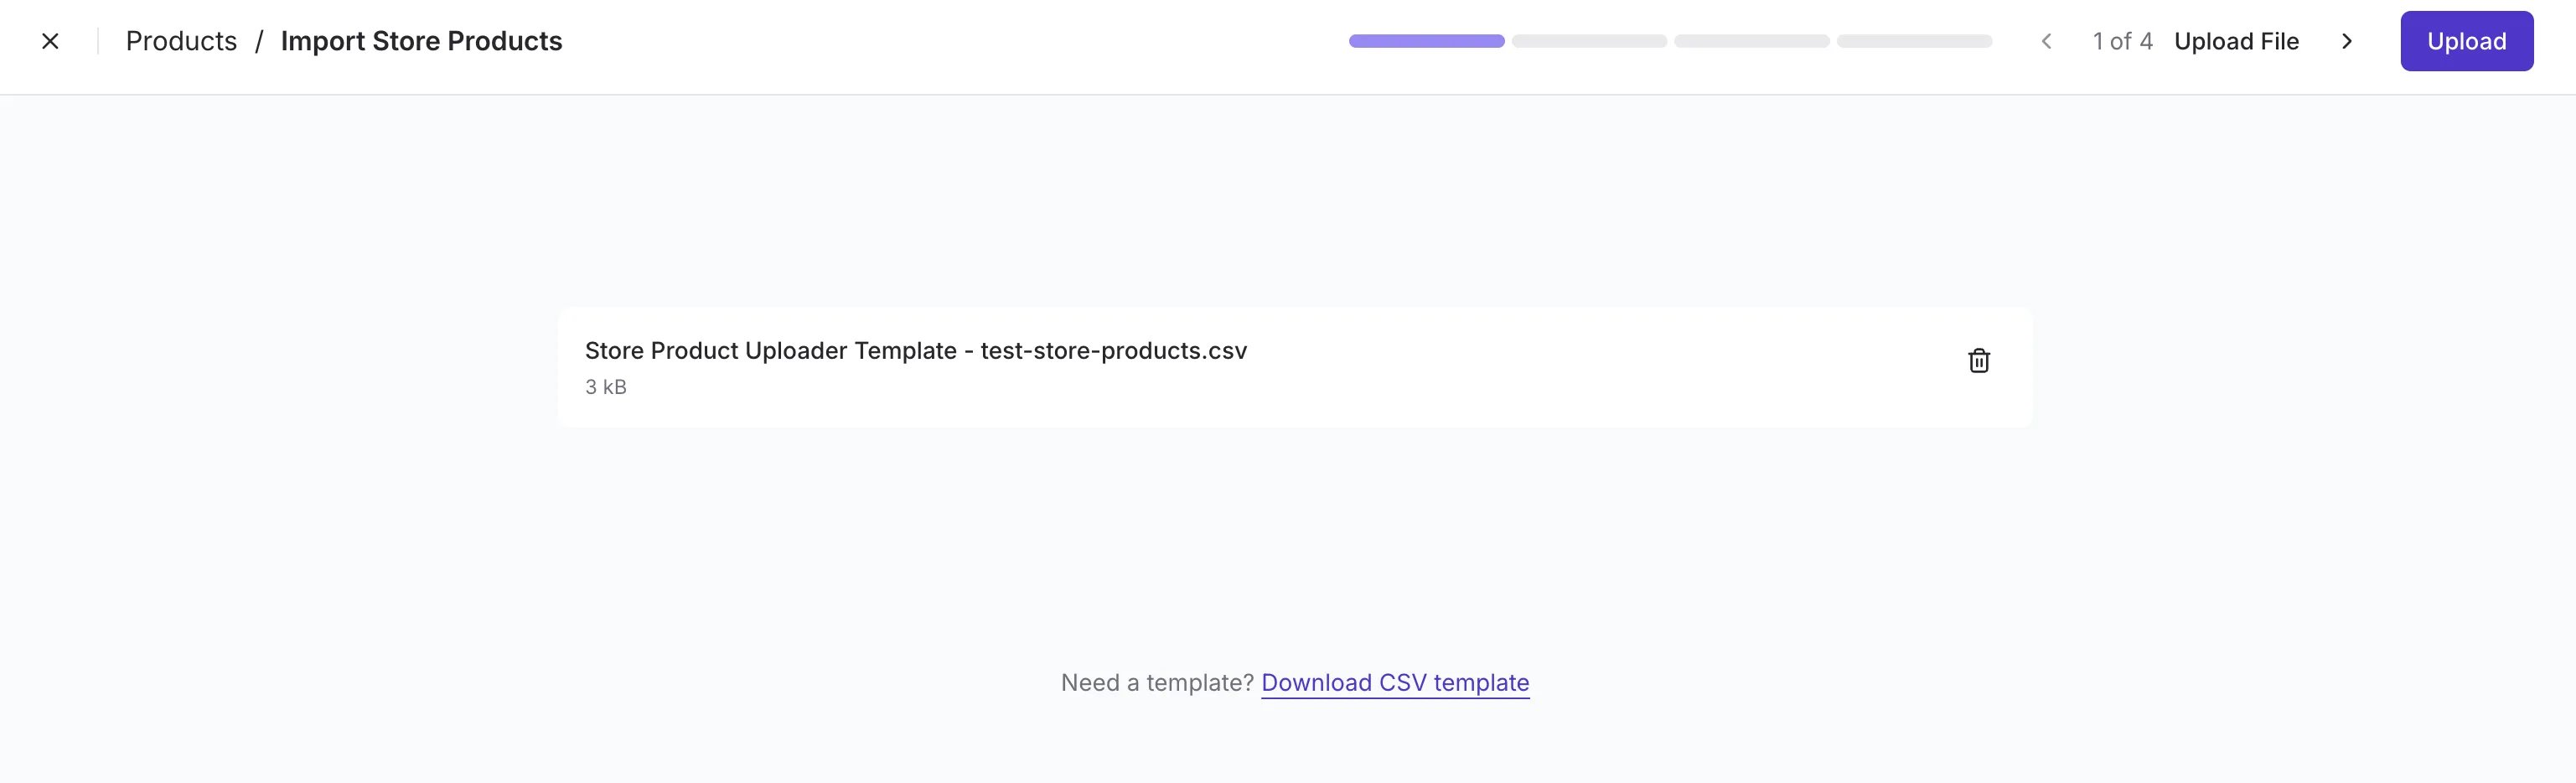
Drag and drop your file into the upload area, or click **Select File** to browse. Only *CSV* files are accepted. If you're starting from the Google Sheets template, export it as a CSV first so you have a file the uploader can accept.
**💡 Tip:** If you don't have a file ready yet, click **Download CSV template** at the bottom of the screen to grab a blank template directly from Vori.
Once your file appears in the upload area, click **Upload** in the top-right to continue.
#### Step 2: Upload your CSV
Drag and drop your file into the upload area, or click **Select File** to browse. Only *CSV* files are accepted. If you're starting from the Google Sheets template, export it as a CSV first so you have a file the uploader can accept.
**💡 Tip:** If you don't have a file ready yet, click **Download CSV template** at the bottom of the screen to grab a blank template directly from Vori.
Once your file appears in the upload area, click **Upload** in the top-right to continue.
 #### Step 3: Map your fields
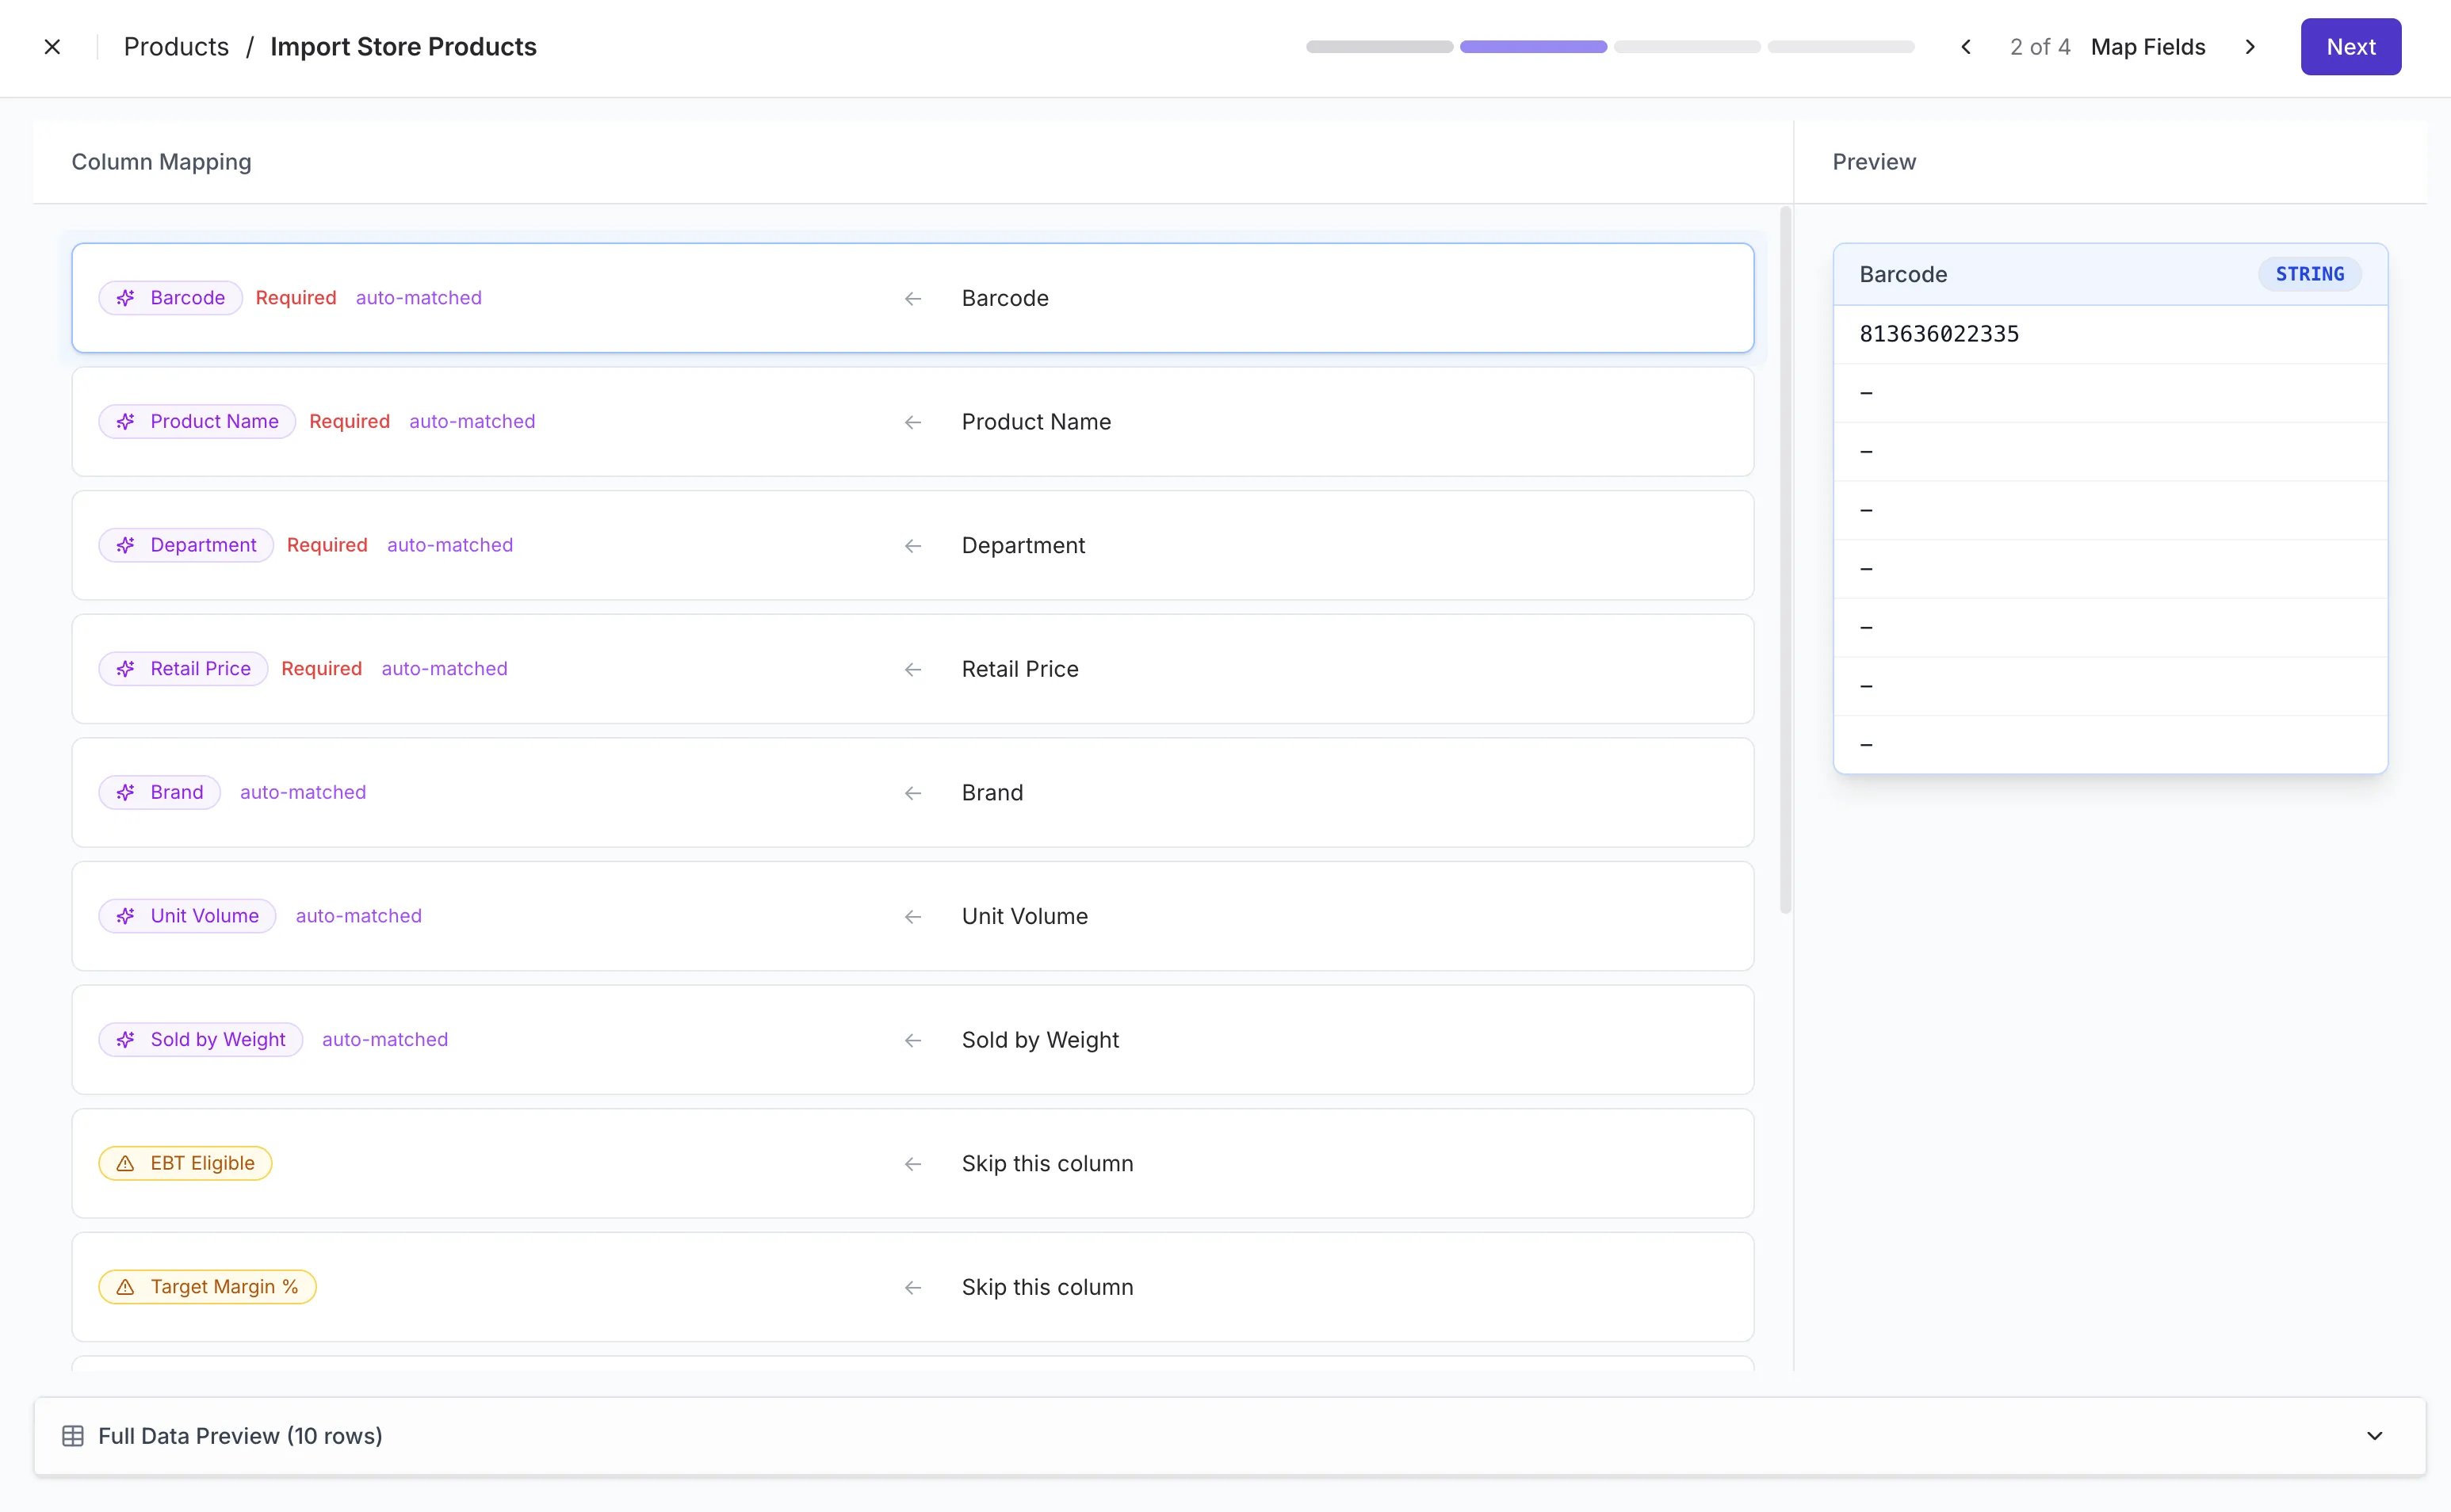
Vori automatically matches your CSV columns to the right fields in Back Office. Required fields — **Barcode**, **Product Name**, **Department**, and **Retail Price** — are flagged so you can confirm they're mapped before moving on.
The right-hand **Preview** panel shows sample values from your file so you can spot mapping issues before committing. If a column isn't relevant, leave it set to **Skip this column**.
When everything looks right, click **Next**.
#### Step 3: Map your fields
Vori automatically matches your CSV columns to the right fields in Back Office. Required fields — **Barcode**, **Product Name**, **Department**, and **Retail Price** — are flagged so you can confirm they're mapped before moving on.
The right-hand **Preview** panel shows sample values from your file so you can spot mapping issues before committing. If a column isn't relevant, leave it set to **Skip this column**.
When everything looks right, click **Next**.
 #### Step 4: Review linked data
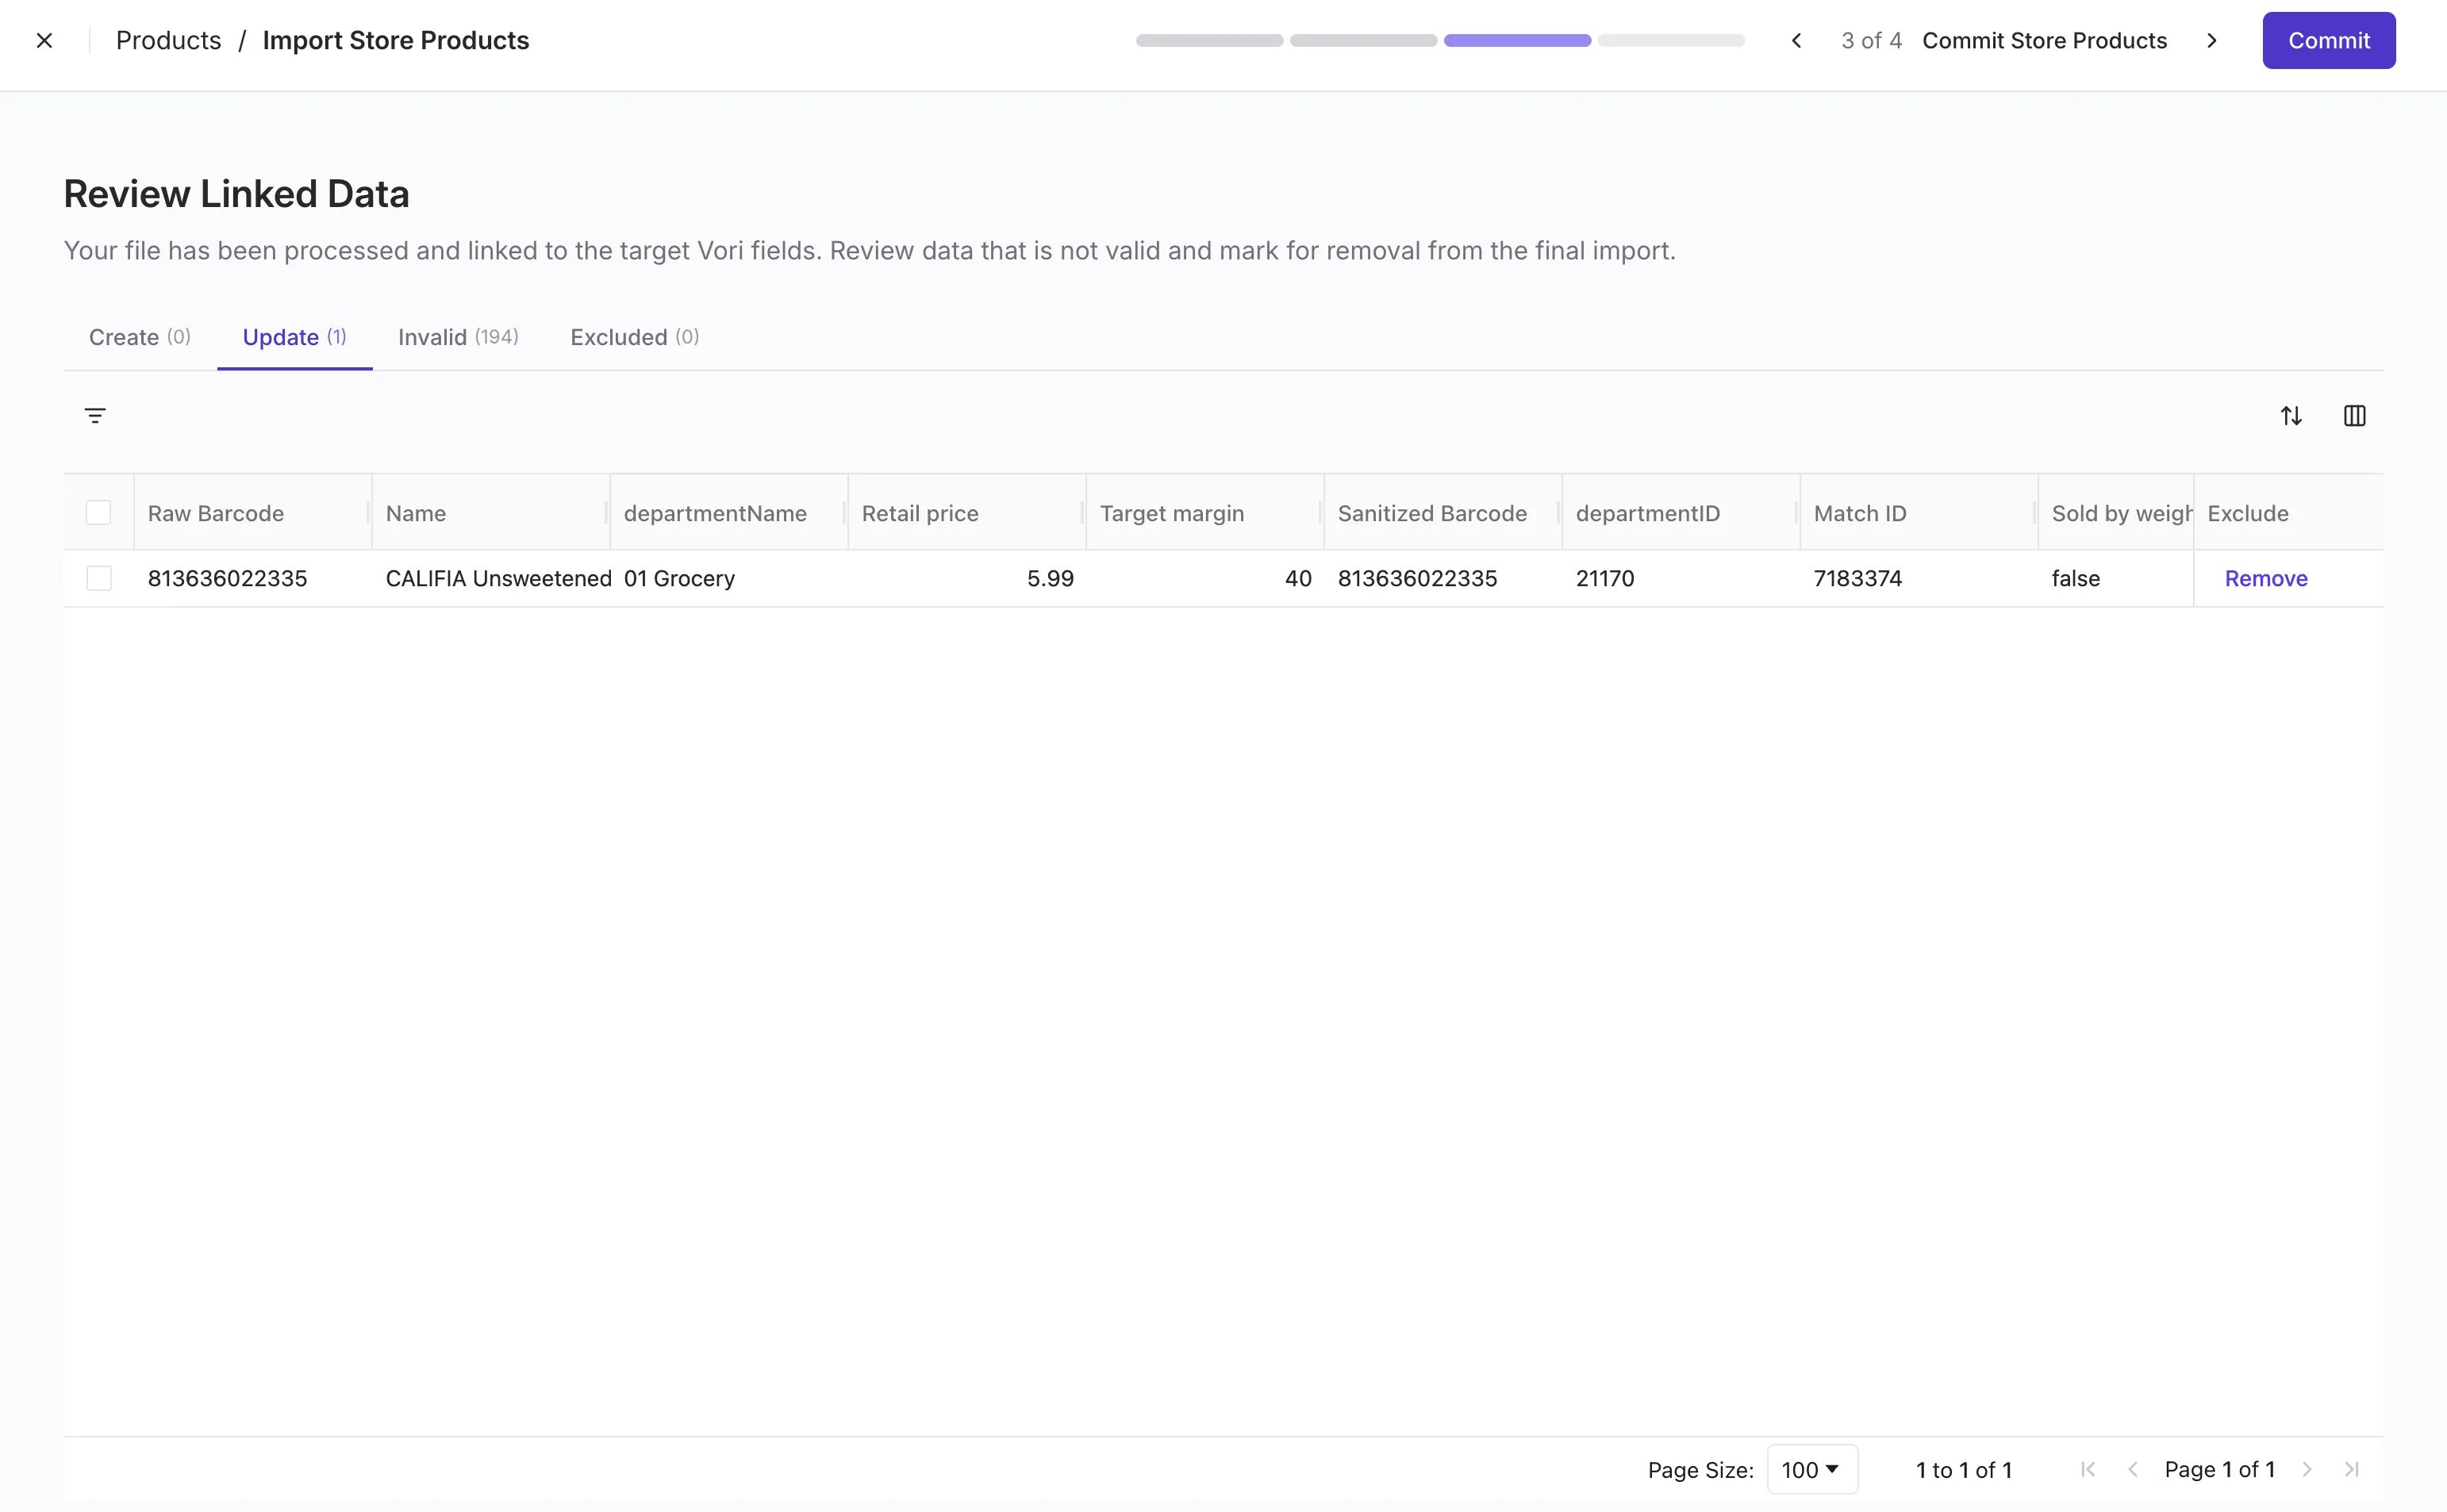
Vori processes your file and sorts every row into one of four tabs. *This is the most important step* — it shows you exactly what's about to happen before any changes are made.
* **Create:** New products that will be added to your catalog.
* **Update:** Existing products that will be *overwritten* with values from your file. Open this tab and review every row carefully — especially **Retail Price**.
* **Invalid:** Rows with errors (e.g., missing required fields, malformed barcodes). These will not import.
* **Excluded:** Rows you've manually excluded from the import.
⚠️ **Caution:** Anything in the **Update** tab will replace what's currently in your catalog. To skip a row from the final import, click **Exclude** in the *Exclude* column. Rows in the *Invalid* tab will not be imported — fix the issues in your CSV and re-upload, or move on without them.
When you're confident in what's about to change, click **Commit** in the top-right to finalize the upload.
#### Step 4: Review linked data
Vori processes your file and sorts every row into one of four tabs. *This is the most important step* — it shows you exactly what's about to happen before any changes are made.
* **Create:** New products that will be added to your catalog.
* **Update:** Existing products that will be *overwritten* with values from your file. Open this tab and review every row carefully — especially **Retail Price**.
* **Invalid:** Rows with errors (e.g., missing required fields, malformed barcodes). These will not import.
* **Excluded:** Rows you've manually excluded from the import.
⚠️ **Caution:** Anything in the **Update** tab will replace what's currently in your catalog. To skip a row from the final import, click **Exclude** in the *Exclude* column. Rows in the *Invalid* tab will not be imported — fix the issues in your CSV and re-upload, or move on without them.
When you're confident in what's about to change, click **Commit** in the top-right to finalize the upload.
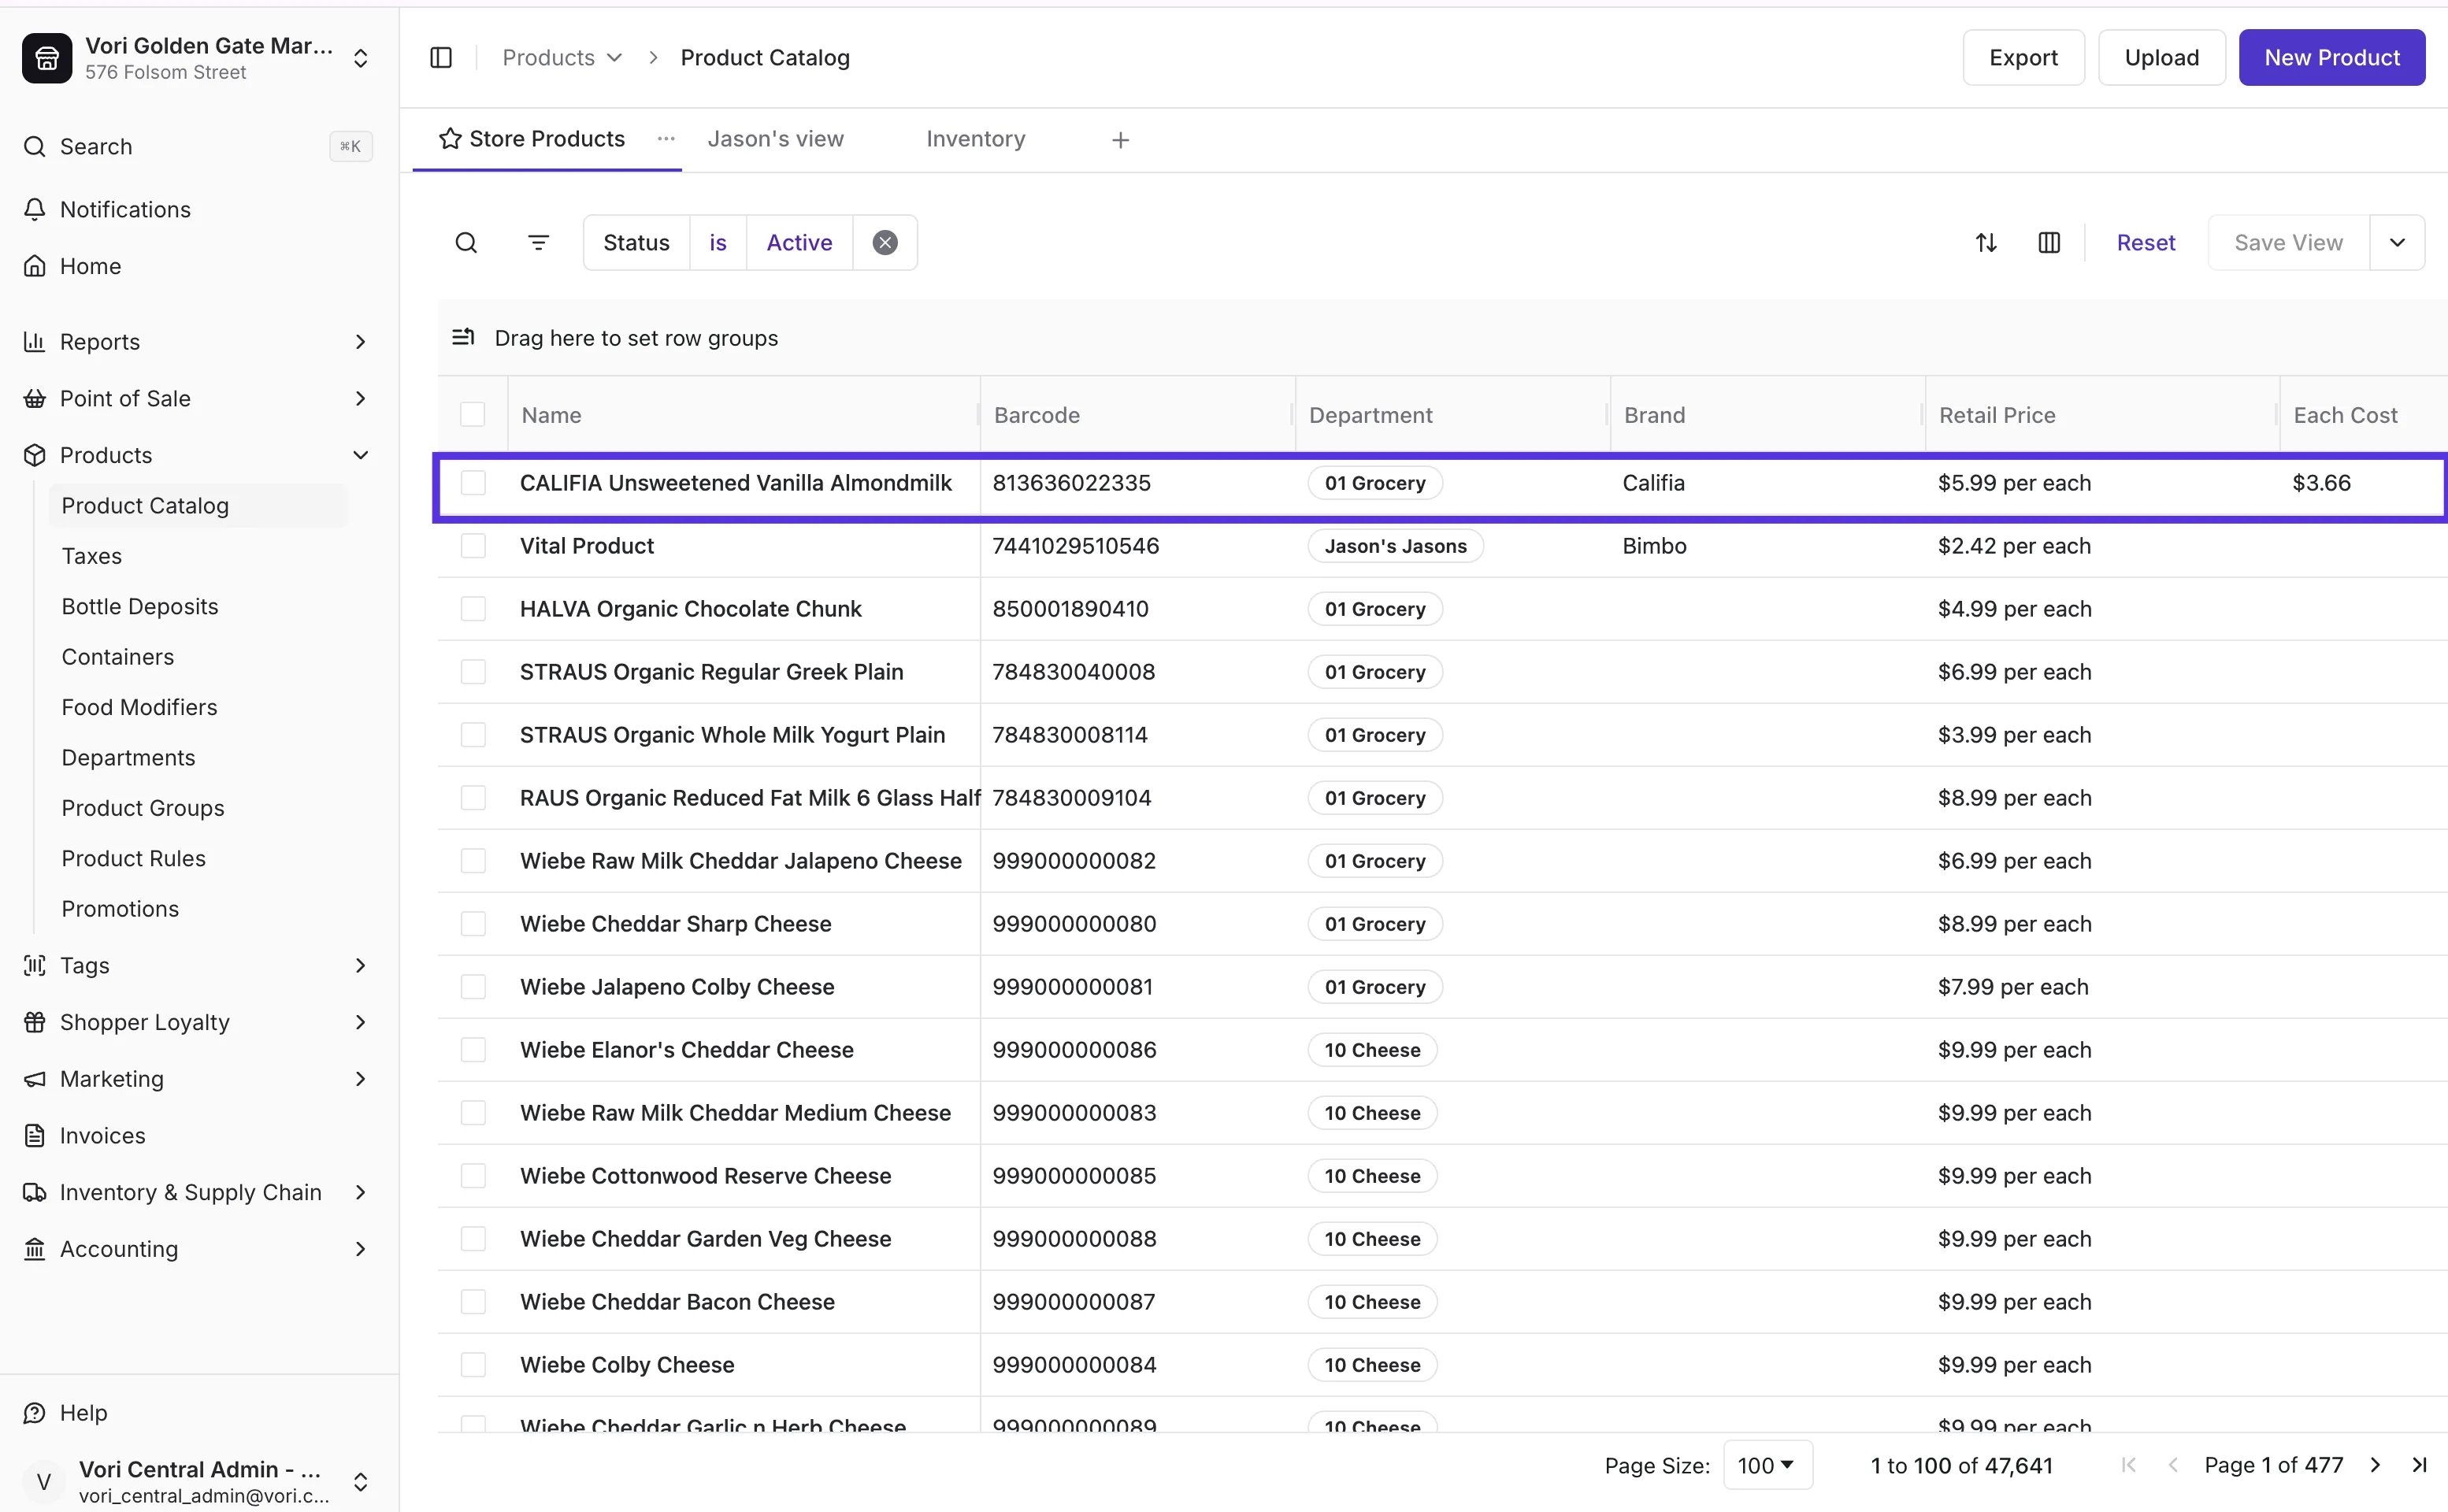
 #### Step 5: Confirm your products are live
Once committed, your products appear in the Product Catalog with all mapped fields populated.
#### Step 5: Confirm your products are live
Once committed, your products appear in the Product Catalog with all mapped fields populated.
 #### How the uploader handles existing products
If you're uploading to a catalog that already has products in it — whether you're adding a new vendor's items or refreshing pricing across the store — here's how Vori matches and updates rows:
* **Matching is by barcode.** Vori looks at the *Barcode* column in your CSV and checks whether that barcode already exists in your catalog.
* **New barcodes create new products.** Anything not already in the catalog lands in the *Create* tab.
* **Matching barcodes overwrite existing products.** Anything that matches lands in the *Update* tab. Values in your CSV — including **Retail Price** — will replace the values currently on file.
* **Invalid rows are skipped.** Rows missing required fields or with malformed data won't import.
**💡 Tip:** If you only want to *add* new products without touching existing ones, filter your CSV down to barcodes that aren't yet in your catalog before uploading. You can also use the **Exclude** action on the *Update* tab to skip specific rows during the review step.
***
### Enhancing Your Product List Further
After your initial upload, you can continue improving your product list using tools in Vori Back Office:
* [**Bulk update**](/product-and-product-catalog-management/product-catalog-and-bulk-management/bulk-update-products) tools to apply changes to multiple products at once.
* [**Department inheritance**](/departments/set-up-departments) to apply shared logic (e.g., age restriction, EBT, tax).
* [**Invoice uploads**](/invoicing-cost-changes-and-smart-pricing/cost-changes-and-smart-pricing/manage-invoices-new-items-and-cost-changes) that automatically apply details like vendor cost, case size, or brand
**💡 Tip:** If you already have this info available, such as from purchase orders or invoices, it’s worth entering now to avoid backtracking later.
## Related topics
- [Sell and Manage Blackhawk Gift Cards in Vori POS](/point-of-sale-pos/blackhawk-gift-cards-checks-lottery-and-payouts/sell-and-manage-blackhawk-gift-cards-in-vori-pos.md)
- [Create and Manage Product Groups](/product-and-product-catalog-management/product-creation-and-set-up/create-and-manage-product-groups.md)
- [Create Order Guides in VoriOS](/inventory-and-ordering/ordering/create-order-guides-in-vorios.md)
#### How the uploader handles existing products
If you're uploading to a catalog that already has products in it — whether you're adding a new vendor's items or refreshing pricing across the store — here's how Vori matches and updates rows:
* **Matching is by barcode.** Vori looks at the *Barcode* column in your CSV and checks whether that barcode already exists in your catalog.
* **New barcodes create new products.** Anything not already in the catalog lands in the *Create* tab.
* **Matching barcodes overwrite existing products.** Anything that matches lands in the *Update* tab. Values in your CSV — including **Retail Price** — will replace the values currently on file.
* **Invalid rows are skipped.** Rows missing required fields or with malformed data won't import.
**💡 Tip:** If you only want to *add* new products without touching existing ones, filter your CSV down to barcodes that aren't yet in your catalog before uploading. You can also use the **Exclude** action on the *Update* tab to skip specific rows during the review step.
***
### Enhancing Your Product List Further
After your initial upload, you can continue improving your product list using tools in Vori Back Office:
* [**Bulk update**](/product-and-product-catalog-management/product-catalog-and-bulk-management/bulk-update-products) tools to apply changes to multiple products at once.
* [**Department inheritance**](/departments/set-up-departments) to apply shared logic (e.g., age restriction, EBT, tax).
* [**Invoice uploads**](/invoicing-cost-changes-and-smart-pricing/cost-changes-and-smart-pricing/manage-invoices-new-items-and-cost-changes) that automatically apply details like vendor cost, case size, or brand
**💡 Tip:** If you already have this info available, such as from purchase orders or invoices, it’s worth entering now to avoid backtracking later.
## Related topics
- [Sell and Manage Blackhawk Gift Cards in Vori POS](/point-of-sale-pos/blackhawk-gift-cards-checks-lottery-and-payouts/sell-and-manage-blackhawk-gift-cards-in-vori-pos.md)
- [Create and Manage Product Groups](/product-and-product-catalog-management/product-creation-and-set-up/create-and-manage-product-groups.md)
- [Create Order Guides in VoriOS](/inventory-and-ordering/ordering/create-order-guides-in-vorios.md)