> ## Documentation Index
> Fetch the complete documentation index at: https://help.vori.com/llms.txt
> Use this file to discover all available pages before exploring further.
# Set Up and Manage Product Rules
> Bulk-apply attributes like EBT, age restriction, taxes, and target margins to groups of products with Product Rules.
Product Rules let you apply settings like EBT eligibility, age restrictions, taxes, and target margins to entire groups of products at once, instead of editing items one at a time. They are the new default for managing product attributes in Vori, replacing department-level inheritance with a faster, more flexible way to keep your catalog consistent.
### What are Product Rules?
A Product Rule is a "when this, then that" instruction. You define a condition (the **when**), such as *the department is Beer, Wine & Liquor*, and the properties that should apply (the **then**), such as *age restriction is 21 and up*. Every product that matches the condition picks up the property automatically.
This works much like department inheritance did, but with more ways to target products and combine settings. The rules you'll most often want to set up before going live are:
* **Age restriction** — flag alcohol and tobacco departments for ID verification.
* **Taxes** — apply the right tax rate across a department.
* **EBT** — mark a department as eligible or ineligible for Electronic Benefit Transfer (EBT).
* **Loyalty exclusions** — remove loyalty eligibility from departments that shouldn't earn points.
* **Discount restrictions** — limit which products can be discounted.
* **Target margins** — set a pricing target across a group of products.
***
### Where to find Product Rules
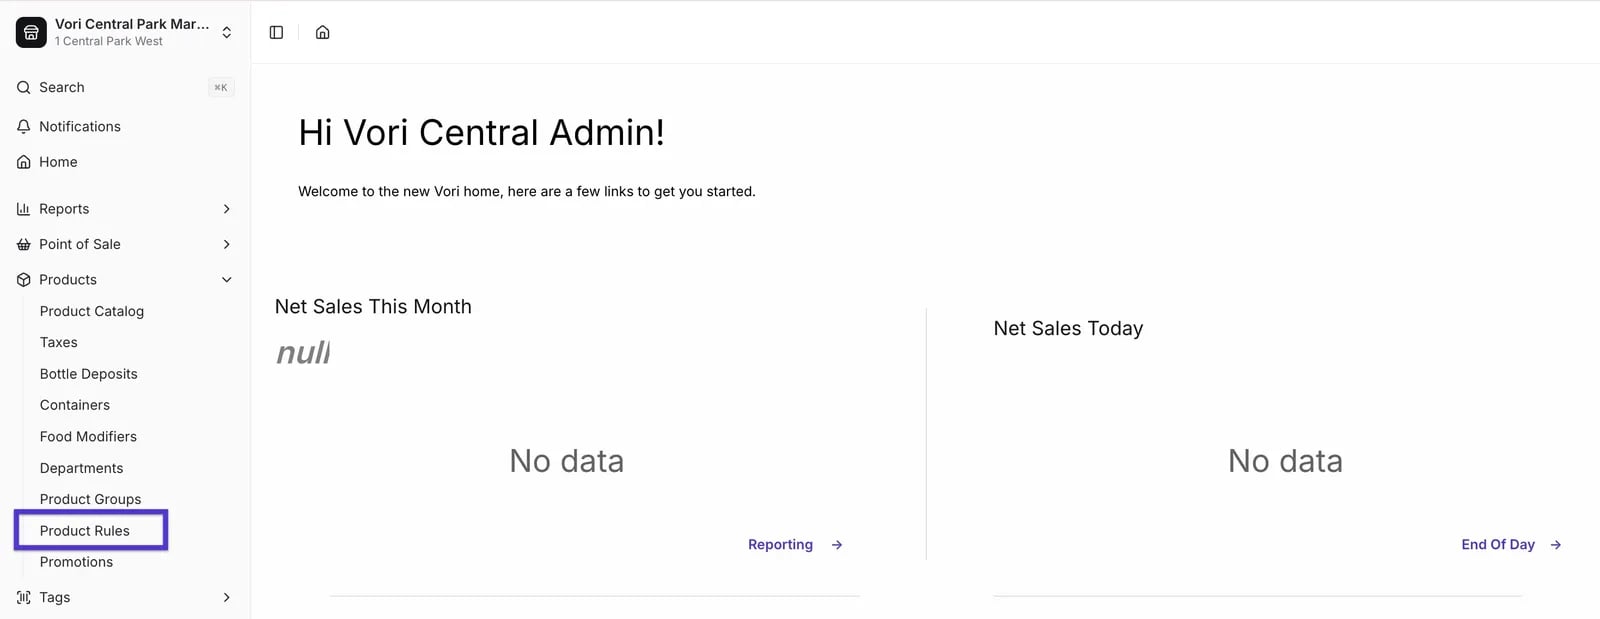
Go to **Products** > **[Product Rules](https://app.vori.com/retail/product-rules)** in the left-hand navigation.
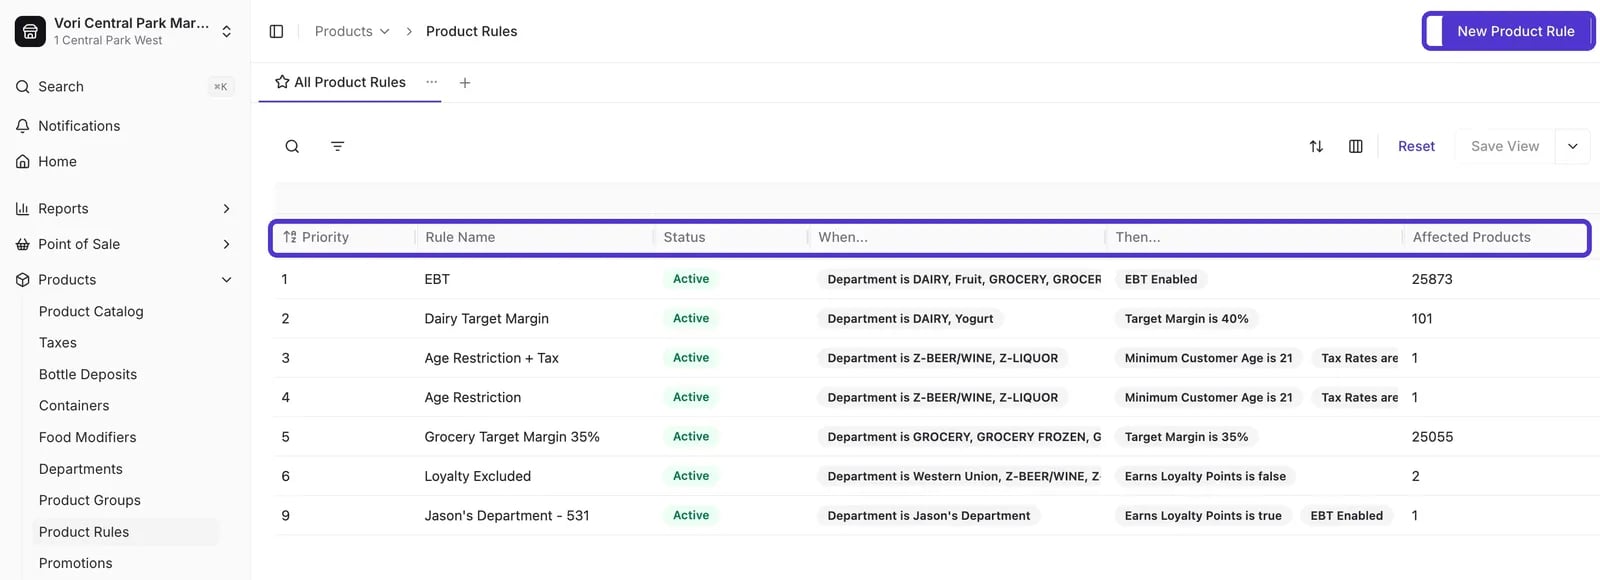
 The Product Rules page lists every rule you've created. Each rule shows its priority, name, status, the **when** condition, the number of affected products, and the **then** properties it sets.
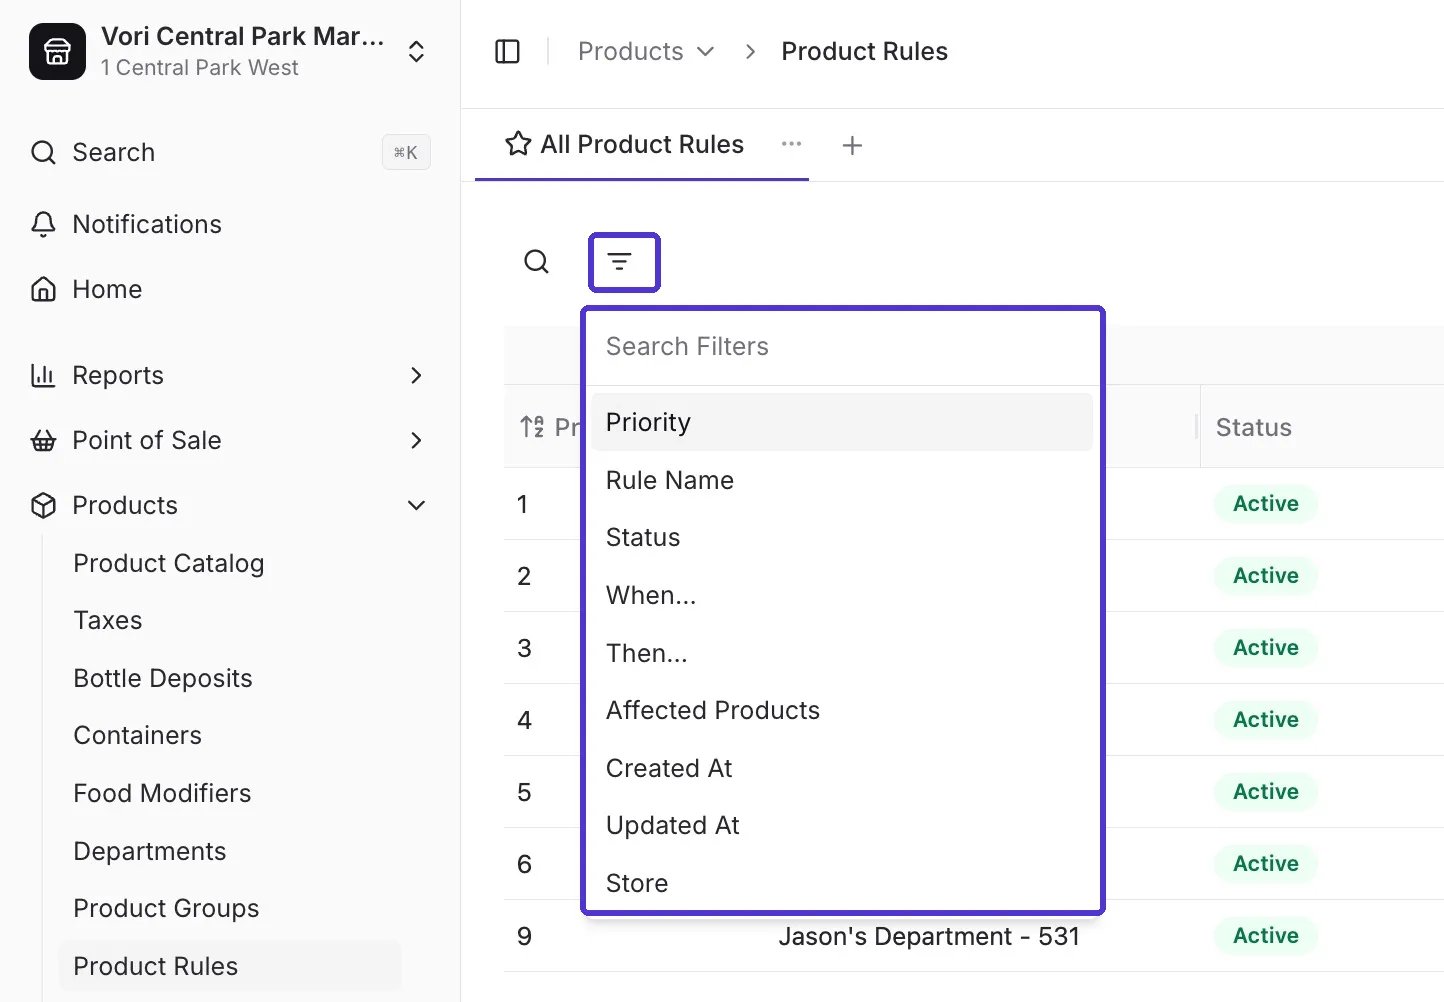
 Use the search and filter controls at the top of the page to narrow the list by any of these fields:
* **Priority** — the order rules apply when a product matches more than one.
* **Rule name** — search by what you named the rule.
* **Status** — **Active** or **Inactive**.
* **When** — the condition, such as *Department is Dairy*.
* **Then** — the property the rule sets.
* **Affected products** — how many products the rule currently applies to.
* **Created at** and **Updated at** — when the rule was made or last changed.
Use the search and filter controls at the top of the page to narrow the list by any of these fields:
* **Priority** — the order rules apply when a product matches more than one.
* **Rule name** — search by what you named the rule.
* **Status** — **Active** or **Inactive**.
* **When** — the condition, such as *Department is Dairy*.
* **Then** — the property the rule sets.
* **Affected products** — how many products the rule currently applies to.
* **Created at** and **Updated at** — when the rule was made or last changed.
 ***
### How priority works
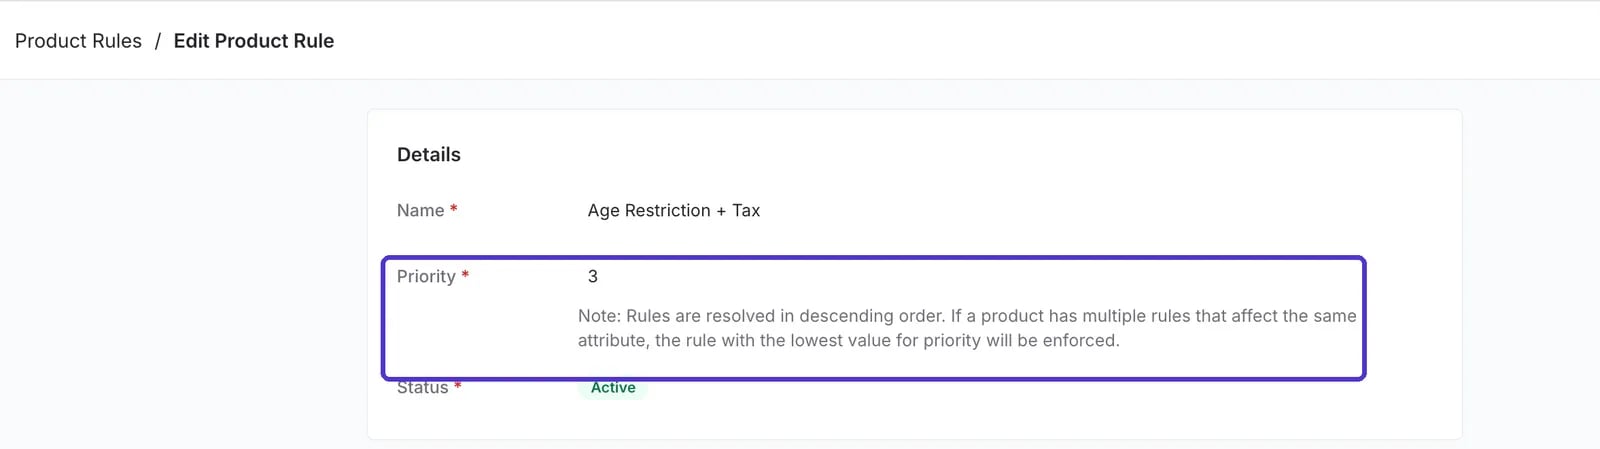
A single product can match more than one rule. For example, an item might belong to both a parent department and a sub-department, each with its own rule. **Priority** decides which rule wins. The lower the priority number, the higher the priority.
Say you have two target-margin rules:
| Rule | Priority | Target margin | Applies to |
| --------------------- | -------- | ------------- | ------------------ |
| Dairy department | 2 | 35% | All dairy products |
| Yogurt sub-department | 4 | 40% | Yogurt only |
A yogurt item lives in both the Dairy parent department and the Yogurt sub-department, so it matches both rules. Because the Dairy rule has the lower priority number (2), its **35%** target margin applies first and takes precedence over the 40% from the Yogurt rule.
***
### How priority works
A single product can match more than one rule. For example, an item might belong to both a parent department and a sub-department, each with its own rule. **Priority** decides which rule wins. The lower the priority number, the higher the priority.
Say you have two target-margin rules:
| Rule | Priority | Target margin | Applies to |
| --------------------- | -------- | ------------- | ------------------ |
| Dairy department | 2 | 35% | All dairy products |
| Yogurt sub-department | 4 | 40% | Yogurt only |
A yogurt item lives in both the Dairy parent department and the Yogurt sub-department, so it matches both rules. Because the Dairy rule has the lower priority number (2), its **35%** target margin applies first and takes precedence over the 40% from the Yogurt rule.
 💡 **Tip:** Plan your priorities so broader rules (whole departments) and narrower rules (single sub-departments) resolve the way you expect when a product matches both.
***
### Create a Product Rule
1. Go to **Products** > **[Product Rules](https://app.vori.com/retail/product-rules)** and click **Create New** in the top-right corner.
2. Select **Rule**.
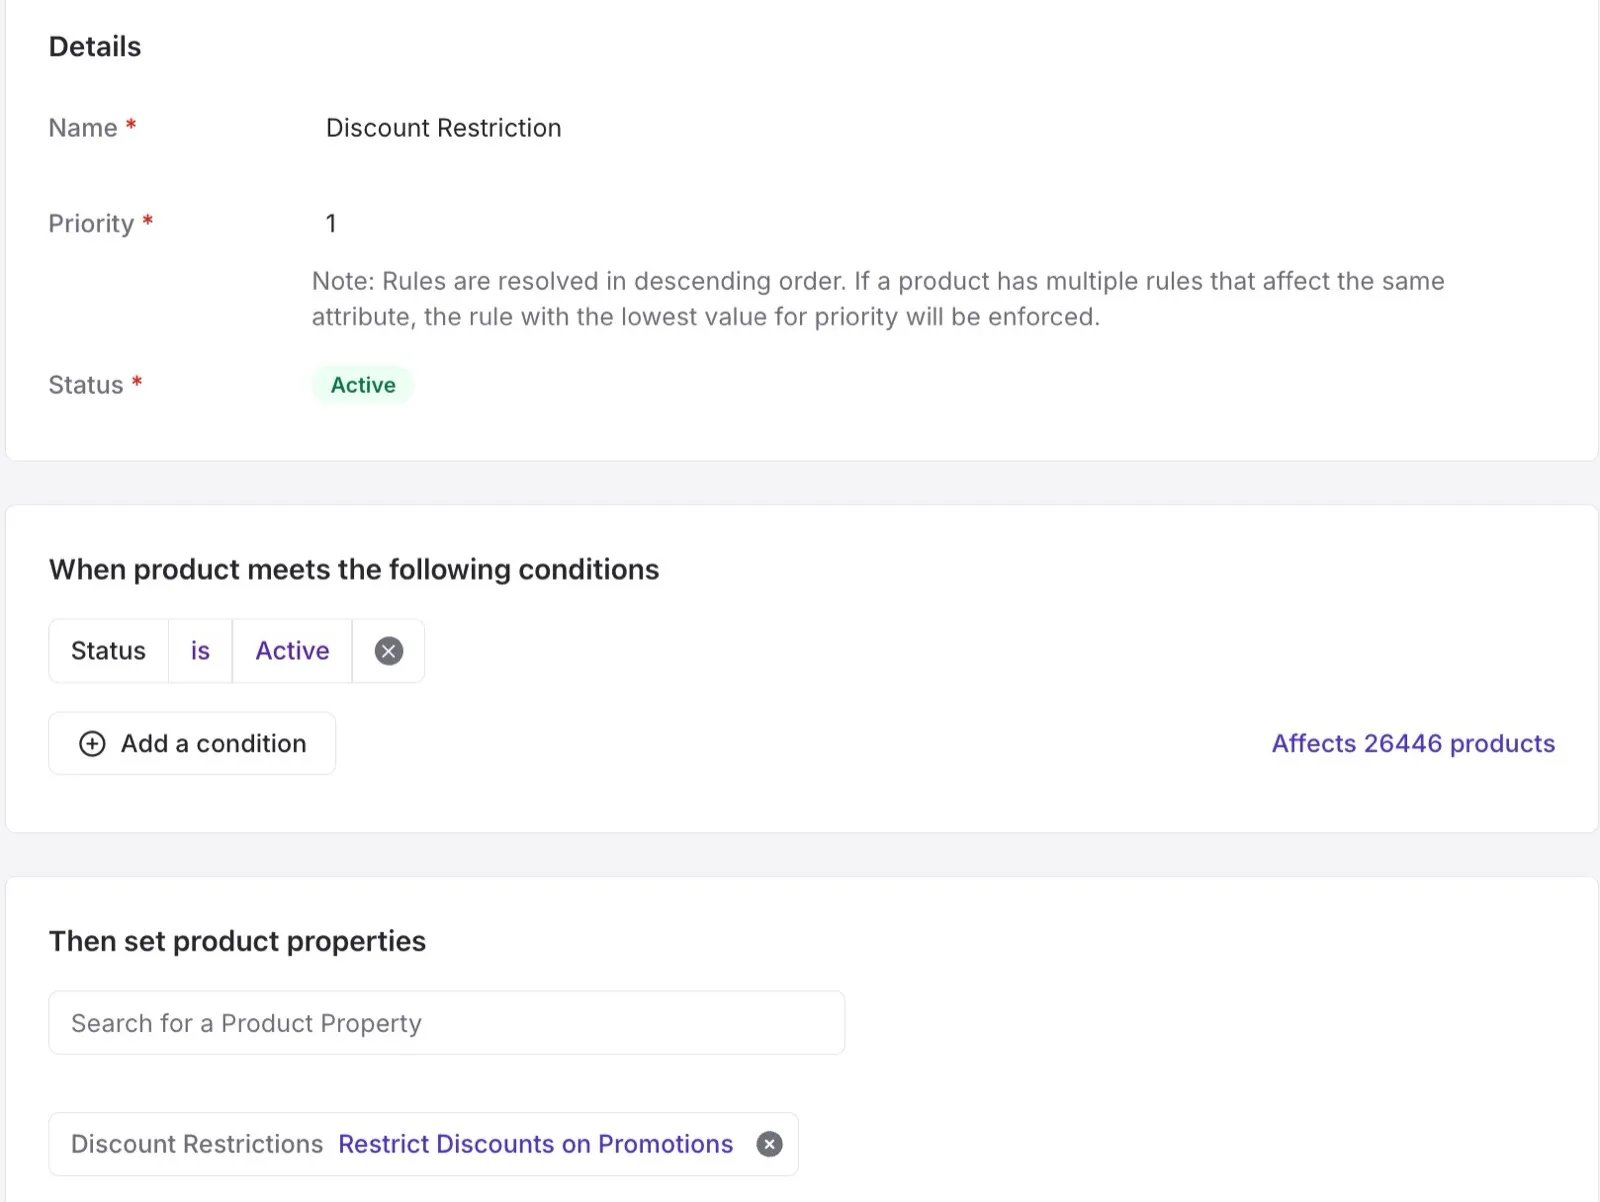
3. Under **Product Details**, give the rule a clear **Name** (for example, "Grocery target margin" or "Age restriction").
4. Set the **Priority**. Remember that a lower number applies first when a product matches multiple rules.
5. Set the **Status** to **Active** to turn the rule on, or **Inactive** to save it for later.
#### Set the "when" condition
Under **When product meets the following conditions**, add the conditions that decide which products the rule targets.
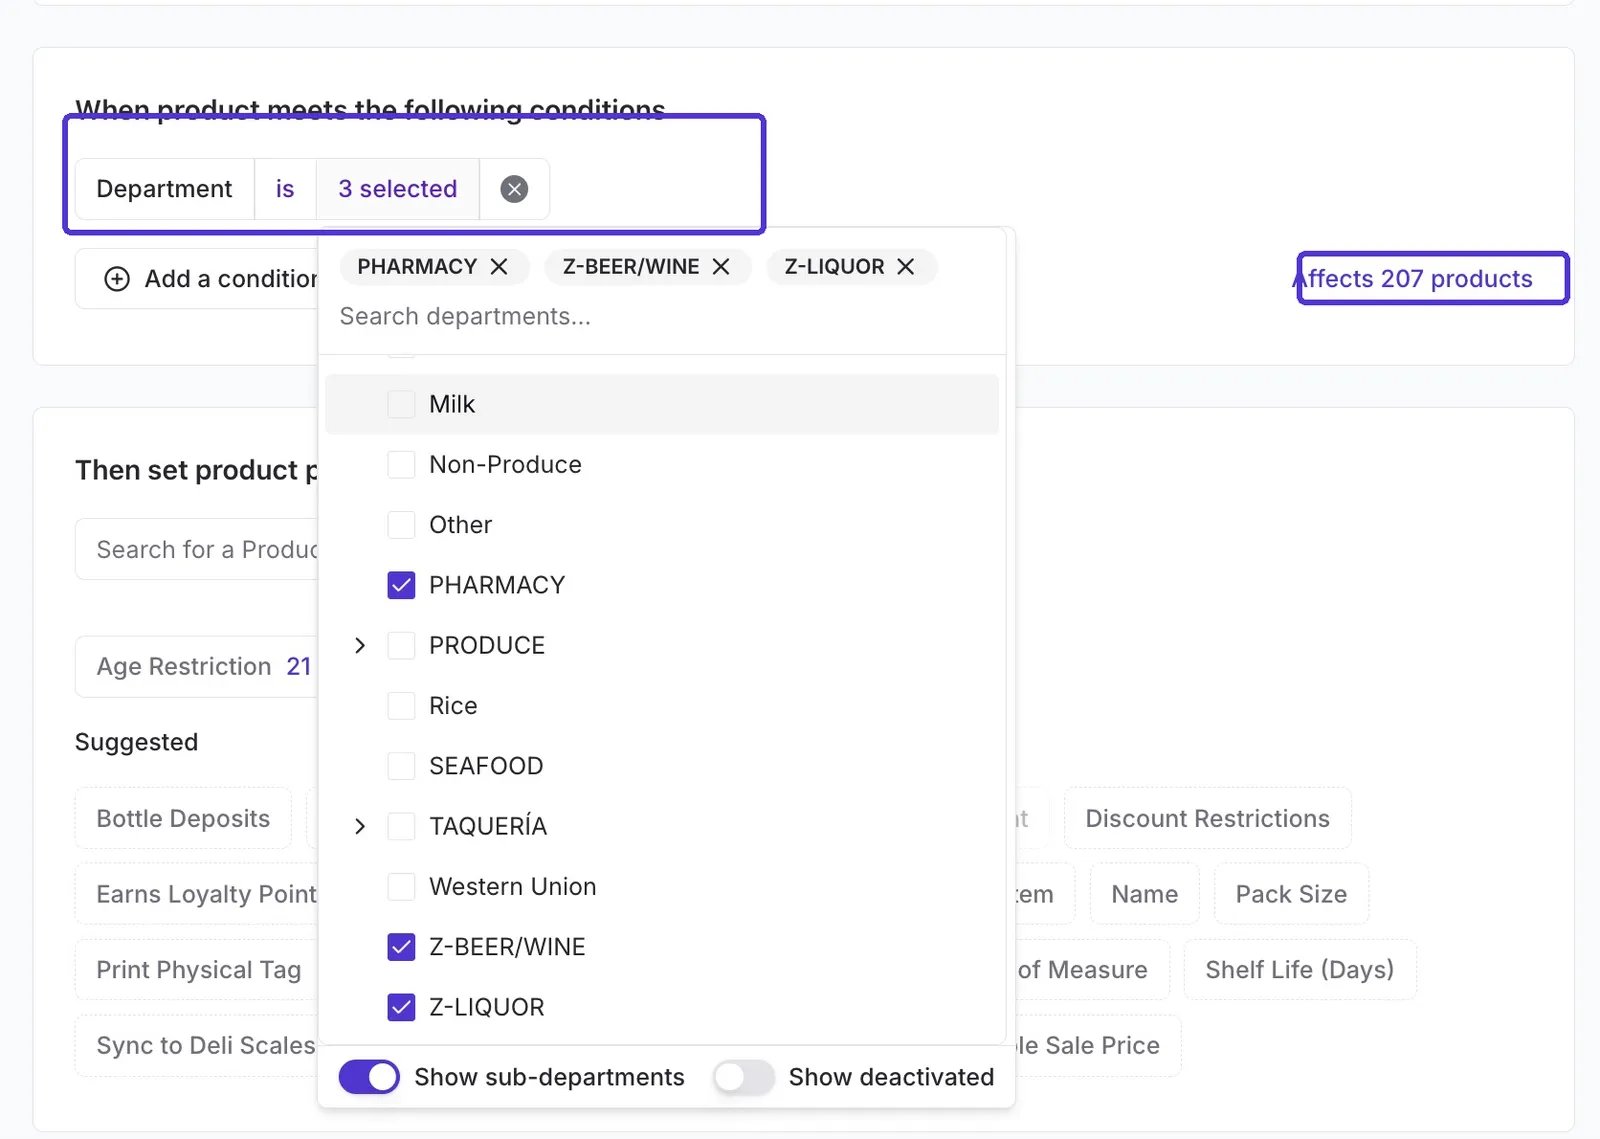
The simplest condition is by department. For example, to build an age-restriction rule for alcohol, set the condition to **Department** **is** your alcohol departments. You can:
* **Select multiple departments** — add every alcohol parent department and sub-department to one rule. Toggle **Show sub-departments** to include them in the list.
* **Use *is* or *is not*** — include or exclude departments to shape the set exactly.
As you build the condition, Vori shows an **Affects # products** count so you can see the rule's reach before you save.
✏️ **Note:** To apply a rule to your entire active product catalog — for example, a discount restriction that should cover every item in the store — set the condition to **Status** **is** **Active**. This targets every active item in your catalog. The **Affects # products** count will update to reflect the full scope before you save.
💡 **Tip:** Plan your priorities so broader rules (whole departments) and narrower rules (single sub-departments) resolve the way you expect when a product matches both.
***
### Create a Product Rule
1. Go to **Products** > **[Product Rules](https://app.vori.com/retail/product-rules)** and click **Create New** in the top-right corner.
2. Select **Rule**.
3. Under **Product Details**, give the rule a clear **Name** (for example, "Grocery target margin" or "Age restriction").
4. Set the **Priority**. Remember that a lower number applies first when a product matches multiple rules.
5. Set the **Status** to **Active** to turn the rule on, or **Inactive** to save it for later.
#### Set the "when" condition
Under **When product meets the following conditions**, add the conditions that decide which products the rule targets.
The simplest condition is by department. For example, to build an age-restriction rule for alcohol, set the condition to **Department** **is** your alcohol departments. You can:
* **Select multiple departments** — add every alcohol parent department and sub-department to one rule. Toggle **Show sub-departments** to include them in the list.
* **Use *is* or *is not*** — include or exclude departments to shape the set exactly.
As you build the condition, Vori shows an **Affects # products** count so you can see the rule's reach before you save.
✏️ **Note:** To apply a rule to your entire active product catalog — for example, a discount restriction that should cover every item in the store — set the condition to **Status** **is** **Active**. This targets every active item in your catalog. The **Affects # products** count will update to reflect the full scope before you save.
 #### Set the "then" properties
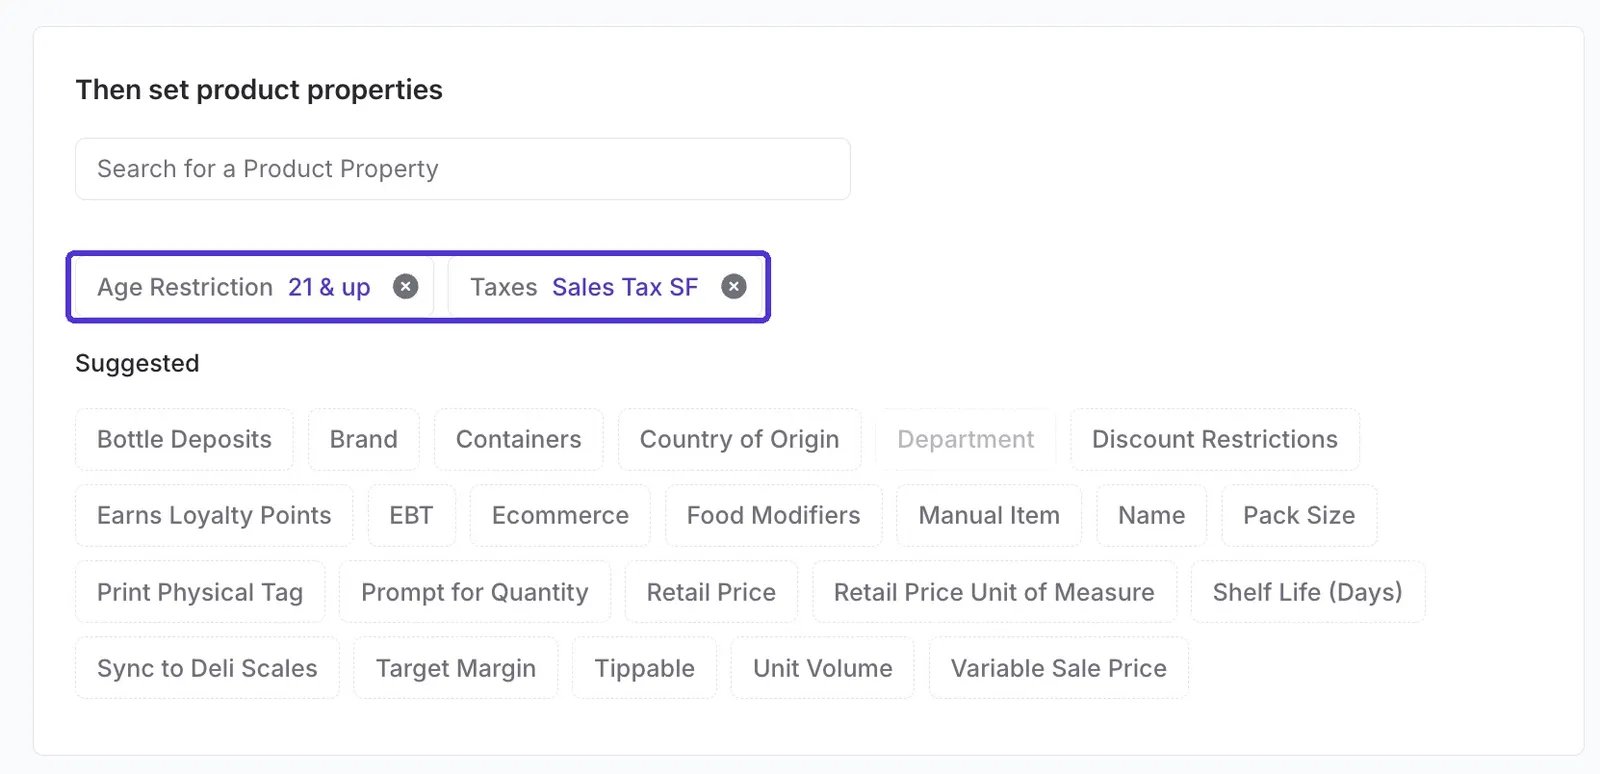
Under **Then set product properties**, choose the properties to apply to every matching product. Search for a property or pick one from the **Suggested** list. For an age-restriction rule, you'd set **Age restriction** to your chosen value. You can add more than one property to a single rule, for example an age restriction *and* a tax rate (see the examples below).
#### Set the "then" properties
Under **Then set product properties**, choose the properties to apply to every matching product. Search for a property or pick one from the **Suggested** list. For an age-restriction rule, you'd set **Age restriction** to your chosen value. You can add more than one property to a single rule, for example an age restriction *and* a tax rate (see the examples below).
 6. Click **Create Product Rule**.
✏️ **Note:** Product Rules can set many of the same properties department settings could, including target margin, age restriction, EBT, tax rates, bottle deposits, loyalty eligibility, **Discount Restrictions**, **Tippable** (useful for a coffee stand), and **Sync to Deli Scales** for connected Ishida scales.
***
### Product properties glossary
Each property you can set in the **Then set product properties** section does the following:
**Age Restriction** — Enforces an age-verification prompt at the Point of Sale (POS) when a matching item is scanned. Set to 18+ or 21+ depending on the product type (for example, tobacco vs. alcohol).
**Bottle Deposits** — Attaches a bottle deposit or California Redemption Value (CRV) fee to matching products. The fee is applied automatically at checkout when a qualifying item is scanned.
**Brand** — Sets the brand name for matching products in bulk.
**Containers** — Specifies the tare container type for matching products. Used for bulk departments where shoppers bring their own containers — for example, a glass jar for bulk teas or peanut butter, a shampoo bottle for refill stations, or a produce bag at the bulk bin. The container's tare weight is subtracted from the total at the POS so the shopper is only charged for the product.
**Country of Origin** — Sets the country of origin for matching products in bulk. Relevant for produce labeling requirements and reporting.
**Department** — Assigns matching products to a department in bulk.
**Discount Restrictions** — Controls which types of discounts can be applied to matching products at checkout. Options include:
* **Restrict Discounts on Promotions** — prevents double-discounting when an item is already on promotion.
* **Restrict POS Discounts** — blocks all discounts at the POS.
* **Restrict Multiple POS Discounts** — allows one discount per item, but not two stacked together.
Commonly used for tobacco and items that already carry a promotional price.
**Earns Loyalty Points** — Controls whether purchases of matching products accrue loyalty points. Some stores prefer to exclude certain departments — like tobacco, alcohol, or lotto — from earning loyalty points. If that fits your store, set this to **No** for those departments.
**EBT** — Marks products as eligible for Electronic Benefit Transfer (EBT), allowing shoppers to pay with SNAP/EBT benefits at checkout. Required for produce, grocery staples, and other qualifying items.
**Ecommerce** — Controls whether matching products are visible and available for purchase on your ecommerce storefront. Use this to bulk-enable or disable an entire department online.
**Manual Item** — Flags matching products as manual items, which are entered by the cashier at the POS without a barcode scan. Manual items are the foundation for quick action buttons at checkout — for example, an open-price deli item or a custom charge.
**Name** — Sets or overwrites the display name for matching products in bulk. Use carefully — this will update every product the rule targets.
**Pack Size** — Sets the pack size (number of units per case) for matching products.
**Print Physical Tag** — Controls whether a shelf tag is queued for printing when matching products are updated.
**Prompt for Quantity** — Enables a quantity prompt at the POS when a matching item is scanned, so the cashier enters how many units are being purchased rather than scanning each one individually.
**Retail Price** — Sets the retail price for matching products in bulk.
**Retail Price Unit of Measure** — Sets the unit of measure for retail pricing: per unit (each) or per weight (lb/kg). Useful for ensuring entire departments like meat or seafood are consistently configured as weighted items.
**Shelf Life (Days)** — Sets the number of days a product remains sellable after it is received or produced. Used for deli tags on stores with a deli scale integration.
**Sync to Deli Scales** — Pushes matching products to connected deli scales so they are available for tare and weight-based pricing at the deli counter. Applies to stores using a deli scale integration.
**Target Margin** — Sets a target gross margin percentage for matching products. Helps buyers and managers track whether items are priced in line with store goals.
**Taxes** — Assigns a tax rate to all matching products. Use this to apply sales tax, alcohol tax, or other applicable rates by department or product group without editing each item individually.
**Tippable** — Enables a tip prompt at the POS when a matching item is purchased. Primarily used for stores with deli departments or coffee stands that accept tips for prepared foods.
**Unit Volume** — Sets the unit volume (for example, fluid ounces or milliliters) for matching products. Used for display and reporting purposes.
**Variable Sale Price** — Allows the sale price for matching products to vary rather than be fixed. Used for items where the price is determined at the time of sale.
✏️ **Note:** Some properties are available in Product Rules but are generally better configured at the individual item level: **Manual Item**, **Pack Size**, **Print Physical Tag**, **Prompt for Quantity**, and **Variable Sale Price**. A Product Rule makes sense for these only if your store has a dedicated department or sub-department where the setting applies uniformly to every item in it.
***
### When to use Product Rules
Product Rules are best suited for applying consistent attributes across large groups of products. Common use cases include:
* **Taxes** — apply the correct tax rate by department or product type.
* **EBT** — flag all qualifying grocery and produce items as EBT-eligible.
* **Age restriction** — enforce age verification for alcohol (21+) and tobacco (18+) departments.
* **Discount Restrictions** — prevent promotions or POS discounts from applying to tobacco or other restricted items.
* **Sync to Deli Scales** — push deli products to connected scales automatically.
* **Target margin** — monitor and enforce margin targets by department.
* **Tippable** — enable tip prompts for deli departments or coffee stands that accept tips for prepared foods.
* **Earns loyalty points** — exclude categories like tobacco or alcohol from loyalty accrual.
**Advanced use cases** work best when your product catalog is clean and well-organized by department:
* **Retail price UOM** — if your meat department contains only weighted items, set a rule so every item in that department defaults to per-weight pricing. No individual product edits needed.
* **Bottle deposit / CRV** — if your single cans and beverages are cleanly organized in their own department or sub-department, you can attach a \$0.05 bottle deposit or CRV automatically. ⚠️ **Caution:** If multi-packs are also in that department, they will be tagged with the wrong deposit amount. Review the affected products list carefully before activating.
***
### Review and exclude affected products
A single rule can apply to thousands of products at once, so it's worth reviewing the list before you save.
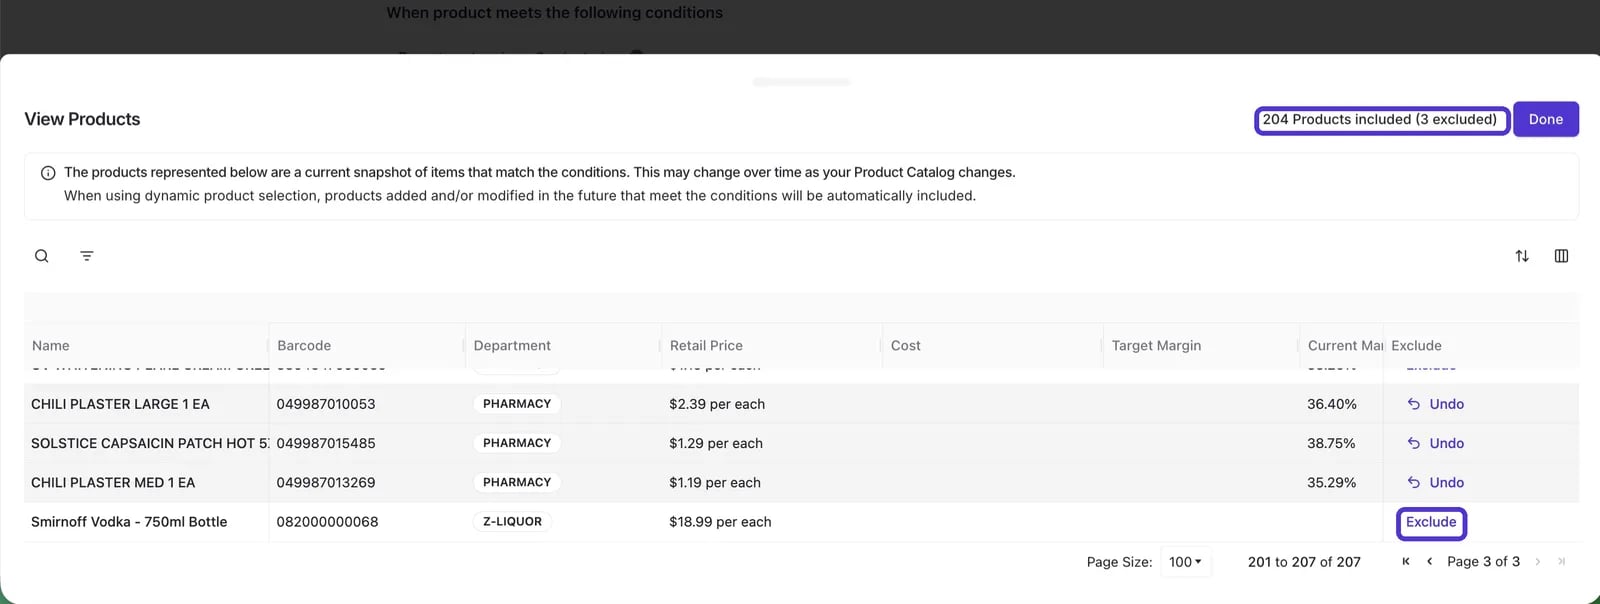
Click the **Affects # products** count to open the **View Products** list. This is a live snapshot of every item that currently matches your conditions. To remove an item, click **Exclude** in its row, the header updates to show how many products are included and how many are excluded (for example, **204 Products included (3 excluded)**). Click **Undo** to add an excluded item back. When you're done, click **Done**.
6. Click **Create Product Rule**.
✏️ **Note:** Product Rules can set many of the same properties department settings could, including target margin, age restriction, EBT, tax rates, bottle deposits, loyalty eligibility, **Discount Restrictions**, **Tippable** (useful for a coffee stand), and **Sync to Deli Scales** for connected Ishida scales.
***
### Product properties glossary
Each property you can set in the **Then set product properties** section does the following:
**Age Restriction** — Enforces an age-verification prompt at the Point of Sale (POS) when a matching item is scanned. Set to 18+ or 21+ depending on the product type (for example, tobacco vs. alcohol).
**Bottle Deposits** — Attaches a bottle deposit or California Redemption Value (CRV) fee to matching products. The fee is applied automatically at checkout when a qualifying item is scanned.
**Brand** — Sets the brand name for matching products in bulk.
**Containers** — Specifies the tare container type for matching products. Used for bulk departments where shoppers bring their own containers — for example, a glass jar for bulk teas or peanut butter, a shampoo bottle for refill stations, or a produce bag at the bulk bin. The container's tare weight is subtracted from the total at the POS so the shopper is only charged for the product.
**Country of Origin** — Sets the country of origin for matching products in bulk. Relevant for produce labeling requirements and reporting.
**Department** — Assigns matching products to a department in bulk.
**Discount Restrictions** — Controls which types of discounts can be applied to matching products at checkout. Options include:
* **Restrict Discounts on Promotions** — prevents double-discounting when an item is already on promotion.
* **Restrict POS Discounts** — blocks all discounts at the POS.
* **Restrict Multiple POS Discounts** — allows one discount per item, but not two stacked together.
Commonly used for tobacco and items that already carry a promotional price.
**Earns Loyalty Points** — Controls whether purchases of matching products accrue loyalty points. Some stores prefer to exclude certain departments — like tobacco, alcohol, or lotto — from earning loyalty points. If that fits your store, set this to **No** for those departments.
**EBT** — Marks products as eligible for Electronic Benefit Transfer (EBT), allowing shoppers to pay with SNAP/EBT benefits at checkout. Required for produce, grocery staples, and other qualifying items.
**Ecommerce** — Controls whether matching products are visible and available for purchase on your ecommerce storefront. Use this to bulk-enable or disable an entire department online.
**Manual Item** — Flags matching products as manual items, which are entered by the cashier at the POS without a barcode scan. Manual items are the foundation for quick action buttons at checkout — for example, an open-price deli item or a custom charge.
**Name** — Sets or overwrites the display name for matching products in bulk. Use carefully — this will update every product the rule targets.
**Pack Size** — Sets the pack size (number of units per case) for matching products.
**Print Physical Tag** — Controls whether a shelf tag is queued for printing when matching products are updated.
**Prompt for Quantity** — Enables a quantity prompt at the POS when a matching item is scanned, so the cashier enters how many units are being purchased rather than scanning each one individually.
**Retail Price** — Sets the retail price for matching products in bulk.
**Retail Price Unit of Measure** — Sets the unit of measure for retail pricing: per unit (each) or per weight (lb/kg). Useful for ensuring entire departments like meat or seafood are consistently configured as weighted items.
**Shelf Life (Days)** — Sets the number of days a product remains sellable after it is received or produced. Used for deli tags on stores with a deli scale integration.
**Sync to Deli Scales** — Pushes matching products to connected deli scales so they are available for tare and weight-based pricing at the deli counter. Applies to stores using a deli scale integration.
**Target Margin** — Sets a target gross margin percentage for matching products. Helps buyers and managers track whether items are priced in line with store goals.
**Taxes** — Assigns a tax rate to all matching products. Use this to apply sales tax, alcohol tax, or other applicable rates by department or product group without editing each item individually.
**Tippable** — Enables a tip prompt at the POS when a matching item is purchased. Primarily used for stores with deli departments or coffee stands that accept tips for prepared foods.
**Unit Volume** — Sets the unit volume (for example, fluid ounces or milliliters) for matching products. Used for display and reporting purposes.
**Variable Sale Price** — Allows the sale price for matching products to vary rather than be fixed. Used for items where the price is determined at the time of sale.
✏️ **Note:** Some properties are available in Product Rules but are generally better configured at the individual item level: **Manual Item**, **Pack Size**, **Print Physical Tag**, **Prompt for Quantity**, and **Variable Sale Price**. A Product Rule makes sense for these only if your store has a dedicated department or sub-department where the setting applies uniformly to every item in it.
***
### When to use Product Rules
Product Rules are best suited for applying consistent attributes across large groups of products. Common use cases include:
* **Taxes** — apply the correct tax rate by department or product type.
* **EBT** — flag all qualifying grocery and produce items as EBT-eligible.
* **Age restriction** — enforce age verification for alcohol (21+) and tobacco (18+) departments.
* **Discount Restrictions** — prevent promotions or POS discounts from applying to tobacco or other restricted items.
* **Sync to Deli Scales** — push deli products to connected scales automatically.
* **Target margin** — monitor and enforce margin targets by department.
* **Tippable** — enable tip prompts for deli departments or coffee stands that accept tips for prepared foods.
* **Earns loyalty points** — exclude categories like tobacco or alcohol from loyalty accrual.
**Advanced use cases** work best when your product catalog is clean and well-organized by department:
* **Retail price UOM** — if your meat department contains only weighted items, set a rule so every item in that department defaults to per-weight pricing. No individual product edits needed.
* **Bottle deposit / CRV** — if your single cans and beverages are cleanly organized in their own department or sub-department, you can attach a \$0.05 bottle deposit or CRV automatically. ⚠️ **Caution:** If multi-packs are also in that department, they will be tagged with the wrong deposit amount. Review the affected products list carefully before activating.
***
### Review and exclude affected products
A single rule can apply to thousands of products at once, so it's worth reviewing the list before you save.
Click the **Affects # products** count to open the **View Products** list. This is a live snapshot of every item that currently matches your conditions. To remove an item, click **Exclude** in its row, the header updates to show how many products are included and how many are excluded (for example, **204 Products included (3 excluded)**). Click **Undo** to add an excluded item back. When you're done, click **Done**.
 ✏️ **Note:** The list uses dynamic product selection. Products you add or change later that match the conditions are included in the rule automatically.
⚠️ **Caution:** Product Rules apply in bulk and can affect thousands of products at once. Review the affected products list before saving, especially for tax rates, EBT, age restrictions, and target margins.
***
### Examples
#### Age restriction + tax
If all of your alcohol is both 21-and-up *and* taxable, you can set both properties in a single rule.
1. Create a new rule and name it (for example, "Age restriction + tax").
2. Set the **when** condition to your alcohol departments, such as **Beer** and **Wine & Liquor**. Add every relevant parent department and sub-department.
3. In the **then** section, add two properties: set **Age restriction** to **21 and up**, and set the **Tax rate** to the rate for your store (for example, NYC or SF sales tax).
4. Click **Create Product Rule**.
Every product in those departments is now both age-restricted and taxed at the rate you chose.
#### Loyalty exclusion
By default, every product is eligible to earn loyalty points. Some stores choose to exclude loyalty from departments like tobacco or alcohol.
1. Create a new rule and name it (for example, "Loyalty excluded").
2. Set the **when** condition to the departments you want to exclude, such as **Western Union**, **Beer**, and **Wine & Liquor**.
3. In the **then** section, set **Earns loyalty points** to **No**.
4. Click **Create Product Rule**.
Every product in those departments is now excluded from earning loyalty points.
#### Discount restrictions
You can stop an entire department or sub-department from receiving discounts at the register, the same restrictions you can apply to a single item, set in bulk. This is useful for departments you never want discounted, like tobacco.
1. Create a new rule and name it (for example, "Tobacco no discounts").
2. Set the **when** condition to the departments you want to restrict, such as **Tobacco**.
3. In the **then** section, add the **Discount Restrictions** property and choose one or more restrictions:
* **Restrict Discounts on Promotions** — prevents double-discounting. When an item is already on promotion, cashiers cannot apply an additional discount at the POS.
* **Restrict POS Discounts** — blocks all discounts on the item at the POS.
* **Restrict Multiple POS Discounts** — allows one discount per item, but not two stacked together.
4. Click **Create Product Rule**.
Every product in those departments now carries the discount restrictions you chose.
These are the same restrictions you can set on a single item in the [product catalog](/product-and-product-catalog-management/product-creation-and-set-up/product-catalog-product-details) — a Product Rule applies them to a whole department at once. To see how they appear to cashiers, read [Manage discounts at the POS](/point-of-sale-pos/basic-cashier-functions/manage-discounts-at-the-pos#discount-restrictions-at-the-pos).
***
### How rules appear in the product catalog
Once a rule is live, you can see it on the individual products it affects. Open any product in the **[Product Catalog](https://app.vori.com/retail/products)** and look for a 🔒 **lock** icon next to an attribute.
A lock means the attribute is set by a Product Rule. For example, a bottle of liquor covered by the "Age Restriction + Tax" rule shows its age restriction locked at **21 & up**. Because the rule controls these values, you can't change them directly on the product.
**Hover over the lock** to see which rule is setting the attribute. To make an exception for a single product, select **Exclude product from this product rule**. The product keeps its current value but is no longer governed by the rule.
✏️ **Note:** The list uses dynamic product selection. Products you add or change later that match the conditions are included in the rule automatically.
⚠️ **Caution:** Product Rules apply in bulk and can affect thousands of products at once. Review the affected products list before saving, especially for tax rates, EBT, age restrictions, and target margins.
***
### Examples
#### Age restriction + tax
If all of your alcohol is both 21-and-up *and* taxable, you can set both properties in a single rule.
1. Create a new rule and name it (for example, "Age restriction + tax").
2. Set the **when** condition to your alcohol departments, such as **Beer** and **Wine & Liquor**. Add every relevant parent department and sub-department.
3. In the **then** section, add two properties: set **Age restriction** to **21 and up**, and set the **Tax rate** to the rate for your store (for example, NYC or SF sales tax).
4. Click **Create Product Rule**.
Every product in those departments is now both age-restricted and taxed at the rate you chose.
#### Loyalty exclusion
By default, every product is eligible to earn loyalty points. Some stores choose to exclude loyalty from departments like tobacco or alcohol.
1. Create a new rule and name it (for example, "Loyalty excluded").
2. Set the **when** condition to the departments you want to exclude, such as **Western Union**, **Beer**, and **Wine & Liquor**.
3. In the **then** section, set **Earns loyalty points** to **No**.
4. Click **Create Product Rule**.
Every product in those departments is now excluded from earning loyalty points.
#### Discount restrictions
You can stop an entire department or sub-department from receiving discounts at the register, the same restrictions you can apply to a single item, set in bulk. This is useful for departments you never want discounted, like tobacco.
1. Create a new rule and name it (for example, "Tobacco no discounts").
2. Set the **when** condition to the departments you want to restrict, such as **Tobacco**.
3. In the **then** section, add the **Discount Restrictions** property and choose one or more restrictions:
* **Restrict Discounts on Promotions** — prevents double-discounting. When an item is already on promotion, cashiers cannot apply an additional discount at the POS.
* **Restrict POS Discounts** — blocks all discounts on the item at the POS.
* **Restrict Multiple POS Discounts** — allows one discount per item, but not two stacked together.
4. Click **Create Product Rule**.
Every product in those departments now carries the discount restrictions you chose.
These are the same restrictions you can set on a single item in the [product catalog](/product-and-product-catalog-management/product-creation-and-set-up/product-catalog-product-details) — a Product Rule applies them to a whole department at once. To see how they appear to cashiers, read [Manage discounts at the POS](/point-of-sale-pos/basic-cashier-functions/manage-discounts-at-the-pos#discount-restrictions-at-the-pos).
***
### How rules appear in the product catalog
Once a rule is live, you can see it on the individual products it affects. Open any product in the **[Product Catalog](https://app.vori.com/retail/products)** and look for a 🔒 **lock** icon next to an attribute.
A lock means the attribute is set by a Product Rule. For example, a bottle of liquor covered by the "Age Restriction + Tax" rule shows its age restriction locked at **21 & up**. Because the rule controls these values, you can't change them directly on the product.
**Hover over the lock** to see which rule is setting the attribute. To make an exception for a single product, select **Exclude product from this product rule**. The product keeps its current value but is no longer governed by the rule.
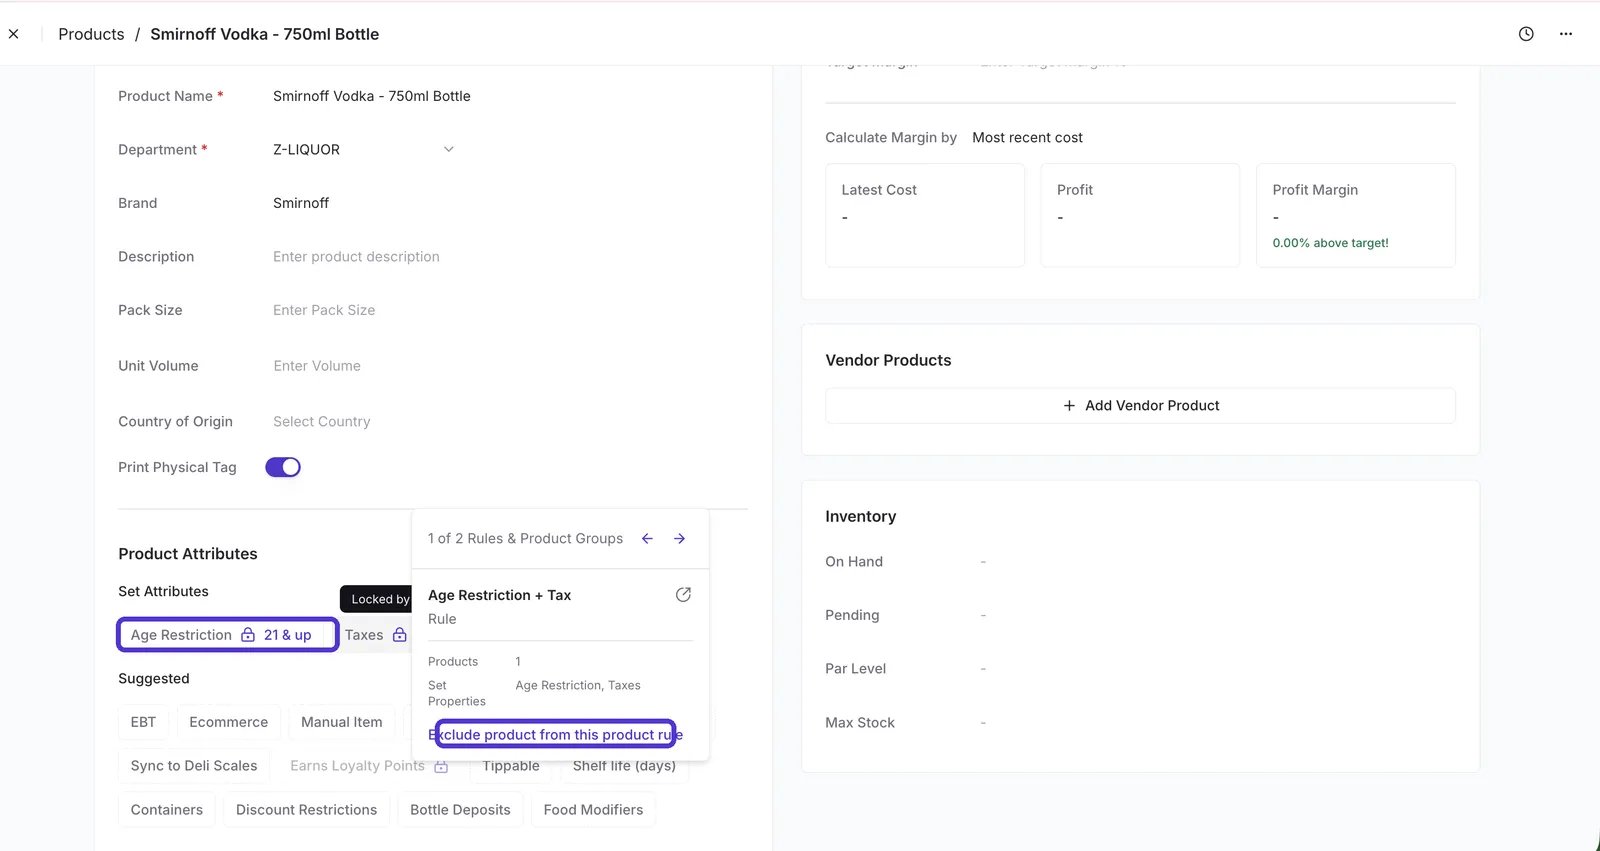 ✏️ **Note:** Product Rules take precedence over individual product settings, that's what the lock represents. To create an exception, either exclude the specific product from the rule or move those items into a separate department or sub-department with its own rule. Editing the value on the product itself won't override the rule.
***
### Frequently asked questions
**How are Product Rules different from department settings?** Product Rules are the new default and replace department-level inheritance. They do the same job, applying shared attributes to groups of products, but give you more ways to target items (multiple departments, *is*/*is not* conditions, priorities) and to combine several properties in one rule.
**What happens when a product matches two rules?** The rule with the lower priority number wins. Set your priorities deliberately when broad and narrow rules overlap.
**Can I turn a rule off without deleting it?** Yes. Set the rule's **Status** to **Inactive** to stop it from applying, and back to **Active** when you need it again.
**How do I make one product an exception to a rule?** Hover over the 🔒 lock on that attribute in the product catalog and select **Exclude from product rule**, or move the item into a separate department or sub-department with its own rule.
## Related topics
- [Create and Manage Product Groups](/product-and-product-catalog-management/product-creation-and-set-up/create-and-manage-product-groups.md)
- [Product History](/product-and-product-catalog-management/product-editing-and-activation/product-history.md)
- [Set Up Departments](/departments/set-up-departments.md)
✏️ **Note:** Product Rules take precedence over individual product settings, that's what the lock represents. To create an exception, either exclude the specific product from the rule or move those items into a separate department or sub-department with its own rule. Editing the value on the product itself won't override the rule.
***
### Frequently asked questions
**How are Product Rules different from department settings?** Product Rules are the new default and replace department-level inheritance. They do the same job, applying shared attributes to groups of products, but give you more ways to target items (multiple departments, *is*/*is not* conditions, priorities) and to combine several properties in one rule.
**What happens when a product matches two rules?** The rule with the lower priority number wins. Set your priorities deliberately when broad and narrow rules overlap.
**Can I turn a rule off without deleting it?** Yes. Set the rule's **Status** to **Inactive** to stop it from applying, and back to **Active** when you need it again.
**How do I make one product an exception to a rule?** Hover over the 🔒 lock on that attribute in the product catalog and select **Exclude from product rule**, or move the item into a separate department or sub-department with its own rule.
## Related topics
- [Create and Manage Product Groups](/product-and-product-catalog-management/product-creation-and-set-up/create-and-manage-product-groups.md)
- [Product History](/product-and-product-catalog-management/product-editing-and-activation/product-history.md)
- [Set Up Departments](/departments/set-up-departments.md)