> ## Documentation Index
> Fetch the complete documentation index at: https://help.vori.com/llms.txt
> Use this file to discover all available pages before exploring further.
# Create Quick Actions in Back Office
> Learn how to create and edit your store's Quick Actions (Hot Keys) from the Back Office.
Quick Actions — also called Hot Keys — are the shortcut buttons on your POS home screen. From the Back Office, you can create individual actions, group them into a Lane Template, and assign that template to any lane in your store. This is also where you control the button order that cashiers see on the register screen.
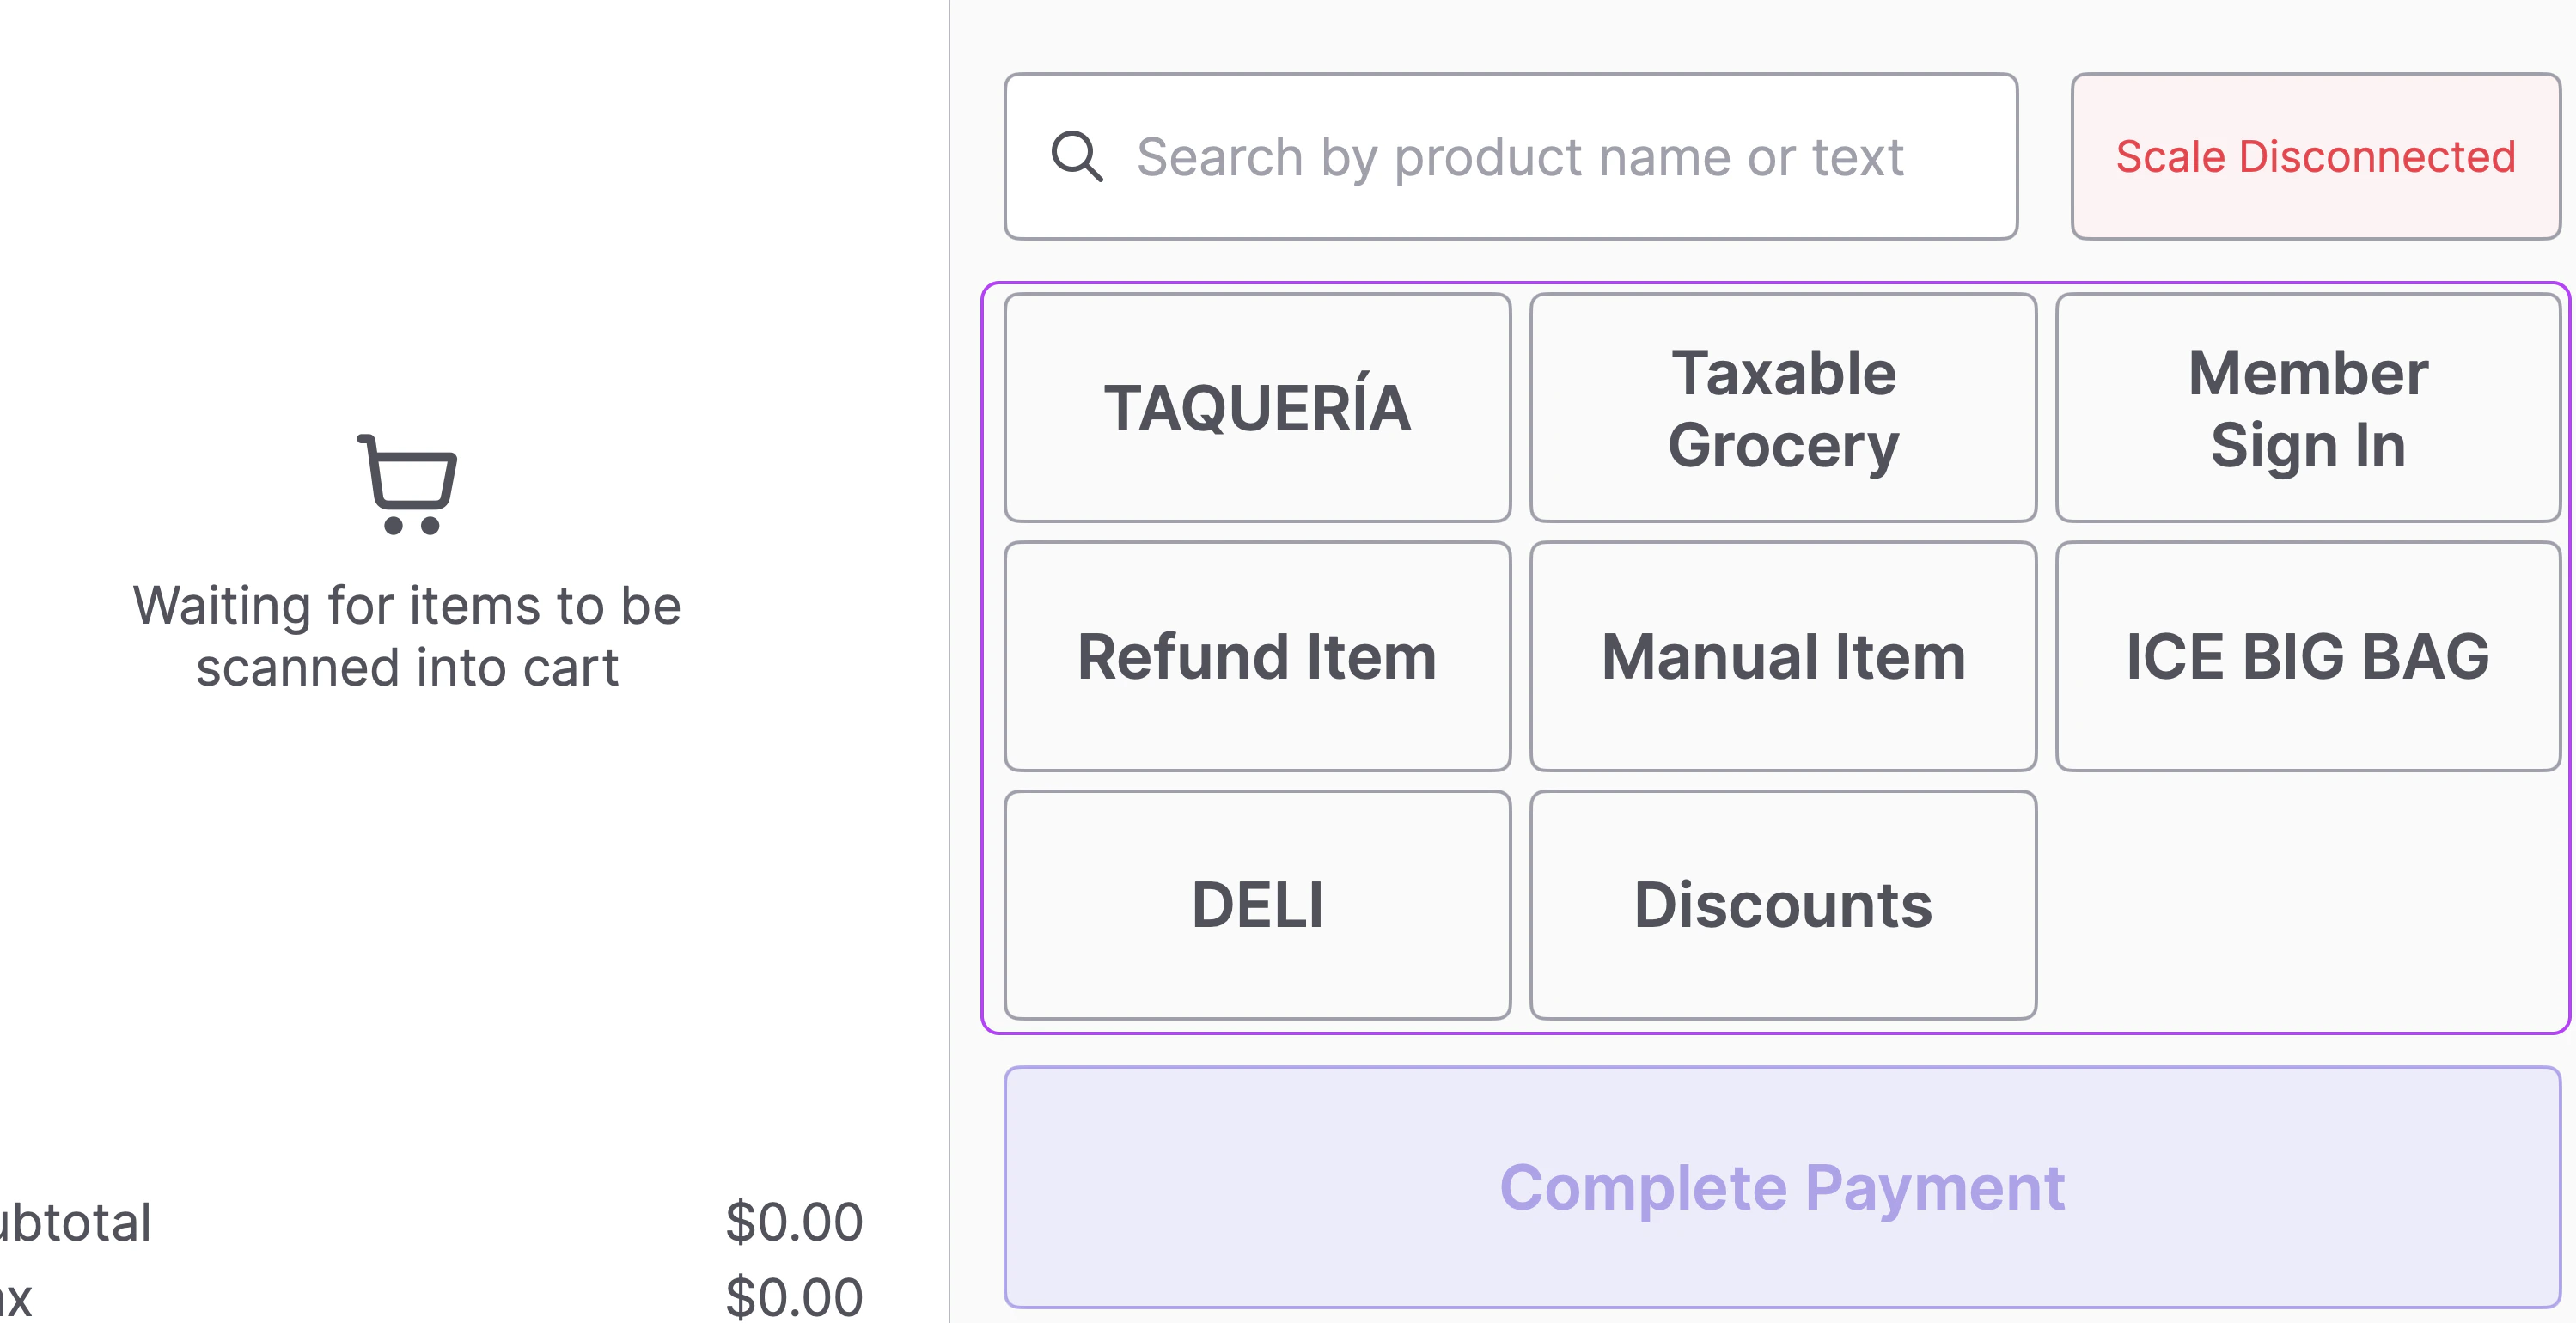 For a deeper look at how Quick Actions work on the POS — including manual items, nested department menus, and how to troubleshoot missing buttons — see [Customize Your POS With Quick Action Buttons and Manual Items](/point-of-sale-pos/pos-customization-and-setup/customize-your-pos-with-quick-action-buttons-and-manual-items).
### Open POS Quick Actions
In the Back Office left navigation, expand **Point of Sale** and select **POS Quick Actions**.
You'll land on the **Actions** tab, which lists every action currently in your store. Use the **Templates** tab to manage saved layouts, and the **Lanes** tab to see what template is assigned where.
### Create a new action
For a deeper look at how Quick Actions work on the POS — including manual items, nested department menus, and how to troubleshoot missing buttons — see [Customize Your POS With Quick Action Buttons and Manual Items](/point-of-sale-pos/pos-customization-and-setup/customize-your-pos-with-quick-action-buttons-and-manual-items).
### Open POS Quick Actions
In the Back Office left navigation, expand **Point of Sale** and select **POS Quick Actions**.
You'll land on the **Actions** tab, which lists every action currently in your store. Use the **Templates** tab to manage saved layouts, and the **Lanes** tab to see what template is assigned where.
### Create a new action
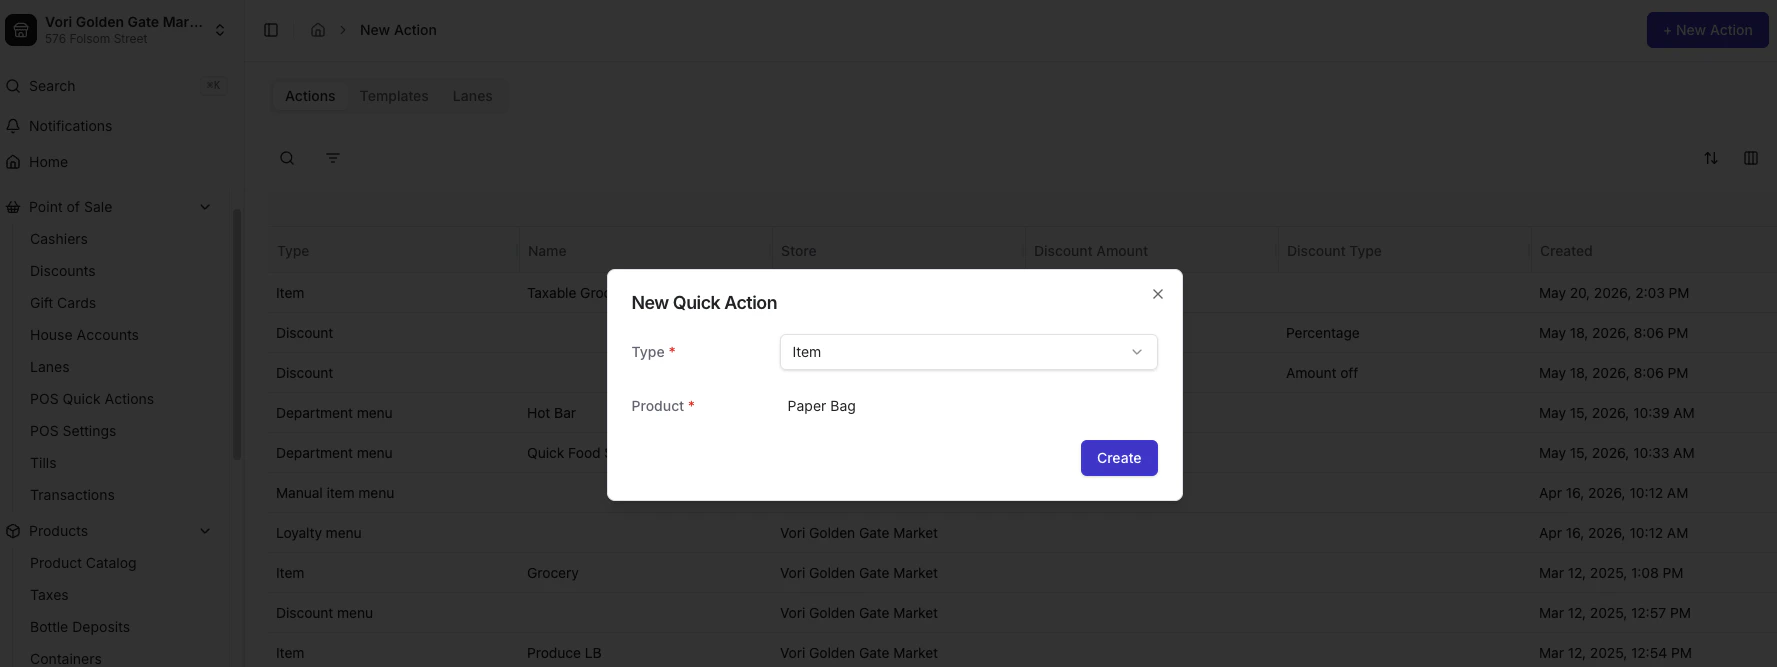 1. Select **+ New Action**.
2. Open the **Type** dropdown and choose what this action should do. Options include:
| Type | Description | Example and use case |
| ------------------------ | ------------------------------------------- | ------------------------------------------------------------------------------------------------------------------------------------------------------------------------------------------------------------------------------------------------------------------------------------------------------------------------ |
| **Item** | Sell a specific product. | Ring up a high-volume item with one tap (e.g., Bag Fee, 24 PK Water). |
| **Bottle deposit** | Apply a bottle deposit to the current item. | Add a deposit on the fly when it isn't configured on the item in Back Office (e.g., \$0.05 CRV). |
| **Refund item** | Refund the current item. | Refund an item when the shopper doesn't have a receipt (e.g., a damaged \$5.99 bakery item). |
| **Bottle refund** | Process a bottle deposit return. | Process a bottle return with one tap (e.g., refund a \$2.00 glass milk bottle deposit). See [Issuing a bottle refund using the Quick Action button](/bottle-deposits-tares-and-taxes/process-a-bottle-deposit-refund-at-the-pos#issuing-a-bottle-refund-using-the-quick-action-button). |
| **Discount** | Apply a fixed discount. | Apply a preset discount without opening the discount menu (e.g., 10% First Responder Discount). |
| **Discount menu** | Open the discount picker. | Browse and apply any custom or manual discount from one menu (e.g., Senior 5%, Employee 10%). |
| **Department menu** | Open a department-specific menu. | Ring up items from a specific department, including its sub-departments (e.g., a Coffee Bar department with nested sub-departments). See [Set up your Quick Food Service departments](/whats-new-in-vori/in-alpha-quick-food-service/setting-up-quick-food-service-counters#set-up-your-quick-food-service-departments). |
| **Loyalty menu** | Open the loyalty flow. | Member sign-in. Sign in Loyalty members and view their rewards at the register. |
| **Manual item menu** | Open the manual item entry screen. | Ring up catch-all items that don't have a barcode or can't be scanned (e.g., Open Produce, Open Deli). |
| **Variable weight menu** | Open the weighed-item entry screen. | Give cashiers a fast way to select a tare weight for bulk items (e.g., a Tare (containers) menu). |
3. Fill in any required fields for the type you selected. For an **Item** action, search for and select the product.
4. Select **Create**.
### Build a lane template
A Lane Template is a saved layout of Quick Actions you can apply to one or more lanes — for example, a *Default* grocery layout or a *Coffee Bar* layout.
1. Select **+ New Action**.
2. Open the **Type** dropdown and choose what this action should do. Options include:
| Type | Description | Example and use case |
| ------------------------ | ------------------------------------------- | ------------------------------------------------------------------------------------------------------------------------------------------------------------------------------------------------------------------------------------------------------------------------------------------------------------------------ |
| **Item** | Sell a specific product. | Ring up a high-volume item with one tap (e.g., Bag Fee, 24 PK Water). |
| **Bottle deposit** | Apply a bottle deposit to the current item. | Add a deposit on the fly when it isn't configured on the item in Back Office (e.g., \$0.05 CRV). |
| **Refund item** | Refund the current item. | Refund an item when the shopper doesn't have a receipt (e.g., a damaged \$5.99 bakery item). |
| **Bottle refund** | Process a bottle deposit return. | Process a bottle return with one tap (e.g., refund a \$2.00 glass milk bottle deposit). See [Issuing a bottle refund using the Quick Action button](/bottle-deposits-tares-and-taxes/process-a-bottle-deposit-refund-at-the-pos#issuing-a-bottle-refund-using-the-quick-action-button). |
| **Discount** | Apply a fixed discount. | Apply a preset discount without opening the discount menu (e.g., 10% First Responder Discount). |
| **Discount menu** | Open the discount picker. | Browse and apply any custom or manual discount from one menu (e.g., Senior 5%, Employee 10%). |
| **Department menu** | Open a department-specific menu. | Ring up items from a specific department, including its sub-departments (e.g., a Coffee Bar department with nested sub-departments). See [Set up your Quick Food Service departments](/whats-new-in-vori/in-alpha-quick-food-service/setting-up-quick-food-service-counters#set-up-your-quick-food-service-departments). |
| **Loyalty menu** | Open the loyalty flow. | Member sign-in. Sign in Loyalty members and view their rewards at the register. |
| **Manual item menu** | Open the manual item entry screen. | Ring up catch-all items that don't have a barcode or can't be scanned (e.g., Open Produce, Open Deli). |
| **Variable weight menu** | Open the weighed-item entry screen. | Give cashiers a fast way to select a tare weight for bulk items (e.g., a Tare (containers) menu). |
3. Fill in any required fields for the type you selected. For an **Item** action, search for and select the product.
4. Select **Create**.
### Build a lane template
A Lane Template is a saved layout of Quick Actions you can apply to one or more lanes — for example, a *Default* grocery layout or a *Coffee Bar* layout.
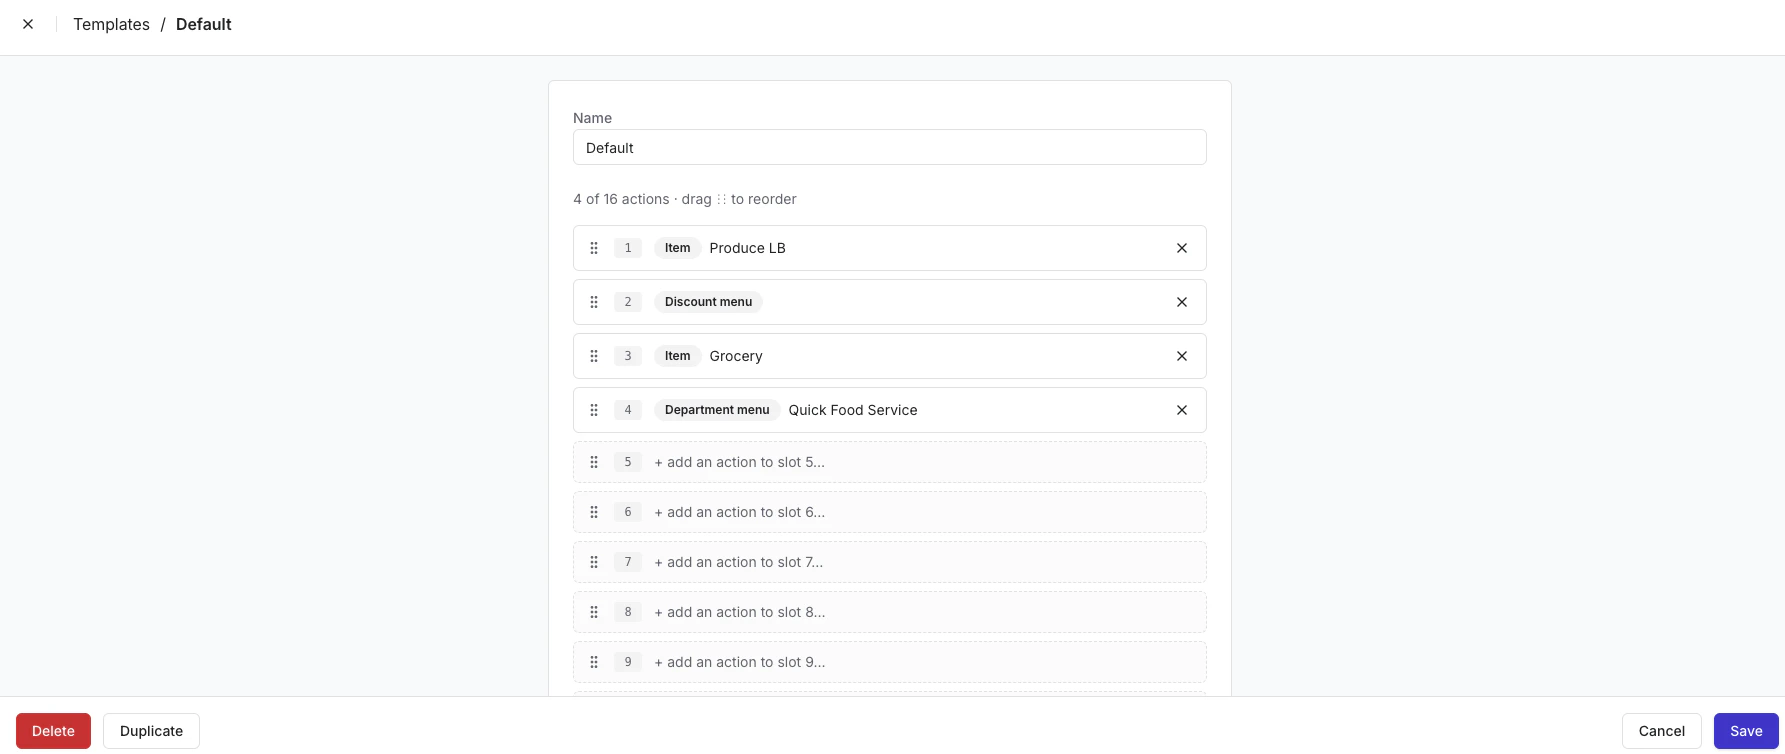 1. Select the **Templates** tab, then **+ New Template**.
2. Enter a **Template Name** (for example, *Default* or *Coffee Bar*).
3. Select the Quick Actions you want to include.
4. Drag each button into the order you want it to appear at the POS.
* To remove a button, tap the **X** on it.
5. Tap **Save**.
### Assign a template to a lane
1. Select the **Templates** tab, then **+ New Template**.
2. Enter a **Template Name** (for example, *Default* or *Coffee Bar*).
3. Select the Quick Actions you want to include.
4. Drag each button into the order you want it to appear at the POS.
* To remove a button, tap the **X** on it.
5. Tap **Save**.
### Assign a template to a lane
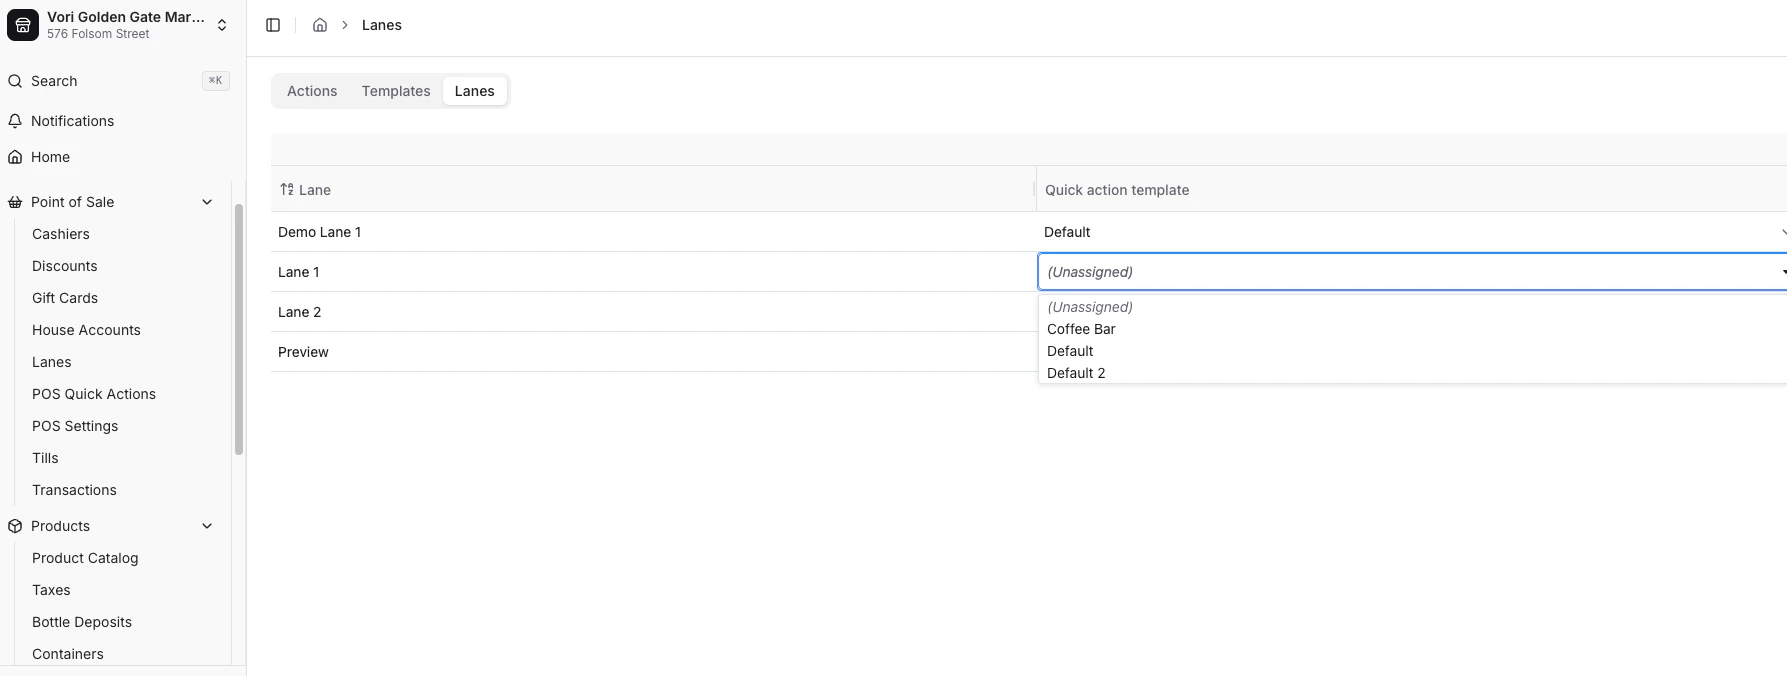 1. Select the **Lanes** tab.
2. Open the lane you want to update.
3. Under **Quick Action template**, select the Lane Template you built in the previous tab.
4. The lane auto-saves. A confirmation appears in the bottom-right corner.
### Additional notes
* Each template can hold up to 16 Quick Actions.
* For new stores, you can assign a Lane Template up to 3 days before install.
1. Select the **Lanes** tab.
2. Open the lane you want to update.
3. Under **Quick Action template**, select the Lane Template you built in the previous tab.
4. The lane auto-saves. A confirmation appears in the bottom-right corner.
### Additional notes
* Each template can hold up to 16 Quick Actions.
* For new stores, you can assign a Lane Template up to 3 days before install.