> ## Documentation Index
> Fetch the complete documentation index at: https://help.vori.com/llms.txt
> Use this file to discover all available pages before exploring further.
# How to Cash a Check for a Shopper
> Learn how to cash a check for a shopper and perform a payout to keep your cash drawer balanced.
### **How to Process a Check Cashing Transaction**
Cashing a check involves two essential stages that must be completed together:
1. **The Sales Transaction:** You will ring up the transaction to account for the service fee and accept the check as payment.
2. **The Pay Out:** You will then perform a pay out to balance the cash drawer, accounting for the cash you gave to the shopper.
Following both stages ensures your drawer is accurate at the end of the day.
***
### **Scenario A: Check Cashing Service**
This scenario is for when the shopper's only intent is to cash a check and you (cashier) charge a fee for the service.
#### Part 1: Process the Check Cashing Transaction
In this stage, you treat the check as a form of payment for the cash you are providing.
**Example:** A shopper wants to cash a $100 check, and your service fee is $5. You will give the shopper **\$95 in cash.**
1. From the main screen, select the **Check Cashing** button.
2. You first need to add the cash amount you'll be giving the shopper to the cart. Enter the value of the check **minus** the service fee.
* *Using the example, you would enter \$95.*
3. Click **Add Custom Item**. The amount will now appear in the cart.
4. Next, select the **Check Cashing Fee** button to add your service fee to the cart.
5. Select **Complete Payment**.
6. Choose **Other** as the payment type.
7. On the final payment screen, select the **Check** tender type to finalize the transaction.
8. The cash drawer will open. Give the shopper **their cash** (\$95 in our example) and place the physical check into the drawer. Click **Continue Transaction**.
9. The payment is complete. Select **Print Receipt** or **No Receipt** to finish.
#### Part 2: Balance the Drawer with a Pay Out
Immediately after the transaction, you must perform a pay out. This step logs the cash that has left the drawer, ensuring your till will balance correctly.
⚠️ **Caution:** Do not skip this stage. If you do not perform a pay out, your cash drawer will be incorrect.
1. From the main screen, select the **Checkout** menu at the bottom.
2. Choose **Payin & Payout** from the options.
3. You are now in Payin & Payout mode. Select the **Pay Out** button.
4. Enter the exact amount of cash you gave to the shopper (the check's face value minus the fee).
* *Using our example, you would enter \$95.*
5. Click **Next**.
6. For the reason, select **Vendor**. Search for and select your store's designated vendor for this process (e.g., *Check Cashing Services, Check Case - Check Fee*).
7. Click **Confirm Pay Out**.
8. A confirmation that the cash drawer has opened will appear. Click **Continue**.
9. The pay out is complete. Select a receipt option and then click **Exit Mode** to return to the main sales screen.
***
### **Scenario B: Overpayment by Check *(Check used to pay for a purchase)***
This scenario is for when a shopper uses a check to pay for a regular purchase, and the check amount is greater than the purchase total, requiring you to give them cash back (change). **The system automatically handles the cash return, so no separate Pay Out is needed.**
1. **Ring Up the Items:** Scan or manually enter all items the shopper is purchasing.
2. **Go to Payment:** Select the **Complete Payment** button.
3. **Select Payment Type:** Choose **Other** from the top row of payment options.
4. **Select Check Tender:** On the "Select Other Payment Method" screen, select the **Check** button.
5. **Enter Check Amount:** Input the specific amount of the check the shopper has provided.
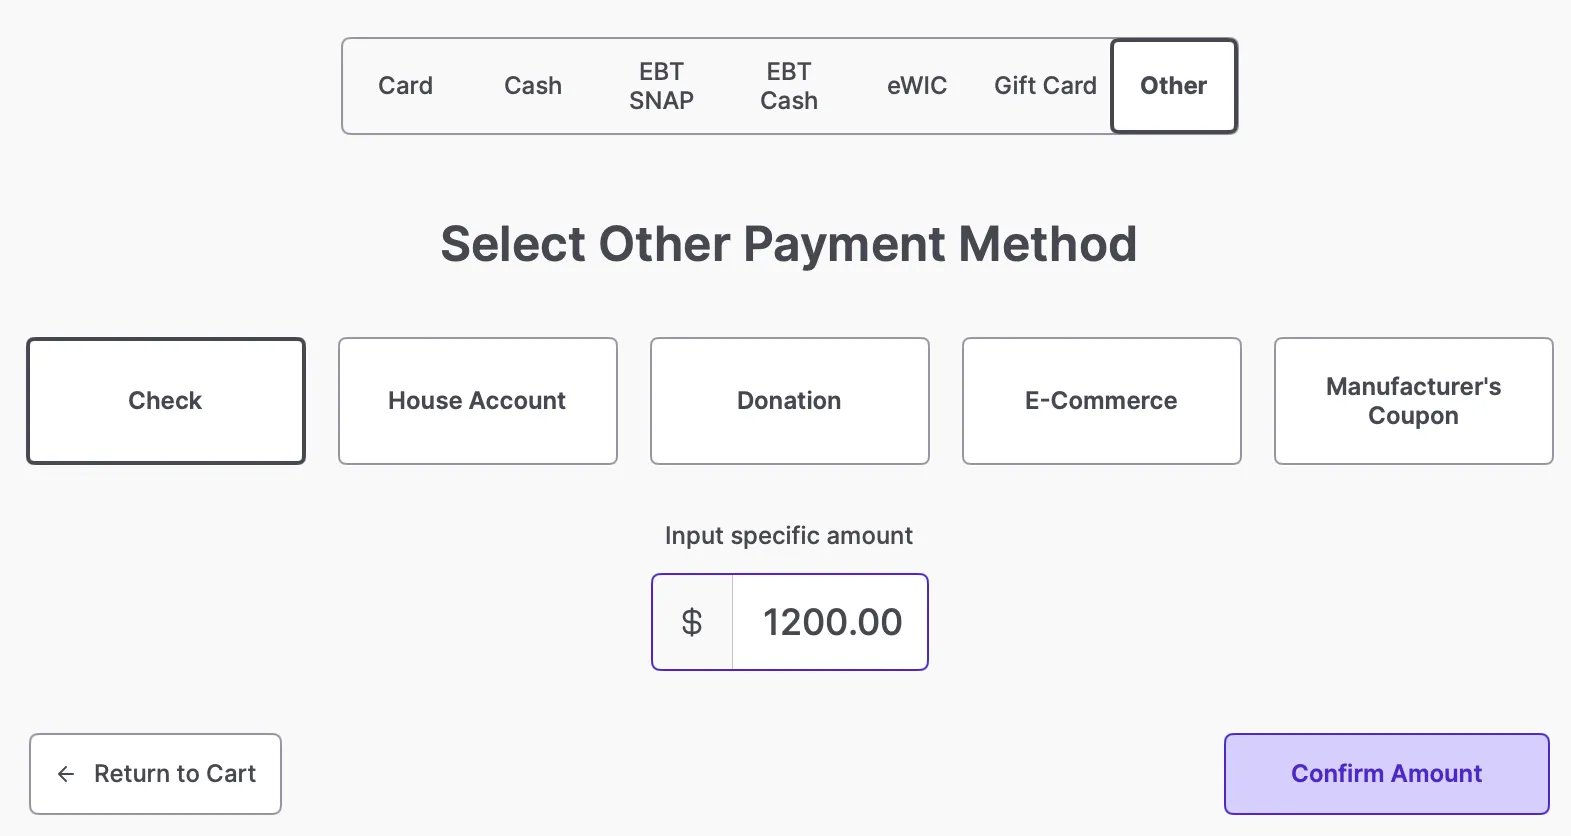 6. **Confirm Amount:** Click **Confirm Amount**.
7. **Verify Cash Return:** A "Cash Drawer Opened" pop-up will appear, showing: **Total Due,** **Check Amount,** \*\*Return Amount
6. **Confirm Amount:** Click **Confirm Amount**.
7. **Verify Cash Return:** A "Cash Drawer Opened" pop-up will appear, showing: **Total Due,** **Check Amount,** \*\*Return Amount
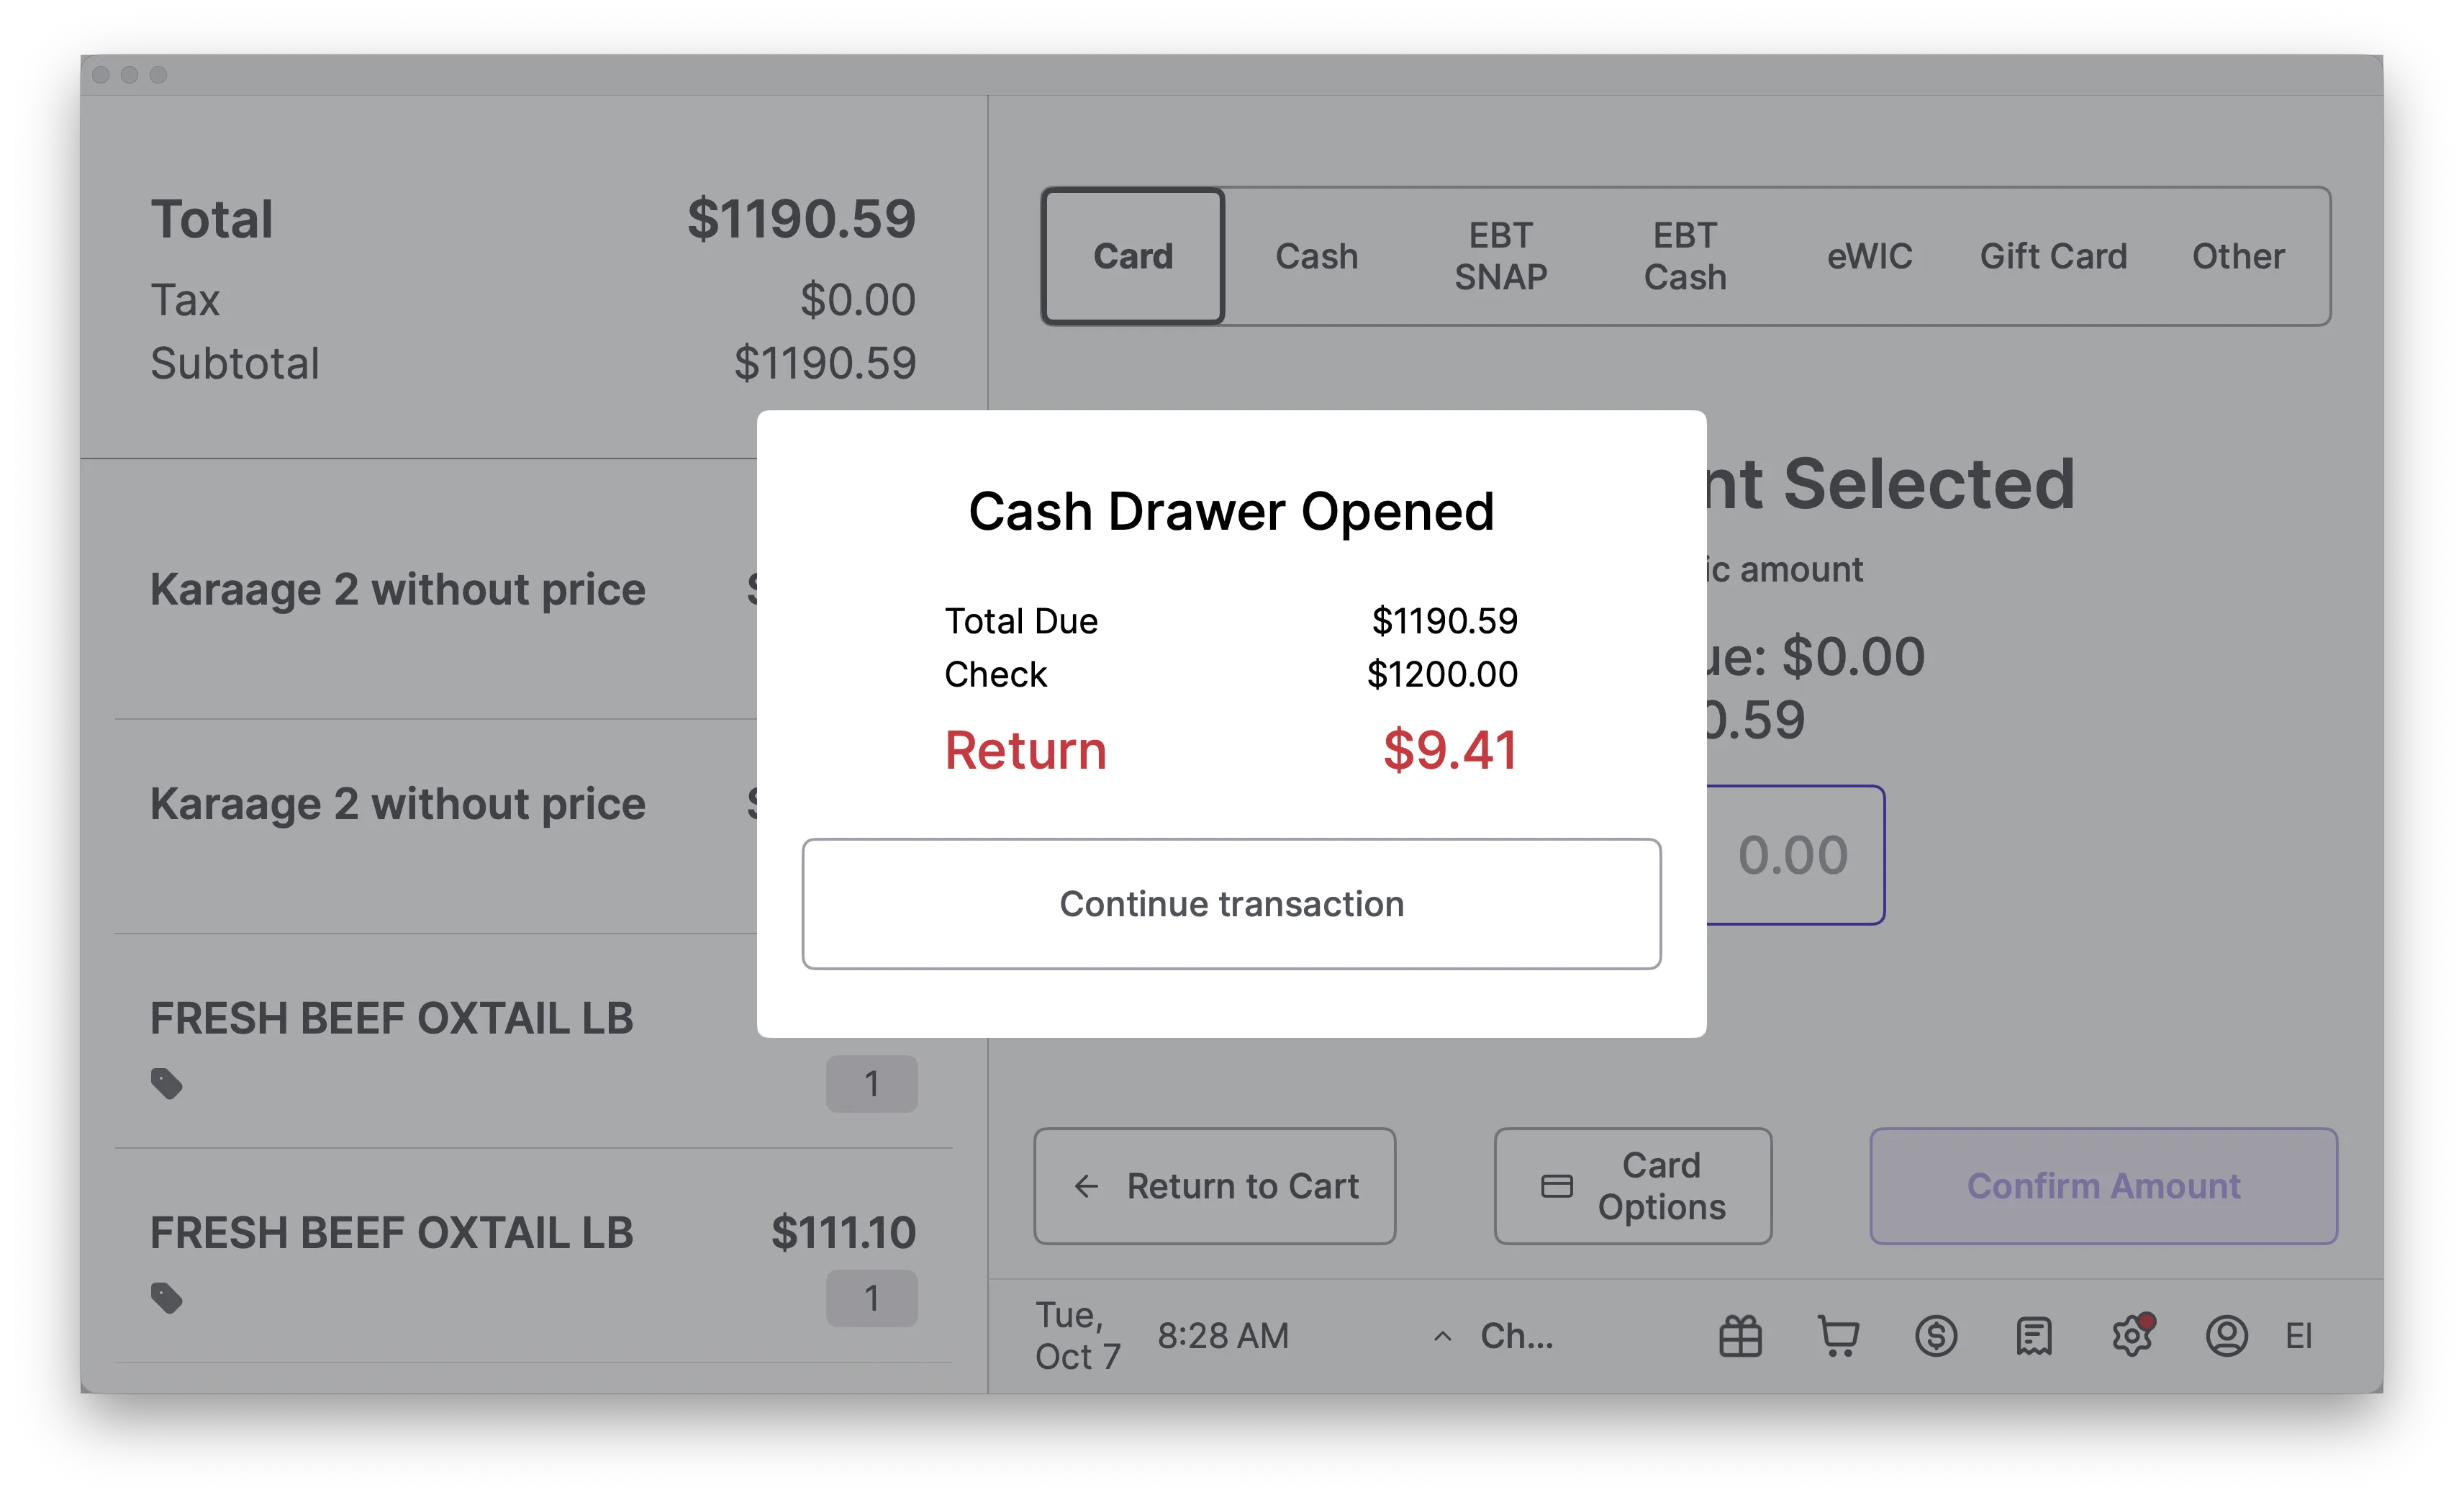 \*\*
8. **Complete Transaction:** Give the shopper their cash return (change) and place the physical check in the drawer. Click **Continue Transaction**.
9. **Finalize:** Select a receipt option (**Print** or **No Receipt**) to finish the sale and return to the main sales screen.
💡 **Note:** The system logs the overpayment and return amount automatically. Since the cash returned is treated as "change" in the sale, **a separate Pay Out is not required** to balance your cash drawer.
## Related topics
- [How cashiers and customers can use Shopper Actions](/point-of-sale-pos/basic-cashier-functions/how-cashiers-and-customers-can-use-shopper-actions.md)
- [Troubleshoot Shopper Display Communication Issues](/hardware-and-integrations/cashier-screen-and-shopper-display/troubleshoot-shopper-display-communication-issues.md)
- [Redeem Campaign Coupons on the POS](/point-of-sale-pos/basic-cashier-functions/redeem-campaign-coupons-on-the-pos.md)
\*\*
8. **Complete Transaction:** Give the shopper their cash return (change) and place the physical check in the drawer. Click **Continue Transaction**.
9. **Finalize:** Select a receipt option (**Print** or **No Receipt**) to finish the sale and return to the main sales screen.
💡 **Note:** The system logs the overpayment and return amount automatically. Since the cash returned is treated as "change" in the sale, **a separate Pay Out is not required** to balance your cash drawer.
## Related topics
- [How cashiers and customers can use Shopper Actions](/point-of-sale-pos/basic-cashier-functions/how-cashiers-and-customers-can-use-shopper-actions.md)
- [Troubleshoot Shopper Display Communication Issues](/hardware-and-integrations/cashier-screen-and-shopper-display/troubleshoot-shopper-display-communication-issues.md)
- [Redeem Campaign Coupons on the POS](/point-of-sale-pos/basic-cashier-functions/redeem-campaign-coupons-on-the-pos.md)