> ## Documentation Index
> Fetch the complete documentation index at: https://help.vori.com/llms.txt
> Use this file to discover all available pages before exploring further.
# Using the POS as a Cashier
> Learn how to navigate and use the POS as a cashier to complete daily tasks.
### Introduction
Get familiar with the cashier-facing POS to handle transactions quickly, apply discounts, and manage orders.
Each section below includes a short video and an overview of key actions you’ll take on the POS.
***
### POS Overview Video
***
### ✍️ Logging In
Each cashier or manager uses their own unique 6-digit PIN to access the POS.
**💡 Tip:** *Need to add new cashiers?* Check out the [**Set Up Cashiers in the Back Office tutorial**](/cashier-and-till-management/pos-user-access/set-up-cashiers-and-managers).
**✏️ Note:** For detailed steps on logging into the POS, view the full **[POS Login guide](/cashier-and-till-management/pos-user-access/manage-pos-logins-tills-timeouts-and-manual-updates#log-in-to-vori-pos)**.
***
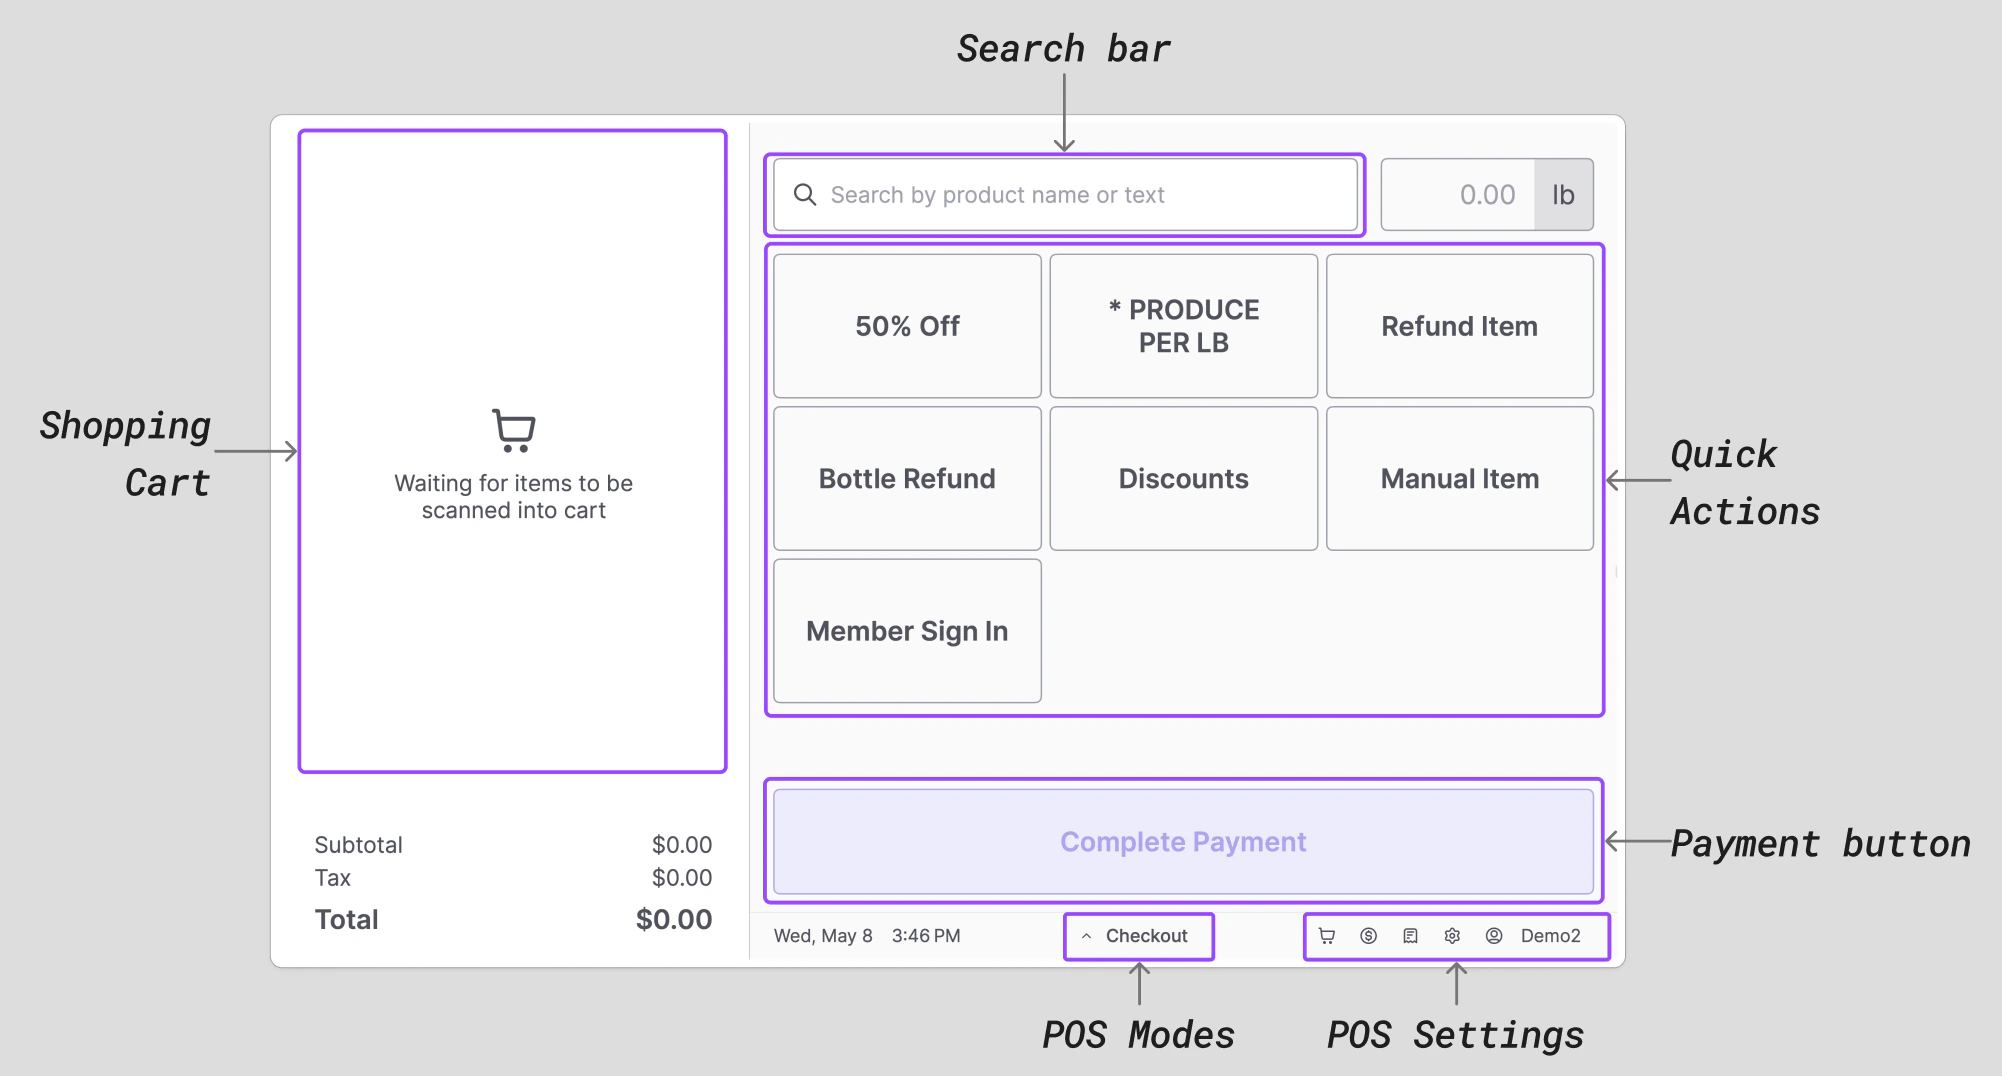
### 🏠 Home Screen
This is the default screen where cashiers can:
* Add items to a transaction.
* Apply discounts.
* Start or resume transactions.
 ***
### 💳 Payment Screen
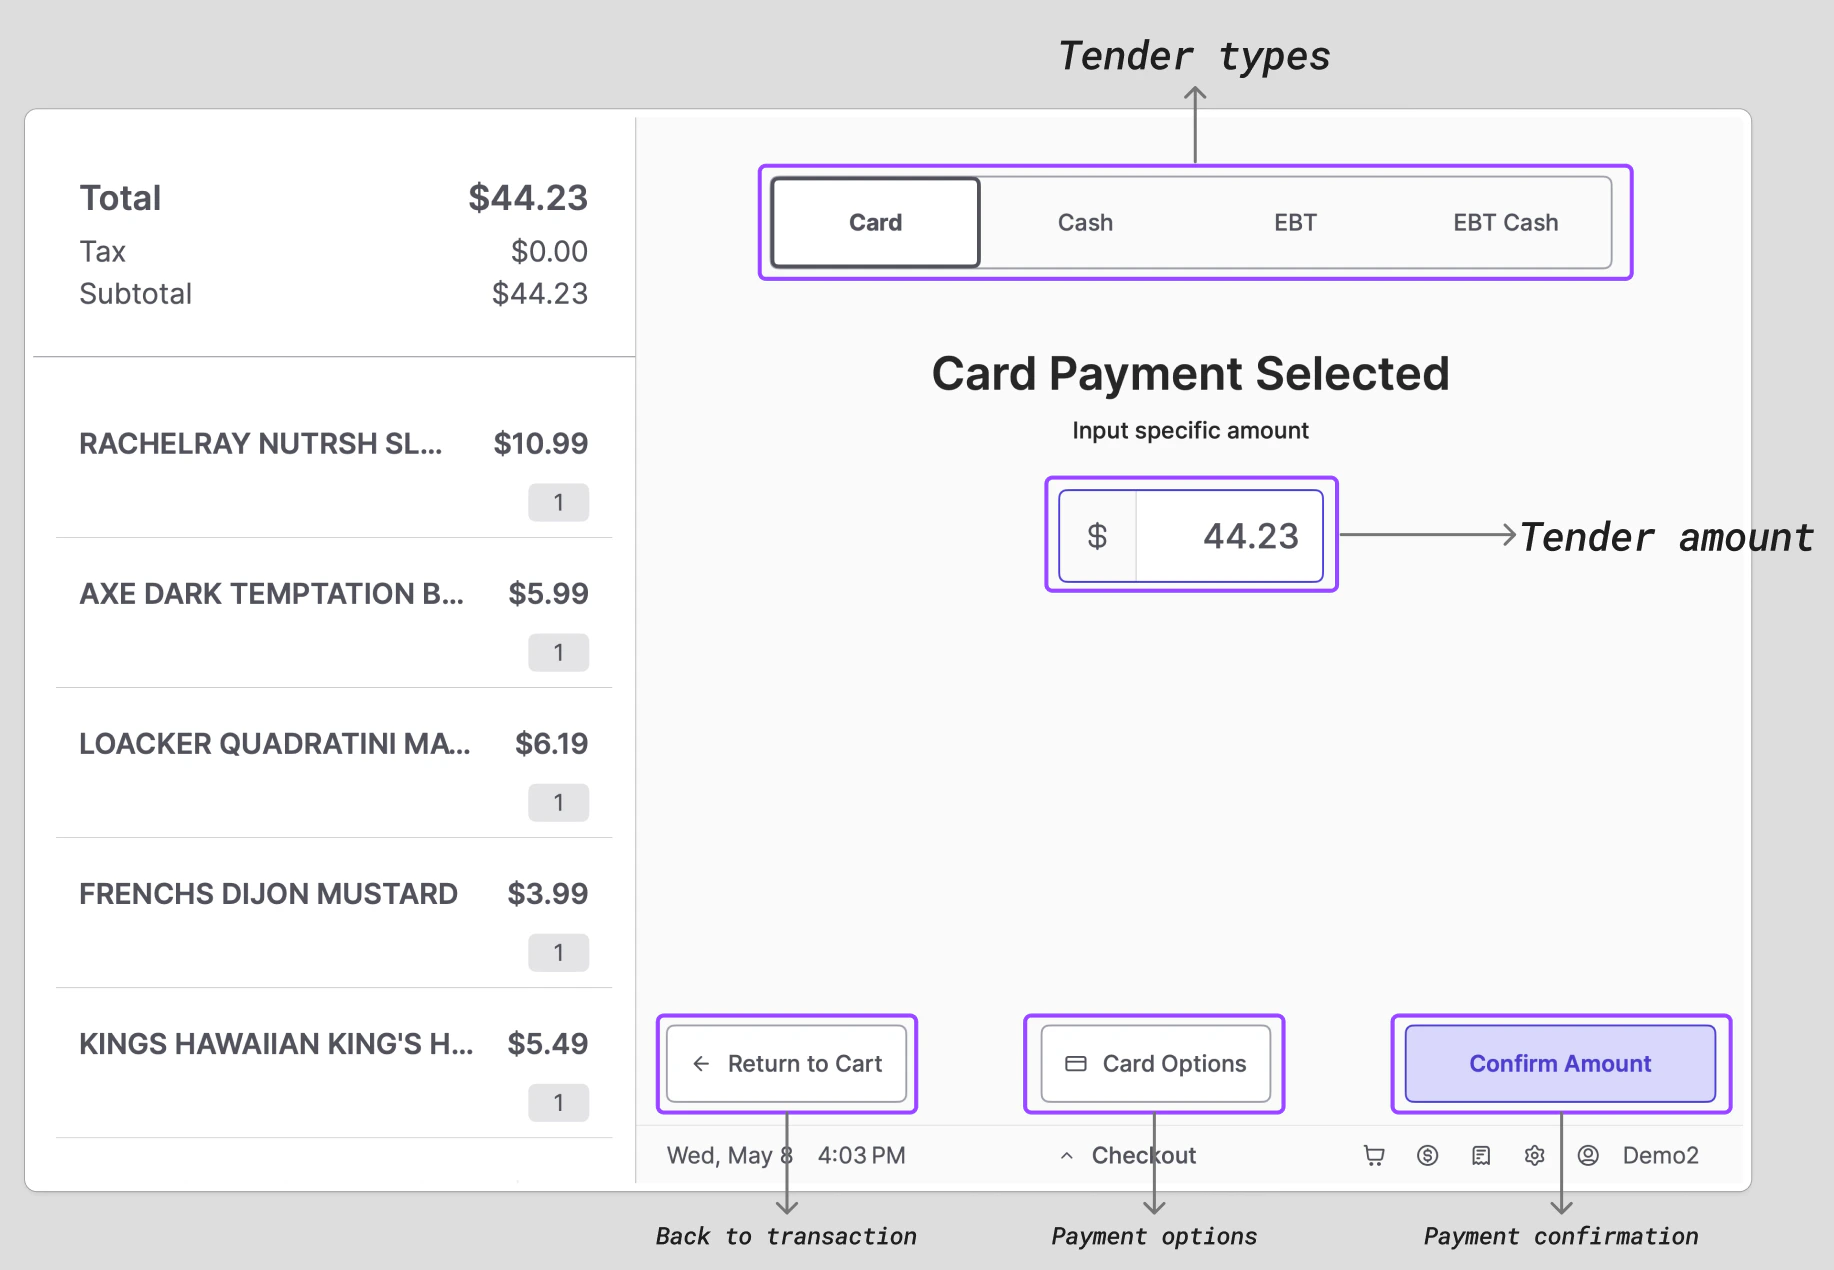
The **Pay** screen guides you through completing a transaction. By default, you'll see **Card** as the payment method, but cashiers can always choose a different option, like **Cash** or **EBT**.
#### How to Process an EBT Payment
When a shopper pays with EBT, the POS automatically identifies eligible items and helps you split the payment.
1. After adding all items to the basket, select **Complete Payment**.
2. Select **EBT SNAP** from the payment options.
3. The system will display the total amount eligible for EBT and mark each eligible item in the cart with a purple **"S" icon**.
1. The purple "S" icon only appears on this payment screen after you select EBT SNAP/CASH. You will not see which items are eligible from the main cart screen.
***
### 💳 Payment Screen
The **Pay** screen guides you through completing a transaction. By default, you'll see **Card** as the payment method, but cashiers can always choose a different option, like **Cash** or **EBT**.
#### How to Process an EBT Payment
When a shopper pays with EBT, the POS automatically identifies eligible items and helps you split the payment.
1. After adding all items to the basket, select **Complete Payment**.
2. Select **EBT SNAP** from the payment options.
3. The system will display the total amount eligible for EBT and mark each eligible item in the cart with a purple **"S" icon**.
1. The purple "S" icon only appears on this payment screen after you select EBT SNAP/CASH. You will not see which items are eligible from the main cart screen.
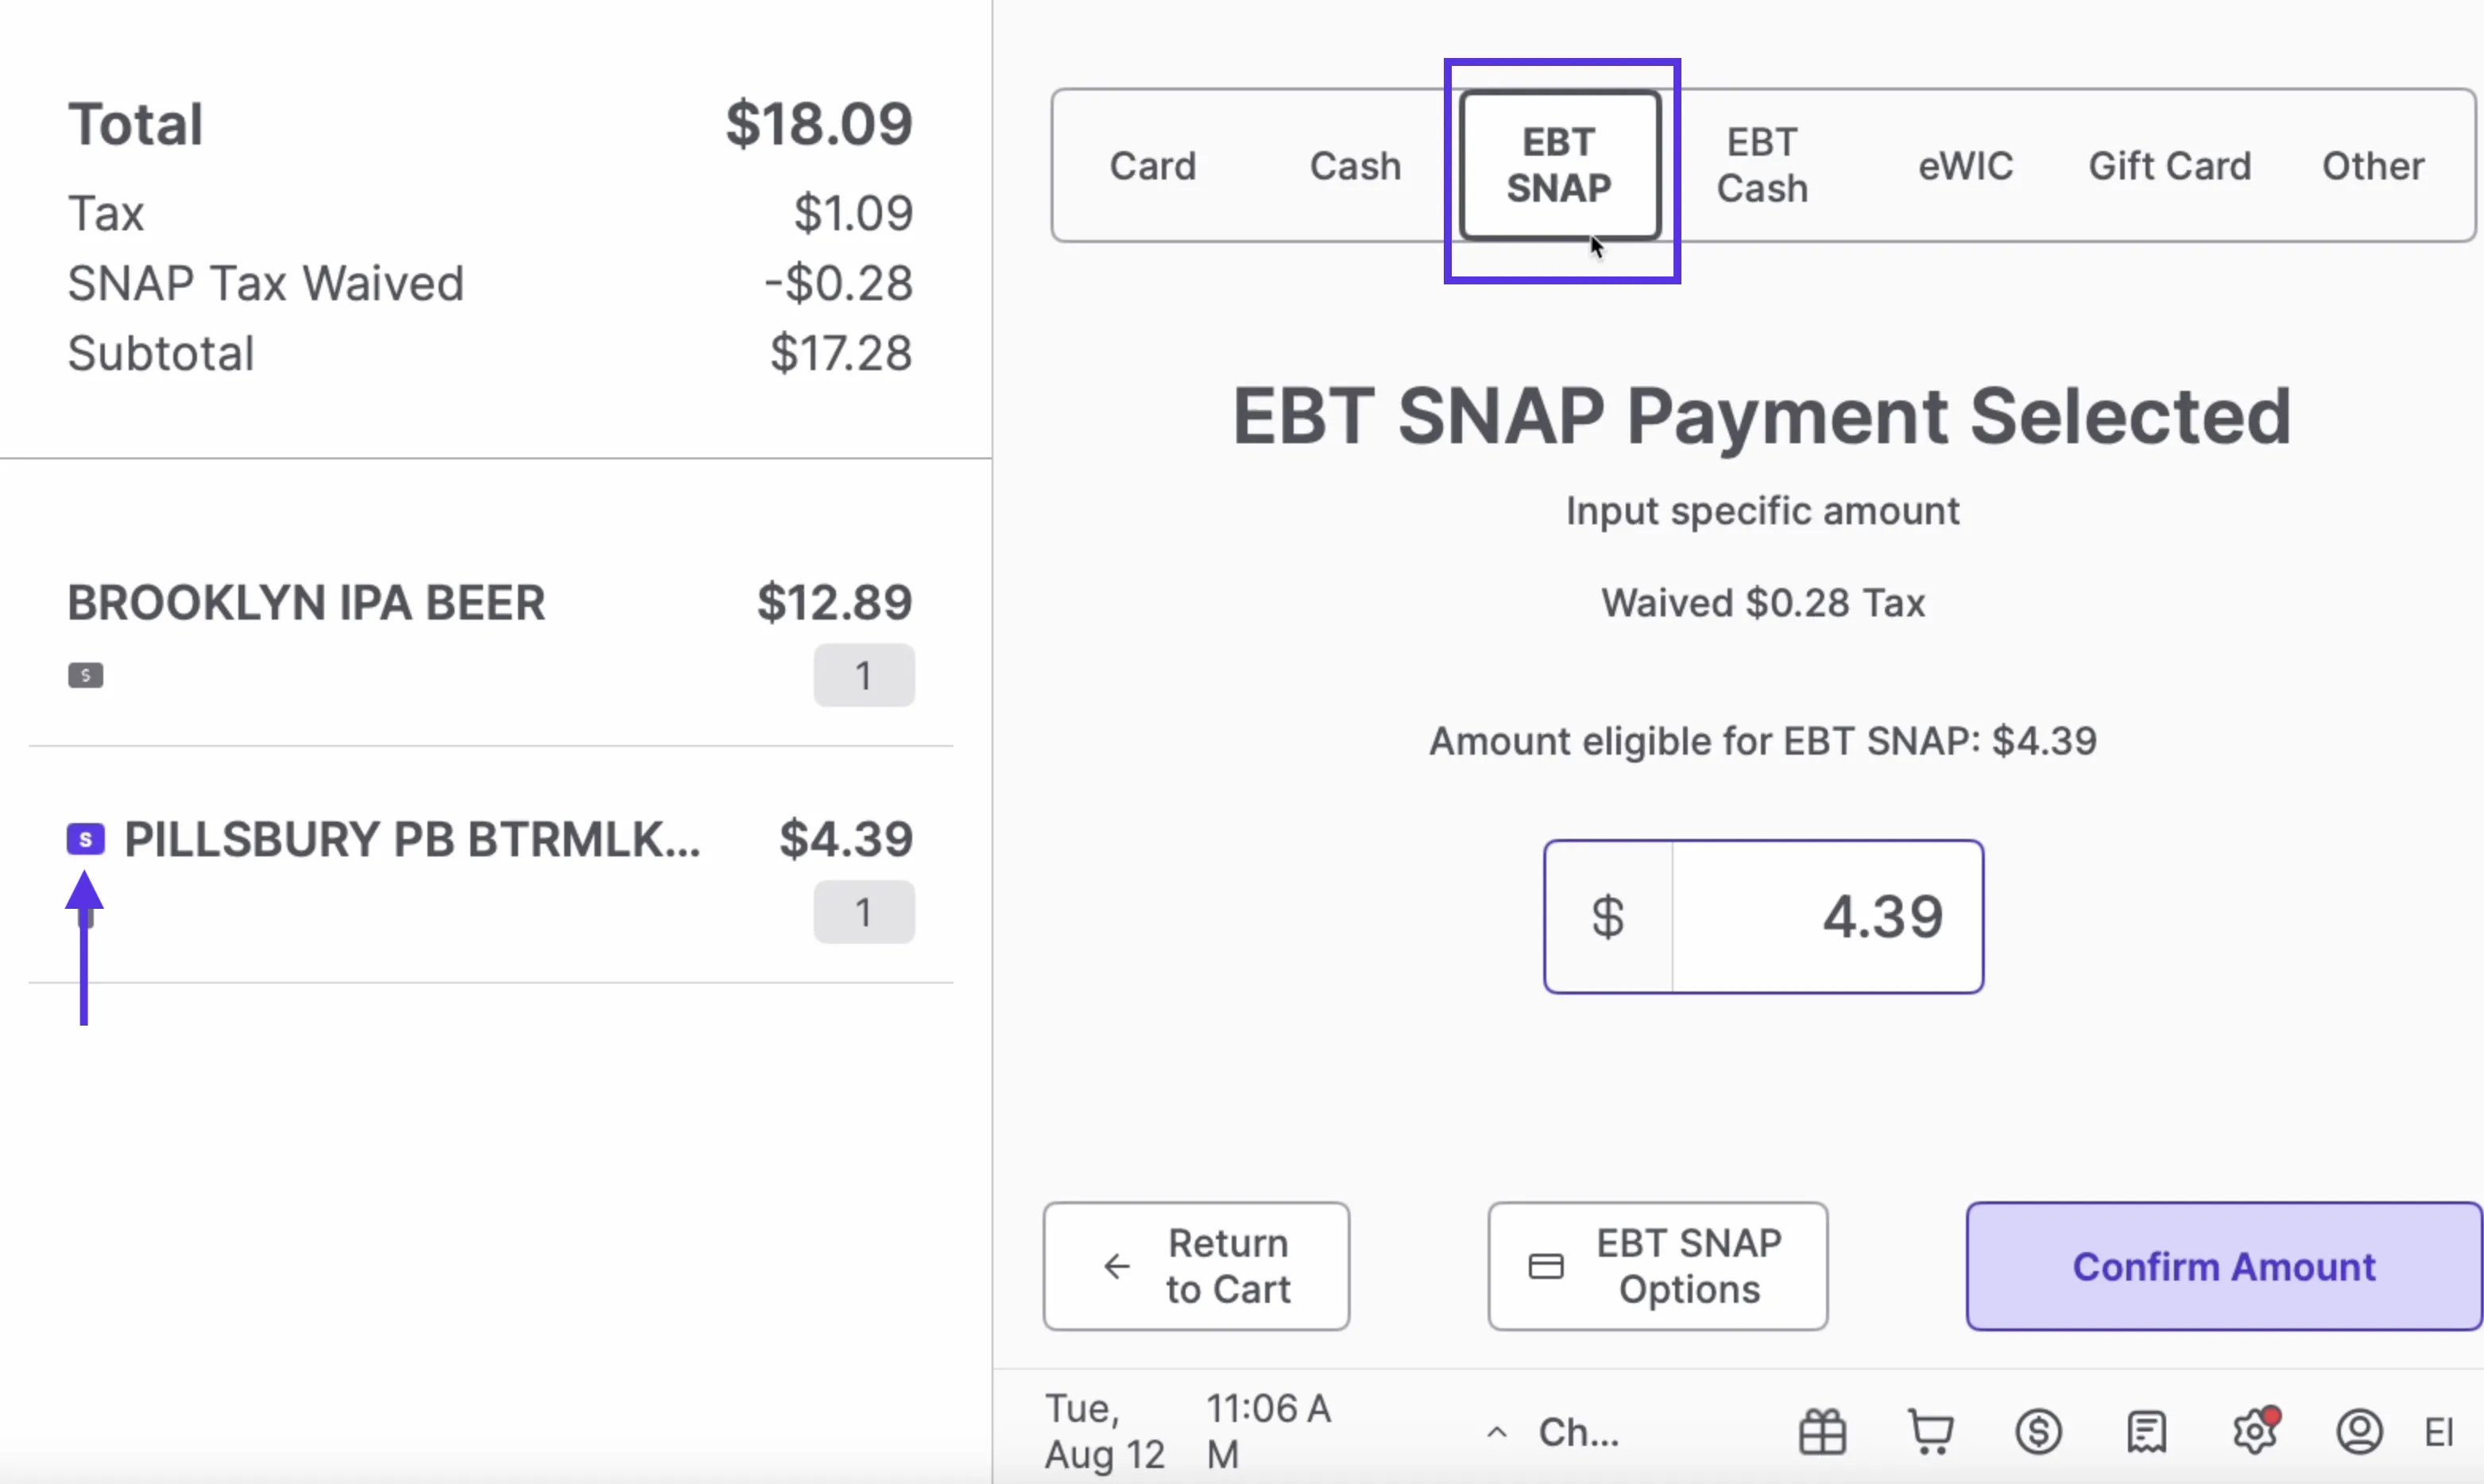 4. Click **Confirm Amount** to proceed with the EBT portion of the payment. The POS will prompt the shopper to swipe their card.
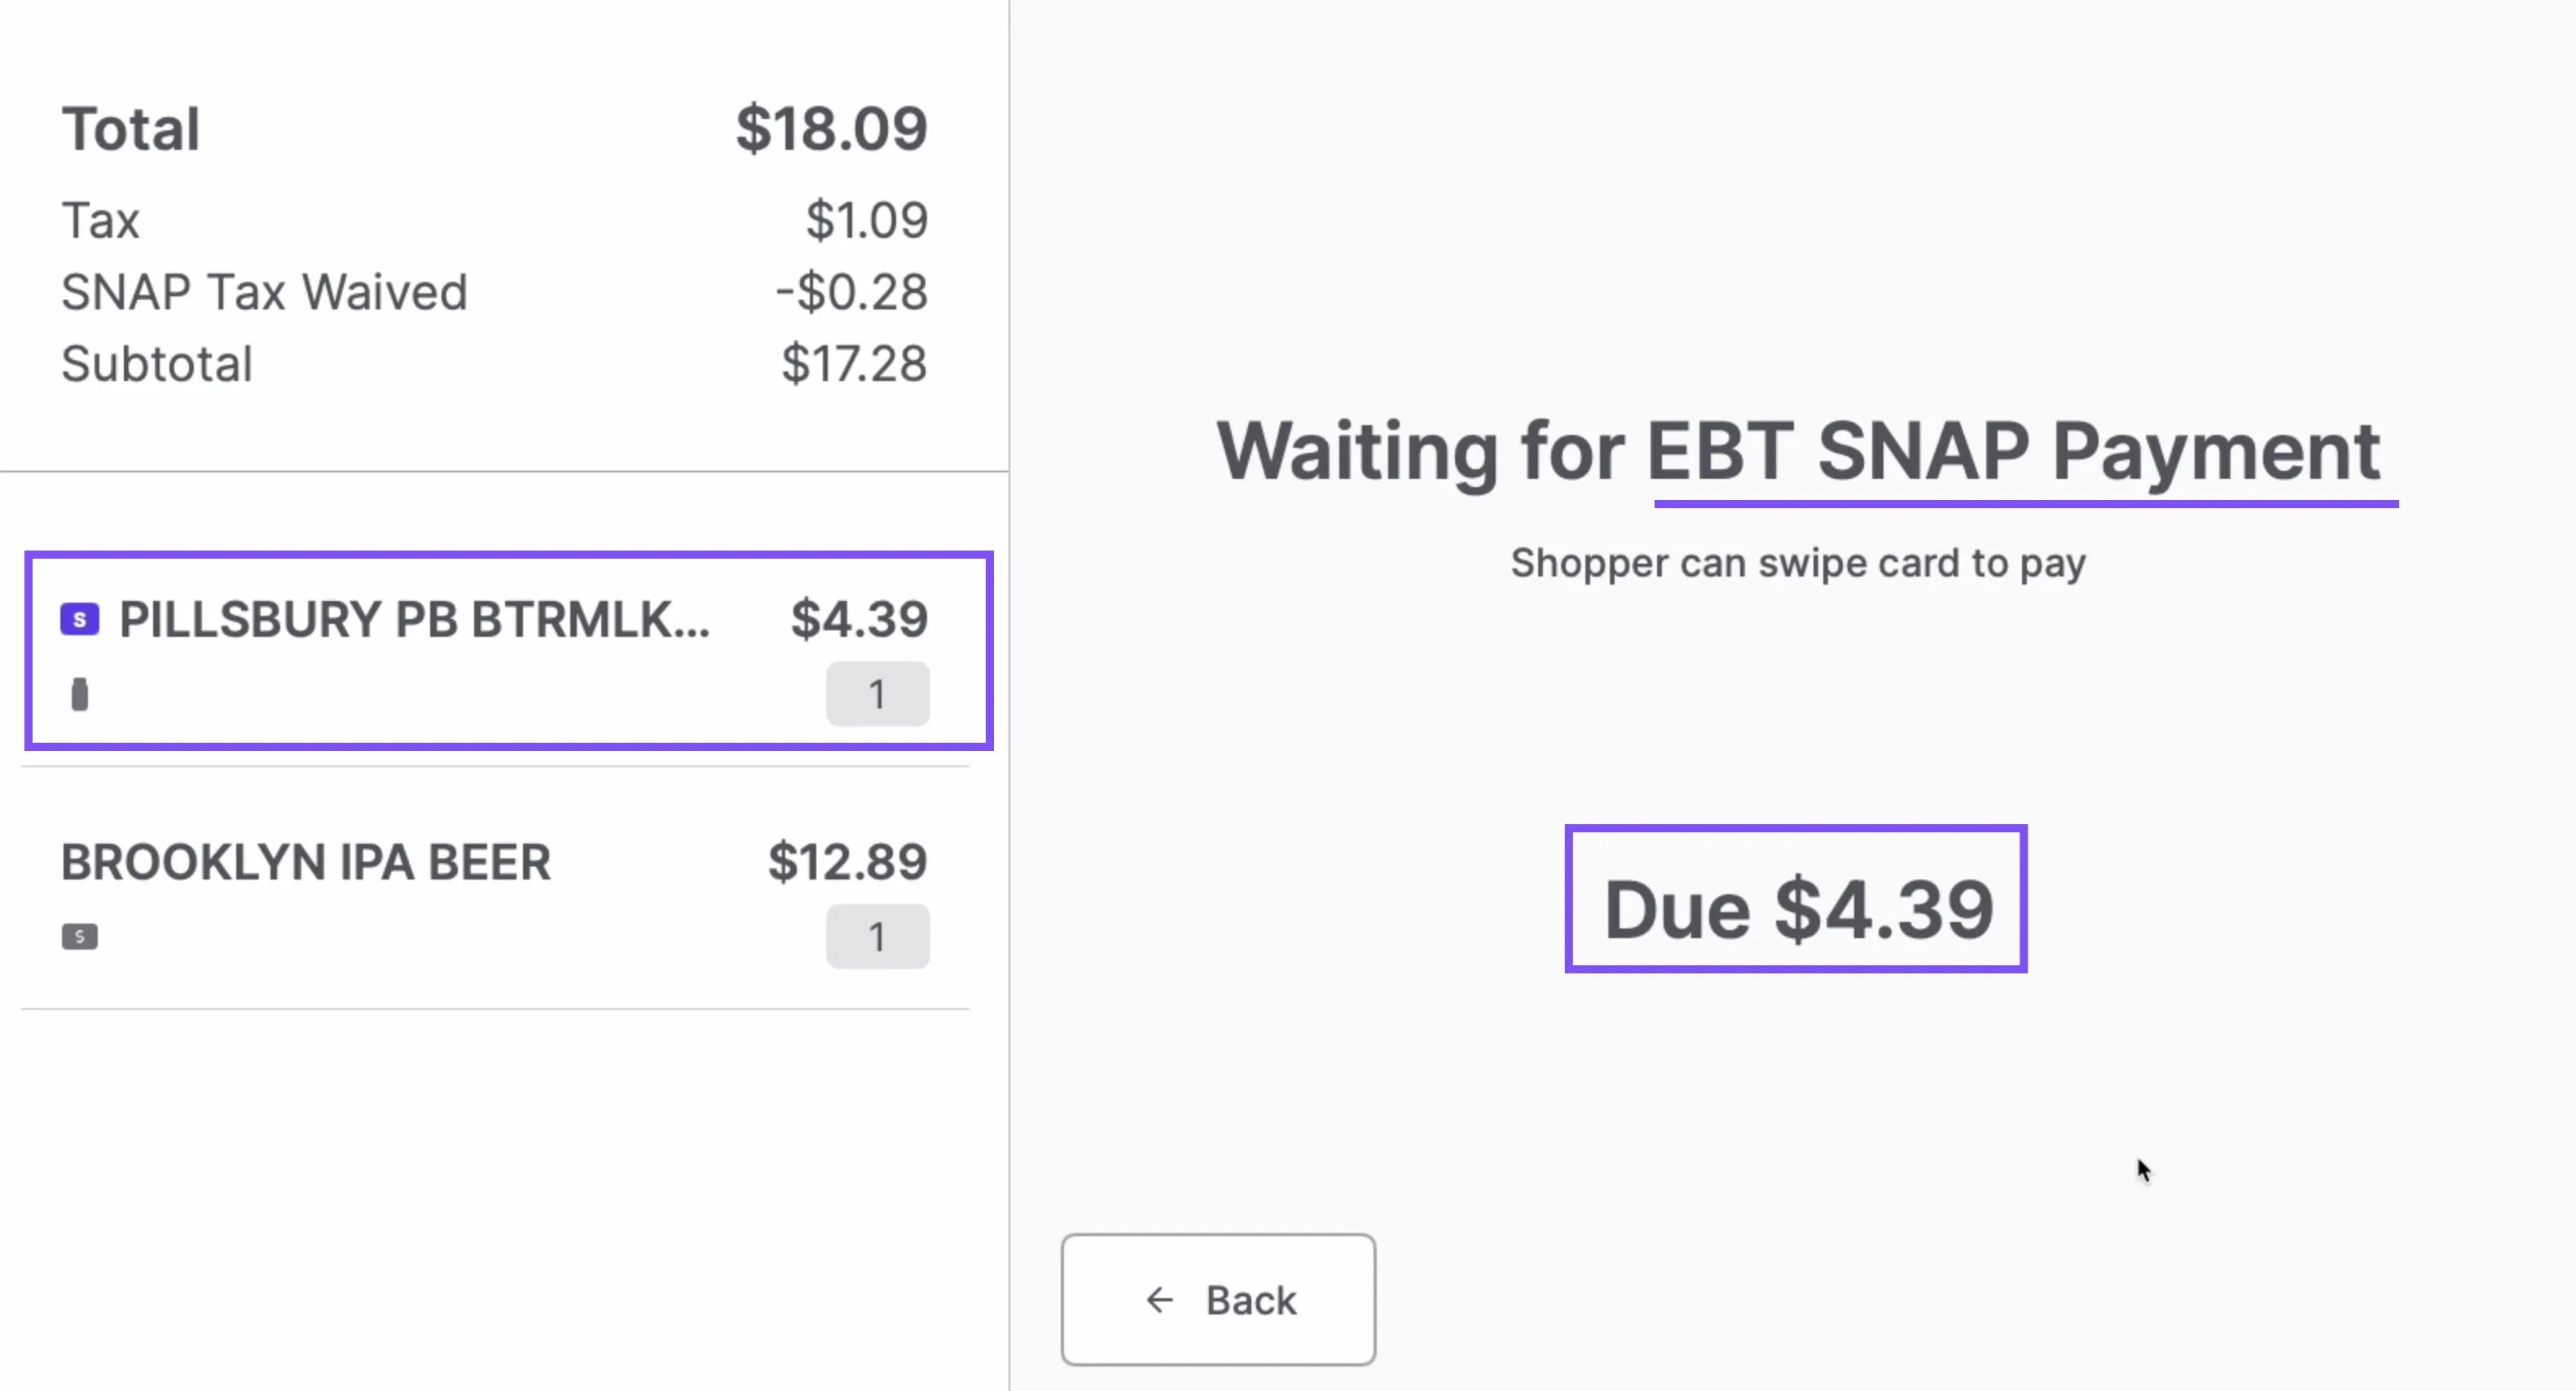 5. If there is a remaining balance (for non-eligible items or tax), the POS will prompt you to select another payment method to complete the transaction.
6. After the transaction is complete, the printed receipt will show the customer's remaining EBT balance.
5. If there is a remaining balance (for non-eligible items or tax), the POS will prompt you to select another payment method to complete the transaction.
6. After the transaction is complete, the printed receipt will show the customer's remaining EBT balance.
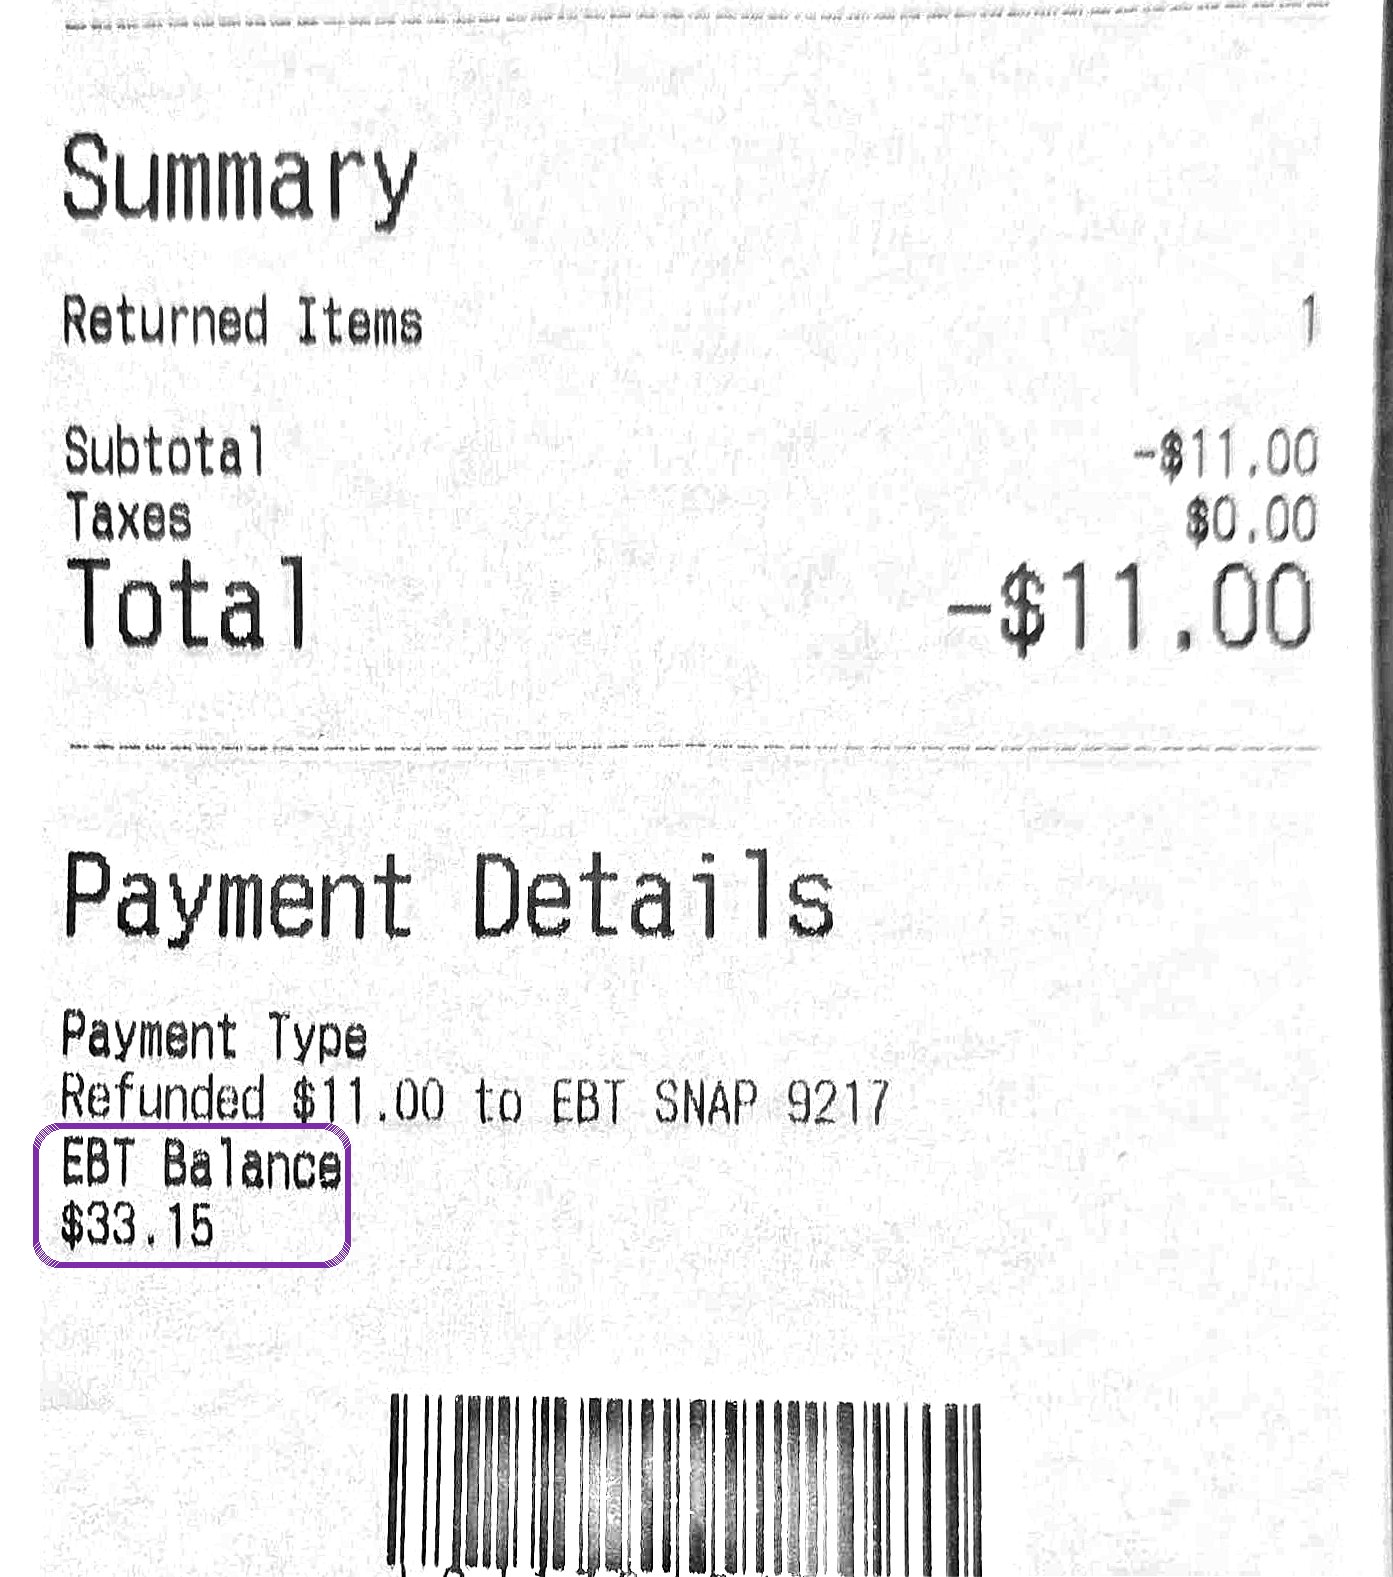 **⚠️** **Important:** If a customer is using EBT for eligible items, **select EBT as the first payment method.**
#### Other Payment Screen Features
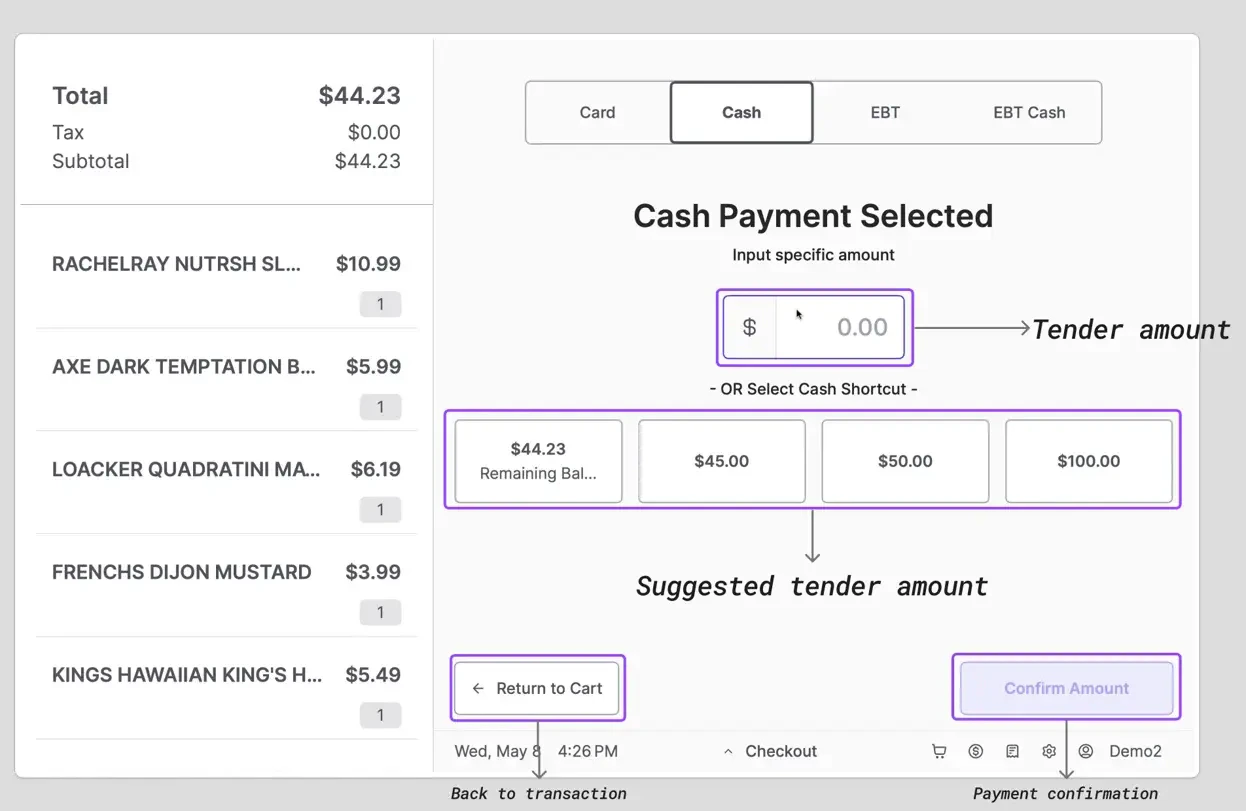
* **Amount to Pay:** If you're paying by **card**, the amount will already be filled in for you. If you're paying with **cash**, the field will be empty, and the cashier will need to enter the right amount.
* **Confirm Payment:** Once you've entered the amount or selected your payment method, simply hit "Confirm Amount" to proceed with your payment.
* **Return to Cart:** Need to make any last-minute changes to your order? Just hit "Return to Cart" to go back and add or remove items before finalizing your payment.
* **Suggested Amount Buttons:** These shortcut buttons auto-fill common payment amounts, including the exact remaining balance and nearby denominations.
⚠️ **Caution: Duplicate Charges Will Be Declined:** If a card is charged, then the charge is immediately reversed, the system will block any attempt to charge the same amount to the same card right after. This is flagged as a potential duplicate charge and will automatically decline to help prevent accidental double billing. Learn more in the [Handle Card Voids and Payment Cancellations at the POS](/point-of-sale-pos/basic-cashier-functions/handle-card-voids-and-payment-cancelations-at-the-pos) article.
* **Return to Cart**: Need to make any last-minute changes to your order? No problem! Just hit "Return to Cart" to go back and add or remove items before finalizing your payment.
**⚠️** **Important:** If a customer is using EBT for eligible items, **select EBT as the first payment method.**
#### Other Payment Screen Features
* **Amount to Pay:** If you're paying by **card**, the amount will already be filled in for you. If you're paying with **cash**, the field will be empty, and the cashier will need to enter the right amount.
* **Confirm Payment:** Once you've entered the amount or selected your payment method, simply hit "Confirm Amount" to proceed with your payment.
* **Return to Cart:** Need to make any last-minute changes to your order? Just hit "Return to Cart" to go back and add or remove items before finalizing your payment.
* **Suggested Amount Buttons:** These shortcut buttons auto-fill common payment amounts, including the exact remaining balance and nearby denominations.
⚠️ **Caution: Duplicate Charges Will Be Declined:** If a card is charged, then the charge is immediately reversed, the system will block any attempt to charge the same amount to the same card right after. This is flagged as a potential duplicate charge and will automatically decline to help prevent accidental double billing. Learn more in the [Handle Card Voids and Payment Cancellations at the POS](/point-of-sale-pos/basic-cashier-functions/handle-card-voids-and-payment-cancelations-at-the-pos) article.
* **Return to Cart**: Need to make any last-minute changes to your order? No problem! Just hit "Return to Cart" to go back and add or remove items before finalizing your payment.
 ✏️ **Note:** If a payment needs to be canceled after it has been started or if there are insufficient funds, see our guide on [Handling Card Voids and Payment Cancelations at the POS](/point-of-sale-pos/basic-cashier-functions/handle-card-voids-and-payment-cancelations-at-the-pos).
* **Suggested Amount Buttons**: These shortcut buttons auto-fill common payment amounts, including the exact remaining balance and nearby denominations.
✏️ **Note:** If a payment needs to be canceled after it has been started or if there are insufficient funds, see our guide on [Handling Card Voids and Payment Cancelations at the POS](/point-of-sale-pos/basic-cashier-functions/handle-card-voids-and-payment-cancelations-at-the-pos).
* **Suggested Amount Buttons**: These shortcut buttons auto-fill common payment amounts, including the exact remaining balance and nearby denominations.
 ***
### 🪪 ID Scan for Age Verification
When an age-restricted item is rung up, cashiers can scan the barcode on the back of a customer's ID instead of typing in a birthday. The POS reads the date of birth, confirms the customer meets the age requirement, and dismisses the prompt in under 2 seconds.
#### What you can scan
* U.S. driver's licenses
* U.S. state-issued ID cards
Scanning works on any ID that uses the **AAMVA barcode format**, which covers most U.S. driver's licenses and state IDs across all 50 states. Other cards with barcodes will not trigger the age verification flow.
#### How to scan an ID at the POS
1. Ring up the age-restricted item. The age verification prompt appears.
2. Flip the customer's ID to the back and scan the barcode using the **handheld scanner** or **scanner scale** at the lane.
3. The POS reads the ID, verifies the customer's age, and auto-dismisses the prompt with **Age Verified** confirmation.
4. Continue the transaction as normal.
**💡 Tip:** *No new hardware needed.* Every Vori lane already has a 2D scanner that can read ID barcodes.
#### What happens if the scan doesn't pass
* If the customer is underage or the ID is expired, the POS will not verify the age. Use the manual birthday entry or bypass option to complete the check, or decline the sale if the customer doesn't meet the age requirement.
* If the barcode can't be read, nothing happens on screen. Use manual entry or bypass to continue.
***
### 🗂️ POS Modes
Tap **Checkout** at the bottom of the cashier display to switch between POS modes. Each mode supports a different type of transaction or workflow.
***
### 🪪 ID Scan for Age Verification
When an age-restricted item is rung up, cashiers can scan the barcode on the back of a customer's ID instead of typing in a birthday. The POS reads the date of birth, confirms the customer meets the age requirement, and dismisses the prompt in under 2 seconds.
#### What you can scan
* U.S. driver's licenses
* U.S. state-issued ID cards
Scanning works on any ID that uses the **AAMVA barcode format**, which covers most U.S. driver's licenses and state IDs across all 50 states. Other cards with barcodes will not trigger the age verification flow.
#### How to scan an ID at the POS
1. Ring up the age-restricted item. The age verification prompt appears.
2. Flip the customer's ID to the back and scan the barcode using the **handheld scanner** or **scanner scale** at the lane.
3. The POS reads the ID, verifies the customer's age, and auto-dismisses the prompt with **Age Verified** confirmation.
4. Continue the transaction as normal.
**💡 Tip:** *No new hardware needed.* Every Vori lane already has a 2D scanner that can read ID barcodes.
#### What happens if the scan doesn't pass
* If the customer is underage or the ID is expired, the POS will not verify the age. Use the manual birthday entry or bypass option to complete the check, or decline the sale if the customer doesn't meet the age requirement.
* If the barcode can't be read, nothing happens on screen. Use manual entry or bypass to continue.
***
### 🗂️ POS Modes
Tap **Checkout** at the bottom of the cashier display to switch between POS modes. Each mode supports a different type of transaction or workflow.
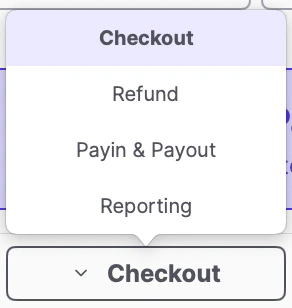 #### Checkout
* The default mode when starting a transaction.
* Configured for purchases where the customer pays for goods or services (net positive).
#### Refund
* Used for returns when the customer doesn't have a receipt.
* Configured as net negative (refund or credit back to the customer).
#### Pay-In & Pay-Out
* Use these tools to adjust the till balance outside of a sale.
* **Pay-In** – Add money to the drawer (e.g., to replenish cash).
* **Pay-Out** – Remove money from the drawer (e.g., to pay a vendor).
* These actions may require [**Manager Approval** based on your POS settings](/cashier-and-till-management/pos-user-access/set-up-cashiers-and-managers).
**💡Tip:** Learn more in the [**Pay-In or Pay-Out on the POS**](/point-of-sale-pos/blackhawk-gift-cards-checks-lottery-and-payouts/pay-in-and-pay-out-on-the-pos) article.
#### Reporting
* Print an **End-of-Day** receipt-style report and review tills reports.
* **Manager PIN required.** Reporting mode is restricted to managers. When a cashier taps Reporting, the POS prompts for a manager PIN before granting access. This protects sensitive financial data — End-of-Day totals and tills reports — from being viewed by cashiers during their shift.
* You must close all tills before generating the End-of-Day report.
***
### Toolbar
Access additional cashier tools by tapping **the appropriate settings icons in the Toolbar**.
#### Checkout
* The default mode when starting a transaction.
* Configured for purchases where the customer pays for goods or services (net positive).
#### Refund
* Used for returns when the customer doesn't have a receipt.
* Configured as net negative (refund or credit back to the customer).
#### Pay-In & Pay-Out
* Use these tools to adjust the till balance outside of a sale.
* **Pay-In** – Add money to the drawer (e.g., to replenish cash).
* **Pay-Out** – Remove money from the drawer (e.g., to pay a vendor).
* These actions may require [**Manager Approval** based on your POS settings](/cashier-and-till-management/pos-user-access/set-up-cashiers-and-managers).
**💡Tip:** Learn more in the [**Pay-In or Pay-Out on the POS**](/point-of-sale-pos/blackhawk-gift-cards-checks-lottery-and-payouts/pay-in-and-pay-out-on-the-pos) article.
#### Reporting
* Print an **End-of-Day** receipt-style report and review tills reports.
* **Manager PIN required.** Reporting mode is restricted to managers. When a cashier taps Reporting, the POS prompts for a manager PIN before granting access. This protects sensitive financial data — End-of-Day totals and tills reports — from being viewed by cashiers during their shift.
* You must close all tills before generating the End-of-Day report.
***
### Toolbar
Access additional cashier tools by tapping **the appropriate settings icons in the Toolbar**.
 There are five icons with built-in workflows:
#### 🎁 Gift Card Icon
* **Purchase:** Add a physical or digital gift card to a transaction. Also used to top up gift cards.
* **Redeem:** Apply an active gift card’s balance as payment.
✏️ **Note:** The Gift Card button is only available for POS customers who subscribed to the Vori Loyalty program.
#### 🛒 Shopper Button Icon
* **Check EBT/eWIC Balance:** Lets shoppers check balances before purchasing.
* **Cash Back:** Must be requested before the payment screen. Limits are set in **Manager Approvals**.
* **Enter Coupon Code:** Applies a loyalty SMS coupon to the order.
#### 💲Till Details Icon
* **Drawer Balance:** View the expected cash drawer total, which includes sales, refunds, and pay-in/pay-out activity.
* **Open Cash Drawer:** Manually open the drawer (e.g., to provide change).
#### 🧾 Orders Icon
* **Pause Order:** Allows you to save an in-progress transaction and resume it later. A transaction can remain paused for up to 30 days.
* **When to Use Pause Order:**
* A customer is checking out but has forgotten an item and needs to go back into the store to retrieve it.
* A customer wishes to place items on "hold" to purchase and pick them up later in the day.
**✏️Note:** This pause order function is intended for situations that occur *before* any payment has been processed. If a customer begins payment (e.g., swipes a card) and then realizes they have forgotten their wallet or cannot complete the purchase, the order cannot be paused. The transaction must be canceled and the cart voided instead.
* **Void Order:** Delete an active transaction (e.g., for mistakes or cancellations).
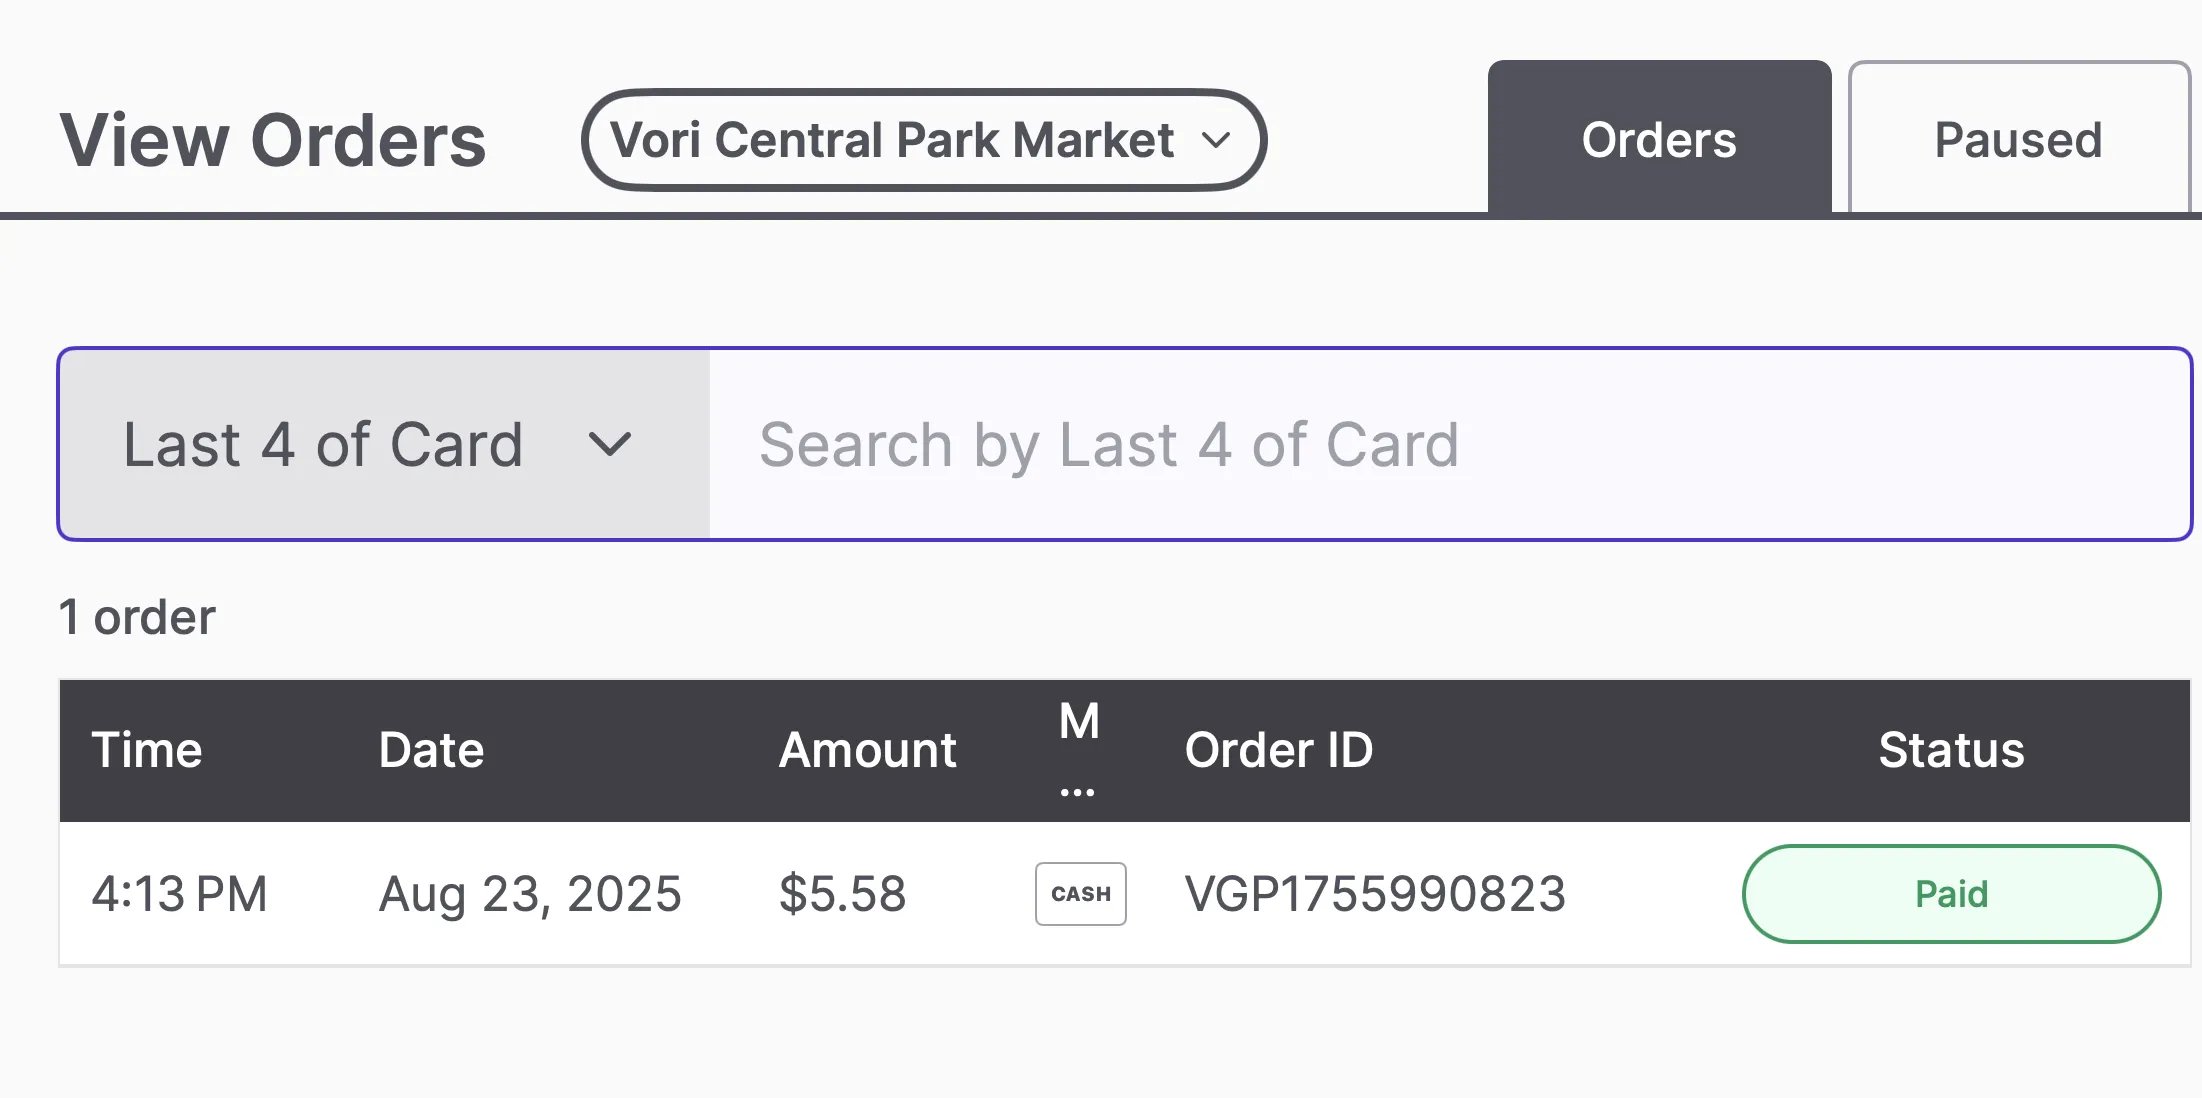
* **View All Orders:** Scroll through the last 50 orders, and search the last 30 days of transactions.
There are five icons with built-in workflows:
#### 🎁 Gift Card Icon
* **Purchase:** Add a physical or digital gift card to a transaction. Also used to top up gift cards.
* **Redeem:** Apply an active gift card’s balance as payment.
✏️ **Note:** The Gift Card button is only available for POS customers who subscribed to the Vori Loyalty program.
#### 🛒 Shopper Button Icon
* **Check EBT/eWIC Balance:** Lets shoppers check balances before purchasing.
* **Cash Back:** Must be requested before the payment screen. Limits are set in **Manager Approvals**.
* **Enter Coupon Code:** Applies a loyalty SMS coupon to the order.
#### 💲Till Details Icon
* **Drawer Balance:** View the expected cash drawer total, which includes sales, refunds, and pay-in/pay-out activity.
* **Open Cash Drawer:** Manually open the drawer (e.g., to provide change).
#### 🧾 Orders Icon
* **Pause Order:** Allows you to save an in-progress transaction and resume it later. A transaction can remain paused for up to 30 days.
* **When to Use Pause Order:**
* A customer is checking out but has forgotten an item and needs to go back into the store to retrieve it.
* A customer wishes to place items on "hold" to purchase and pick them up later in the day.
**✏️Note:** This pause order function is intended for situations that occur *before* any payment has been processed. If a customer begins payment (e.g., swipes a card) and then realizes they have forgotten their wallet or cannot complete the purchase, the order cannot be paused. The transaction must be canceled and the cart voided instead.
* **Void Order:** Delete an active transaction (e.g., for mistakes or cancellations).
* **View All Orders:** Scroll through the last 50 orders, and search the last 30 days of transactions.
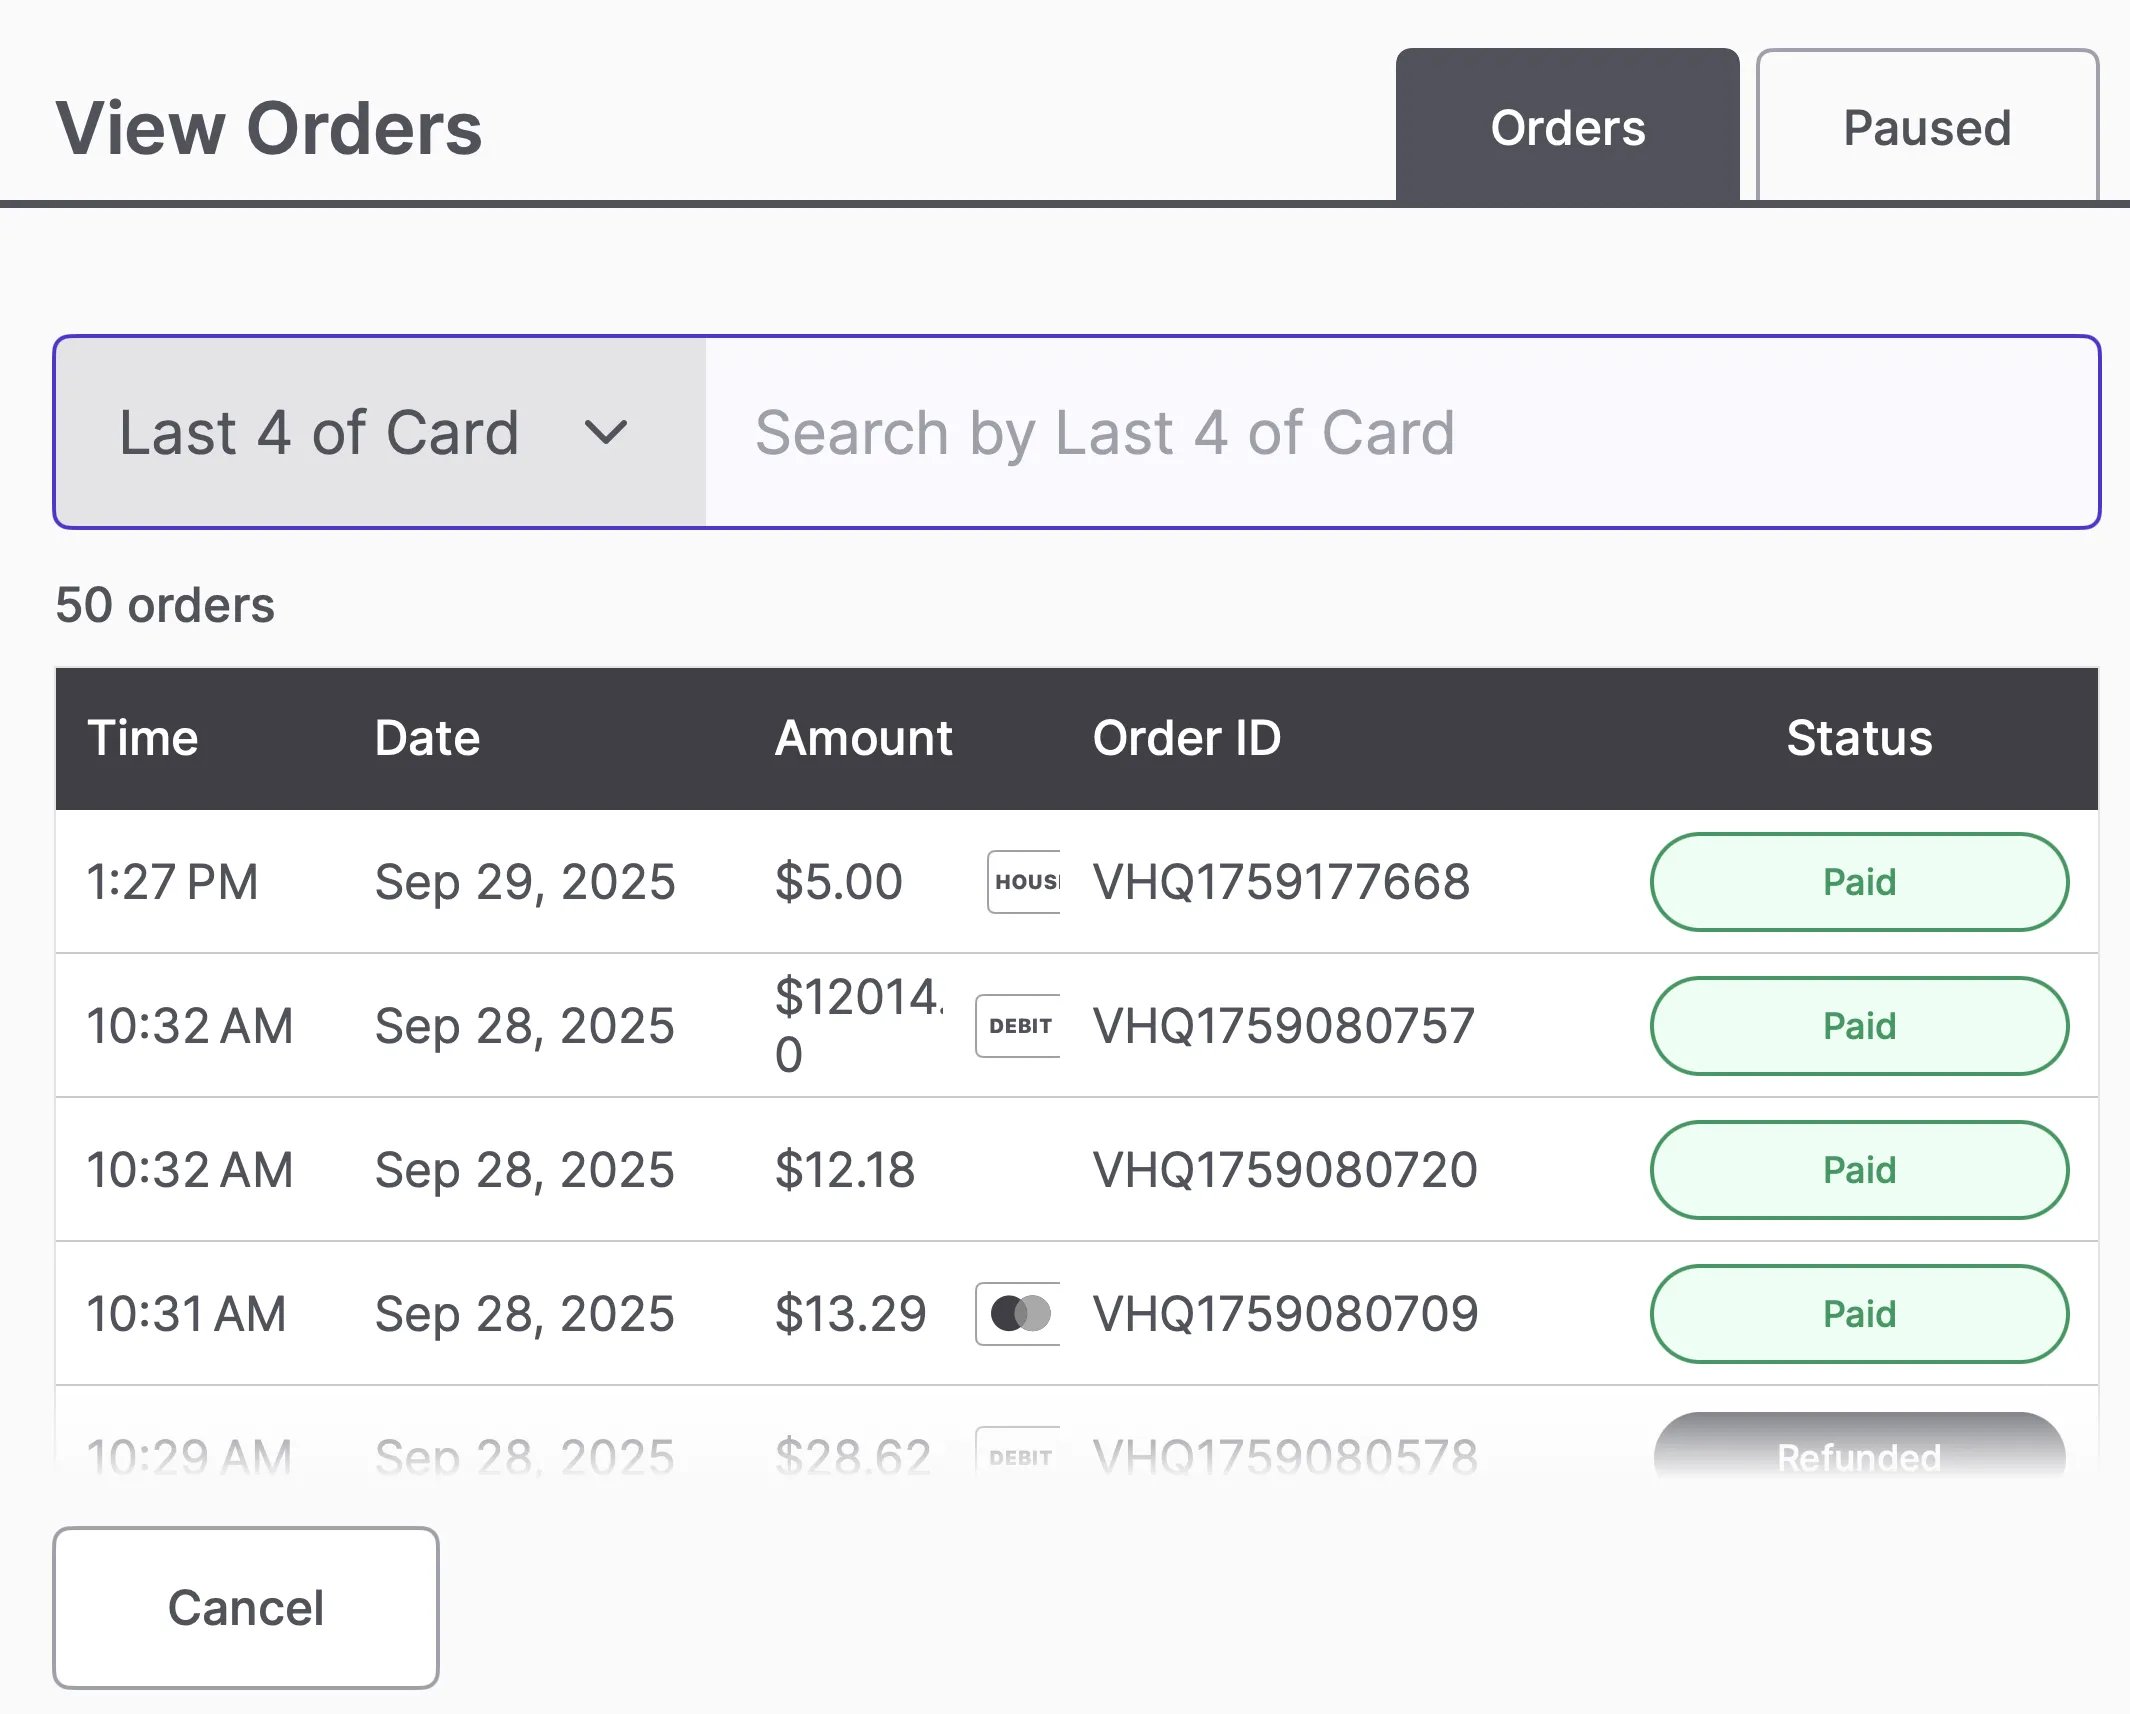 * **Filter Orders by Store:** When viewing orders, you can filter the list to show transactions from *All Stores* or a specific location (e.g., *Vori Central Park Market*).
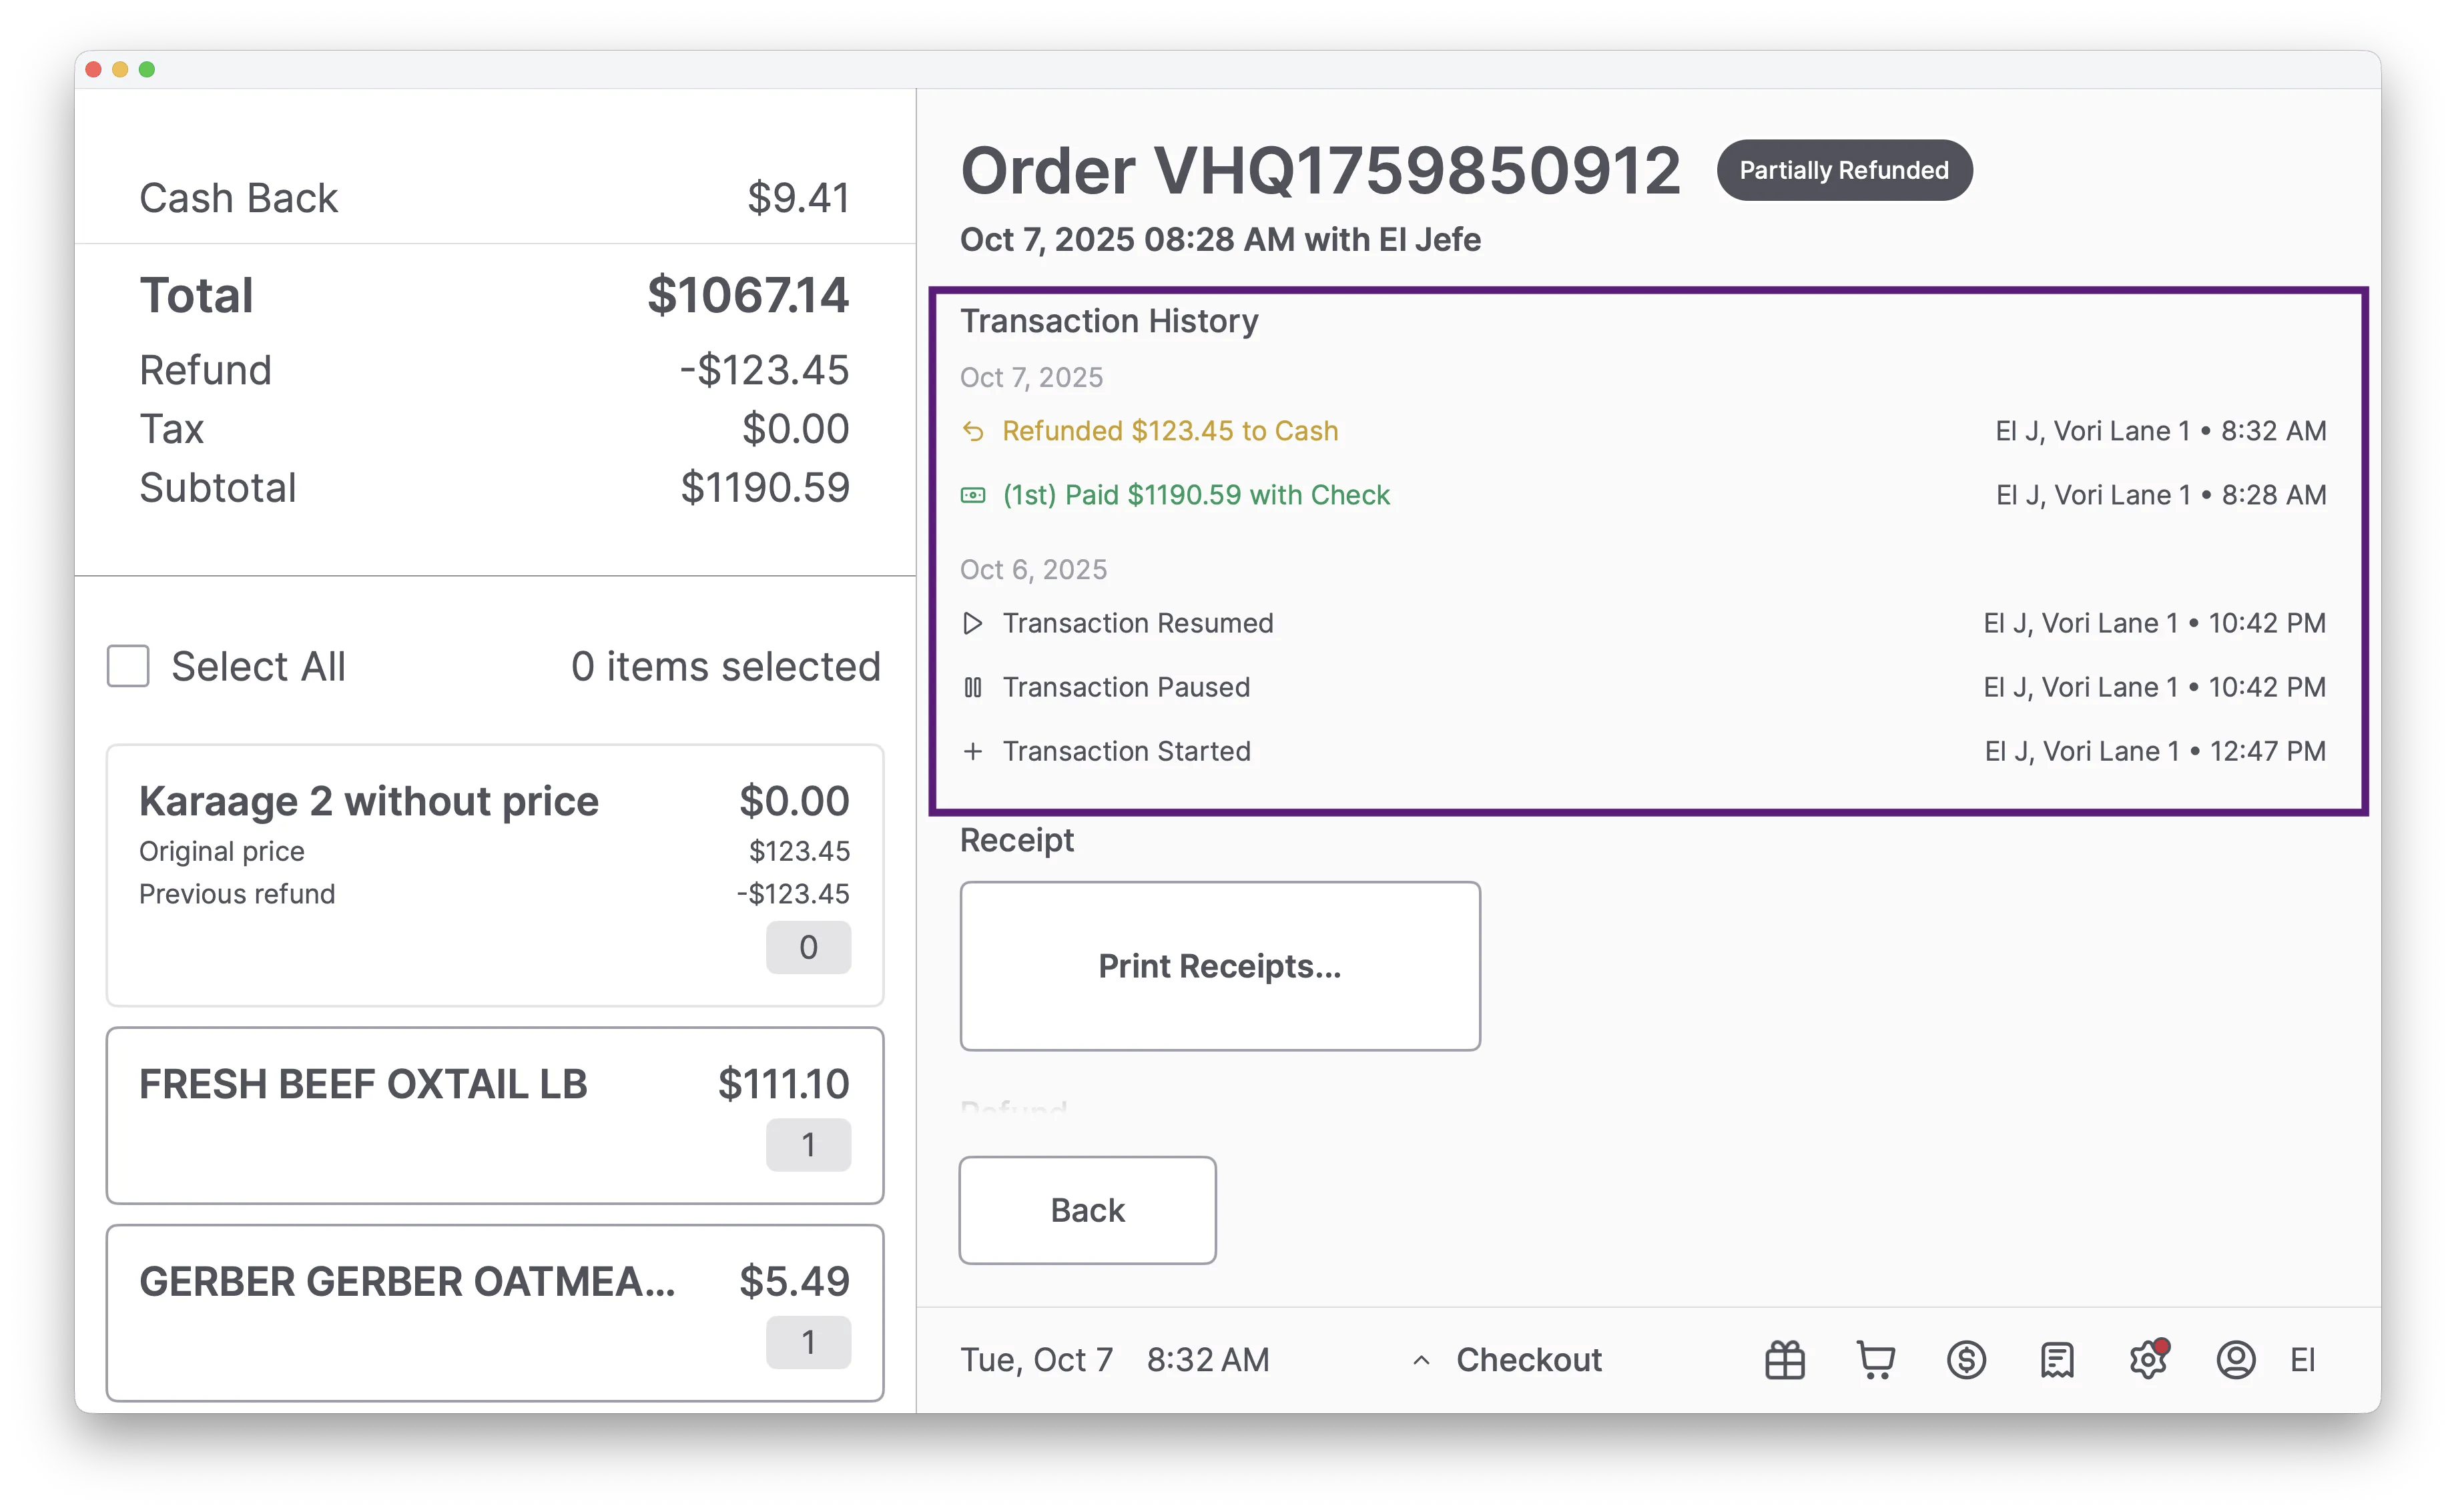
 * **Order History:** When you view a completed transaction, the Transaction History panel provides a detailed timeline of events, including payments, refunds, and other actions. This is especially useful for quickly reviewing transactions that were Partially Refunded or paused and resumed.
 #### ⚙️ System Status Icon
* Check the **System** **Status** section for system health and updates.
* 🟢 Connected and working.
* 🌕 Sub-Optimal Status
* 🔴 Error — contact Vori Support and mention the light color.
* **Restart the App Button:** This button Logs you out and restarts the app to install updates and reconnect devices.
***
### 👤 Logging Out
To end your till session, tap the **Profile (Cashier Name)** in the bottom-right corner of the POS screen.
✏️ **Note:** For a full walkthrough, see the article [**Log Out of Vori POS and Close a Till**](/cashier-and-till-management/pos-user-access/manage-pos-logins-tills-timeouts-and-manual-updates#log-out-of-vori-pos).
## Related topics
- [Restart a POS Cashier Screen or Shopper Display](/hardware-and-integrations/cashier-screen-and-shopper-display/restart-a-pos-cashier-screen-or-shopper-display.md)
- [How to add Vori Back Office to the POS Cashier Screen](/vori-setup-and-troubleshooting/how-to-add-vori-back-office-to-the-pos-cashier-screen.md)
- [Fix a Black or Frozen POS Cashier Screen](/hardware-and-integrations/cashier-screen-and-shopper-display/fix-a-black-or-frozen-pos-cashier-screen.md)
#### ⚙️ System Status Icon
* Check the **System** **Status** section for system health and updates.
* 🟢 Connected and working.
* 🌕 Sub-Optimal Status
* 🔴 Error — contact Vori Support and mention the light color.
* **Restart the App Button:** This button Logs you out and restarts the app to install updates and reconnect devices.
***
### 👤 Logging Out
To end your till session, tap the **Profile (Cashier Name)** in the bottom-right corner of the POS screen.
✏️ **Note:** For a full walkthrough, see the article [**Log Out of Vori POS and Close a Till**](/cashier-and-till-management/pos-user-access/manage-pos-logins-tills-timeouts-and-manual-updates#log-out-of-vori-pos).
## Related topics
- [Restart a POS Cashier Screen or Shopper Display](/hardware-and-integrations/cashier-screen-and-shopper-display/restart-a-pos-cashier-screen-or-shopper-display.md)
- [How to add Vori Back Office to the POS Cashier Screen](/vori-setup-and-troubleshooting/how-to-add-vori-back-office-to-the-pos-cashier-screen.md)
- [Fix a Black or Frozen POS Cashier Screen](/hardware-and-integrations/cashier-screen-and-shopper-display/fix-a-black-or-frozen-pos-cashier-screen.md)