> ## Documentation Index
> Fetch the complete documentation index at: https://help.vori.com/llms.txt
> Use this file to discover all available pages before exploring further.
# Troubleshoot Shopper Display Communication Issues
> If the shopper display of the POS is not communicating with the POS, follow the troubleshooting steps of this guide in order:
If the Shopper Display isn't communicating with the POS, follow these steps in order to resolve the issue.
### Identifying your hardware
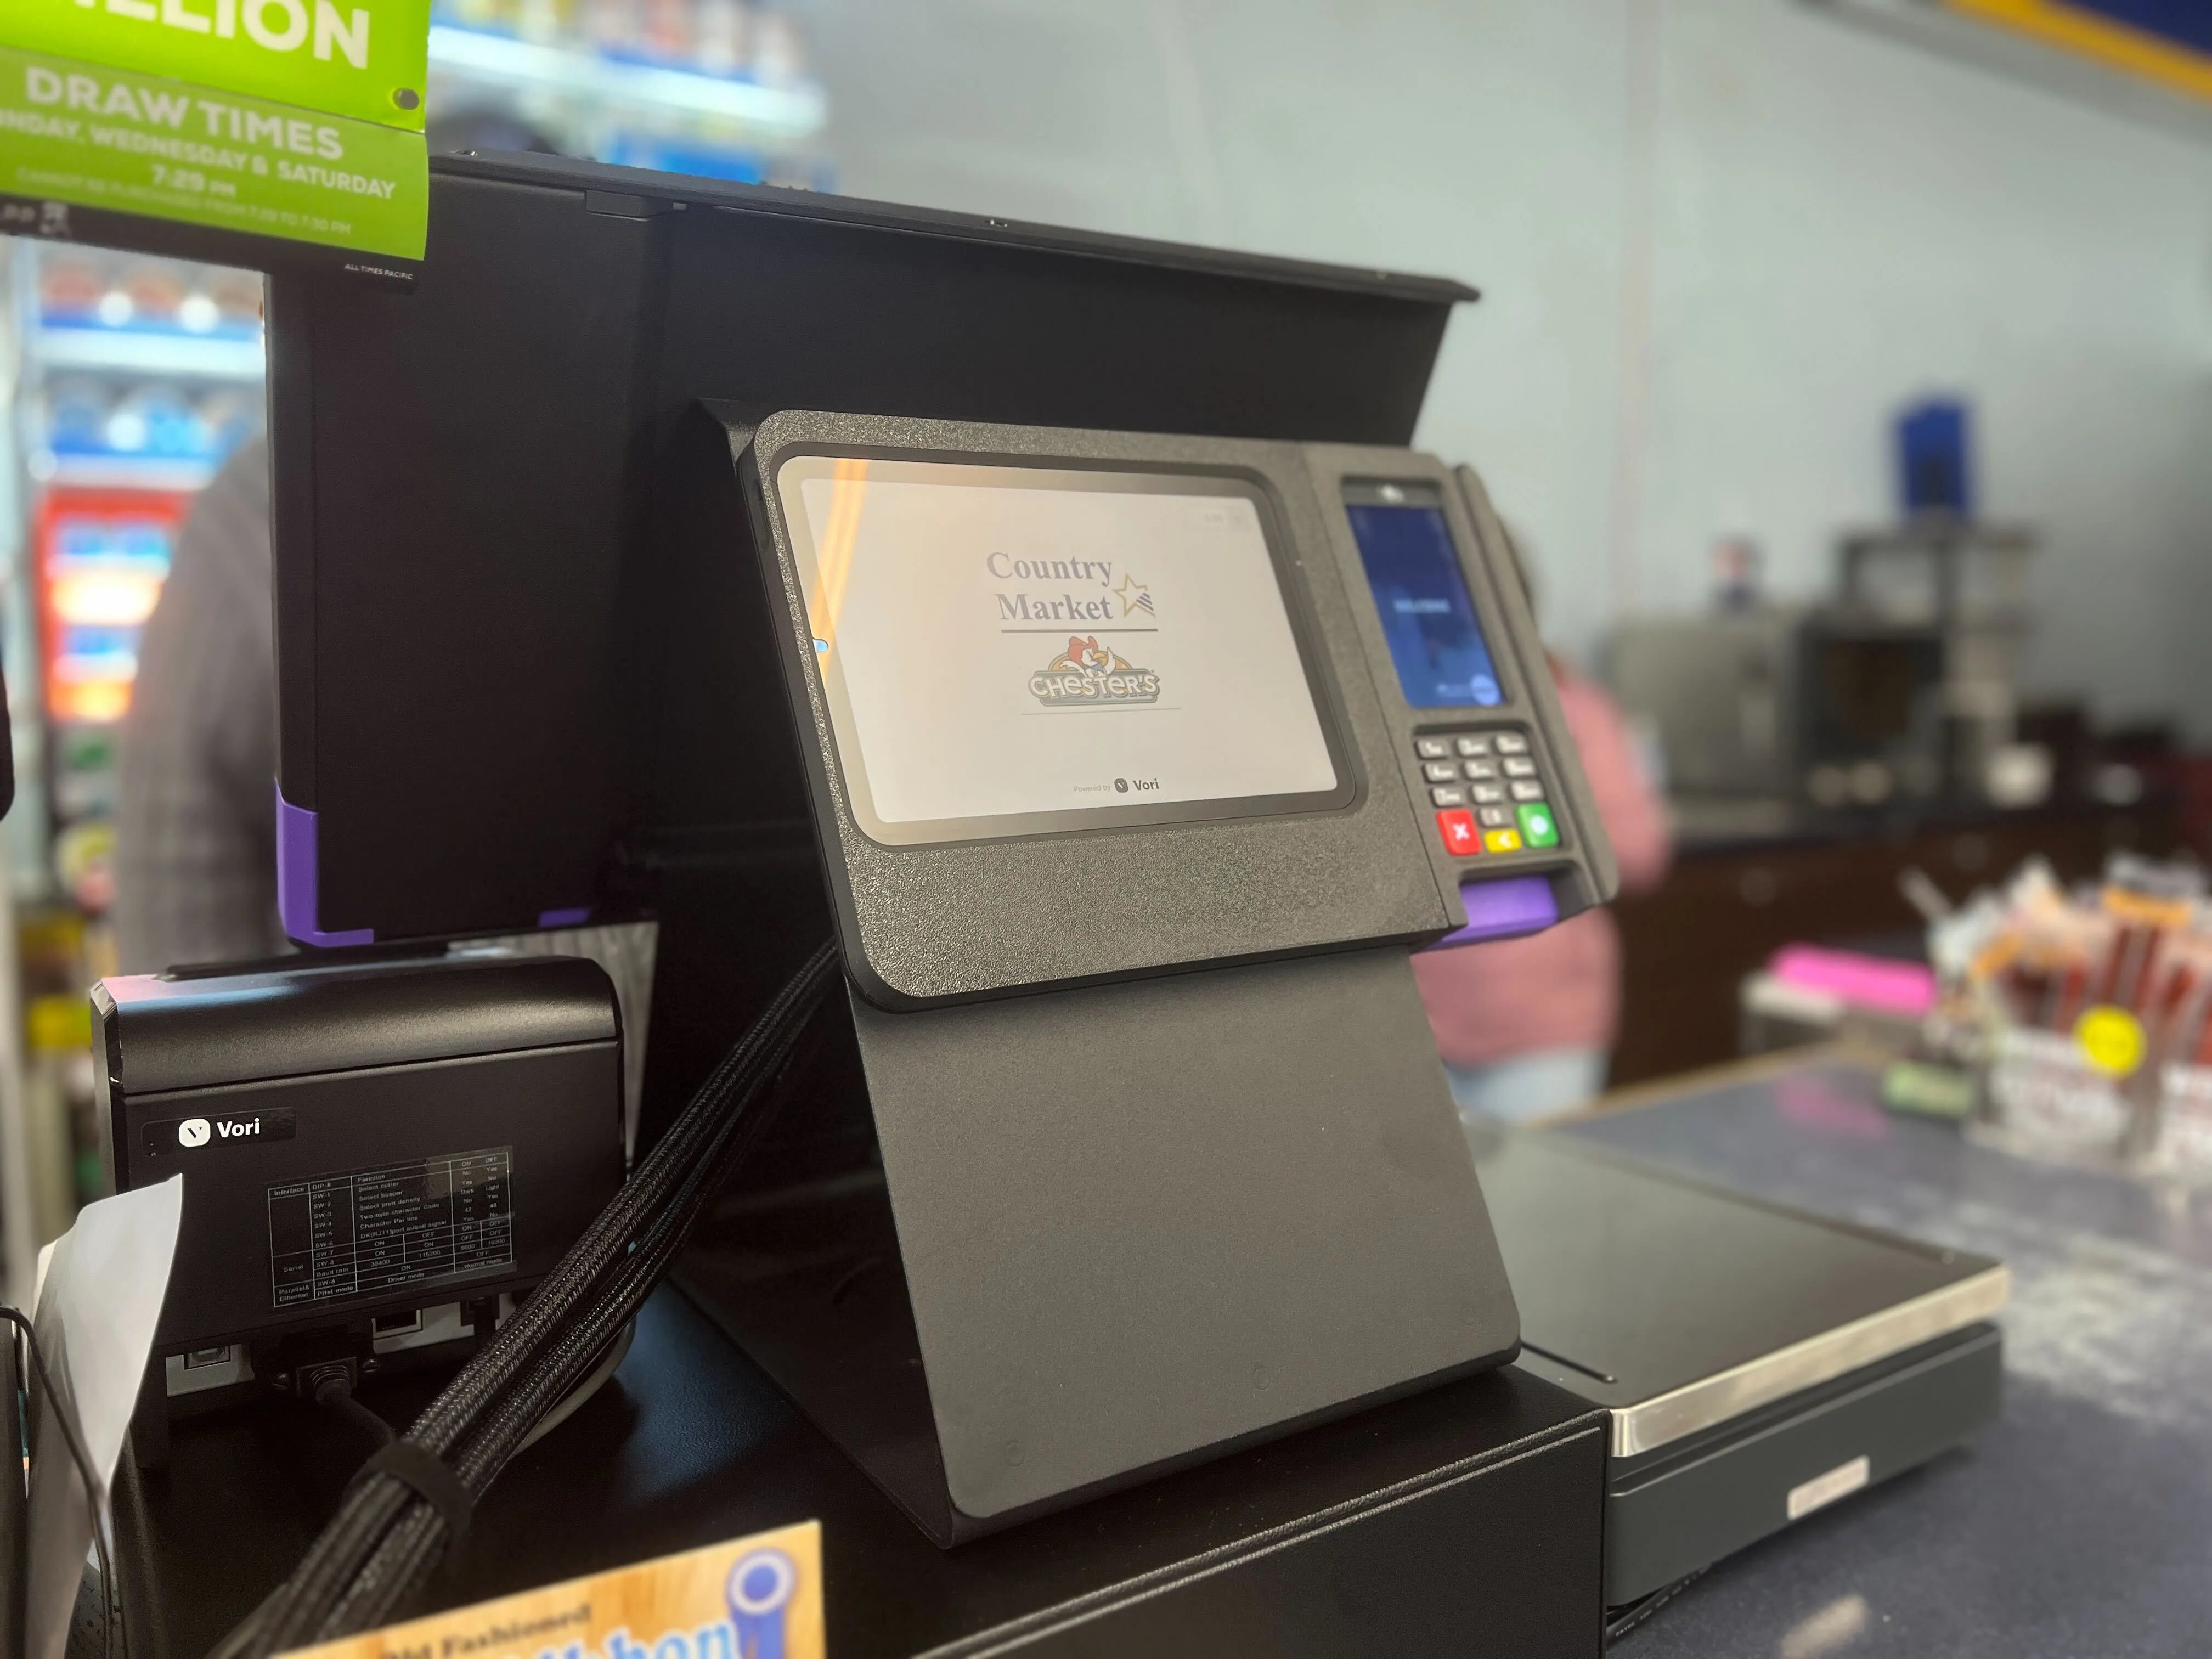
**Shopper Display:** The large, horizontal touchscreen tablet facing the customer. It displays the store logo, itemized cart, and the "Member Rewards" login.
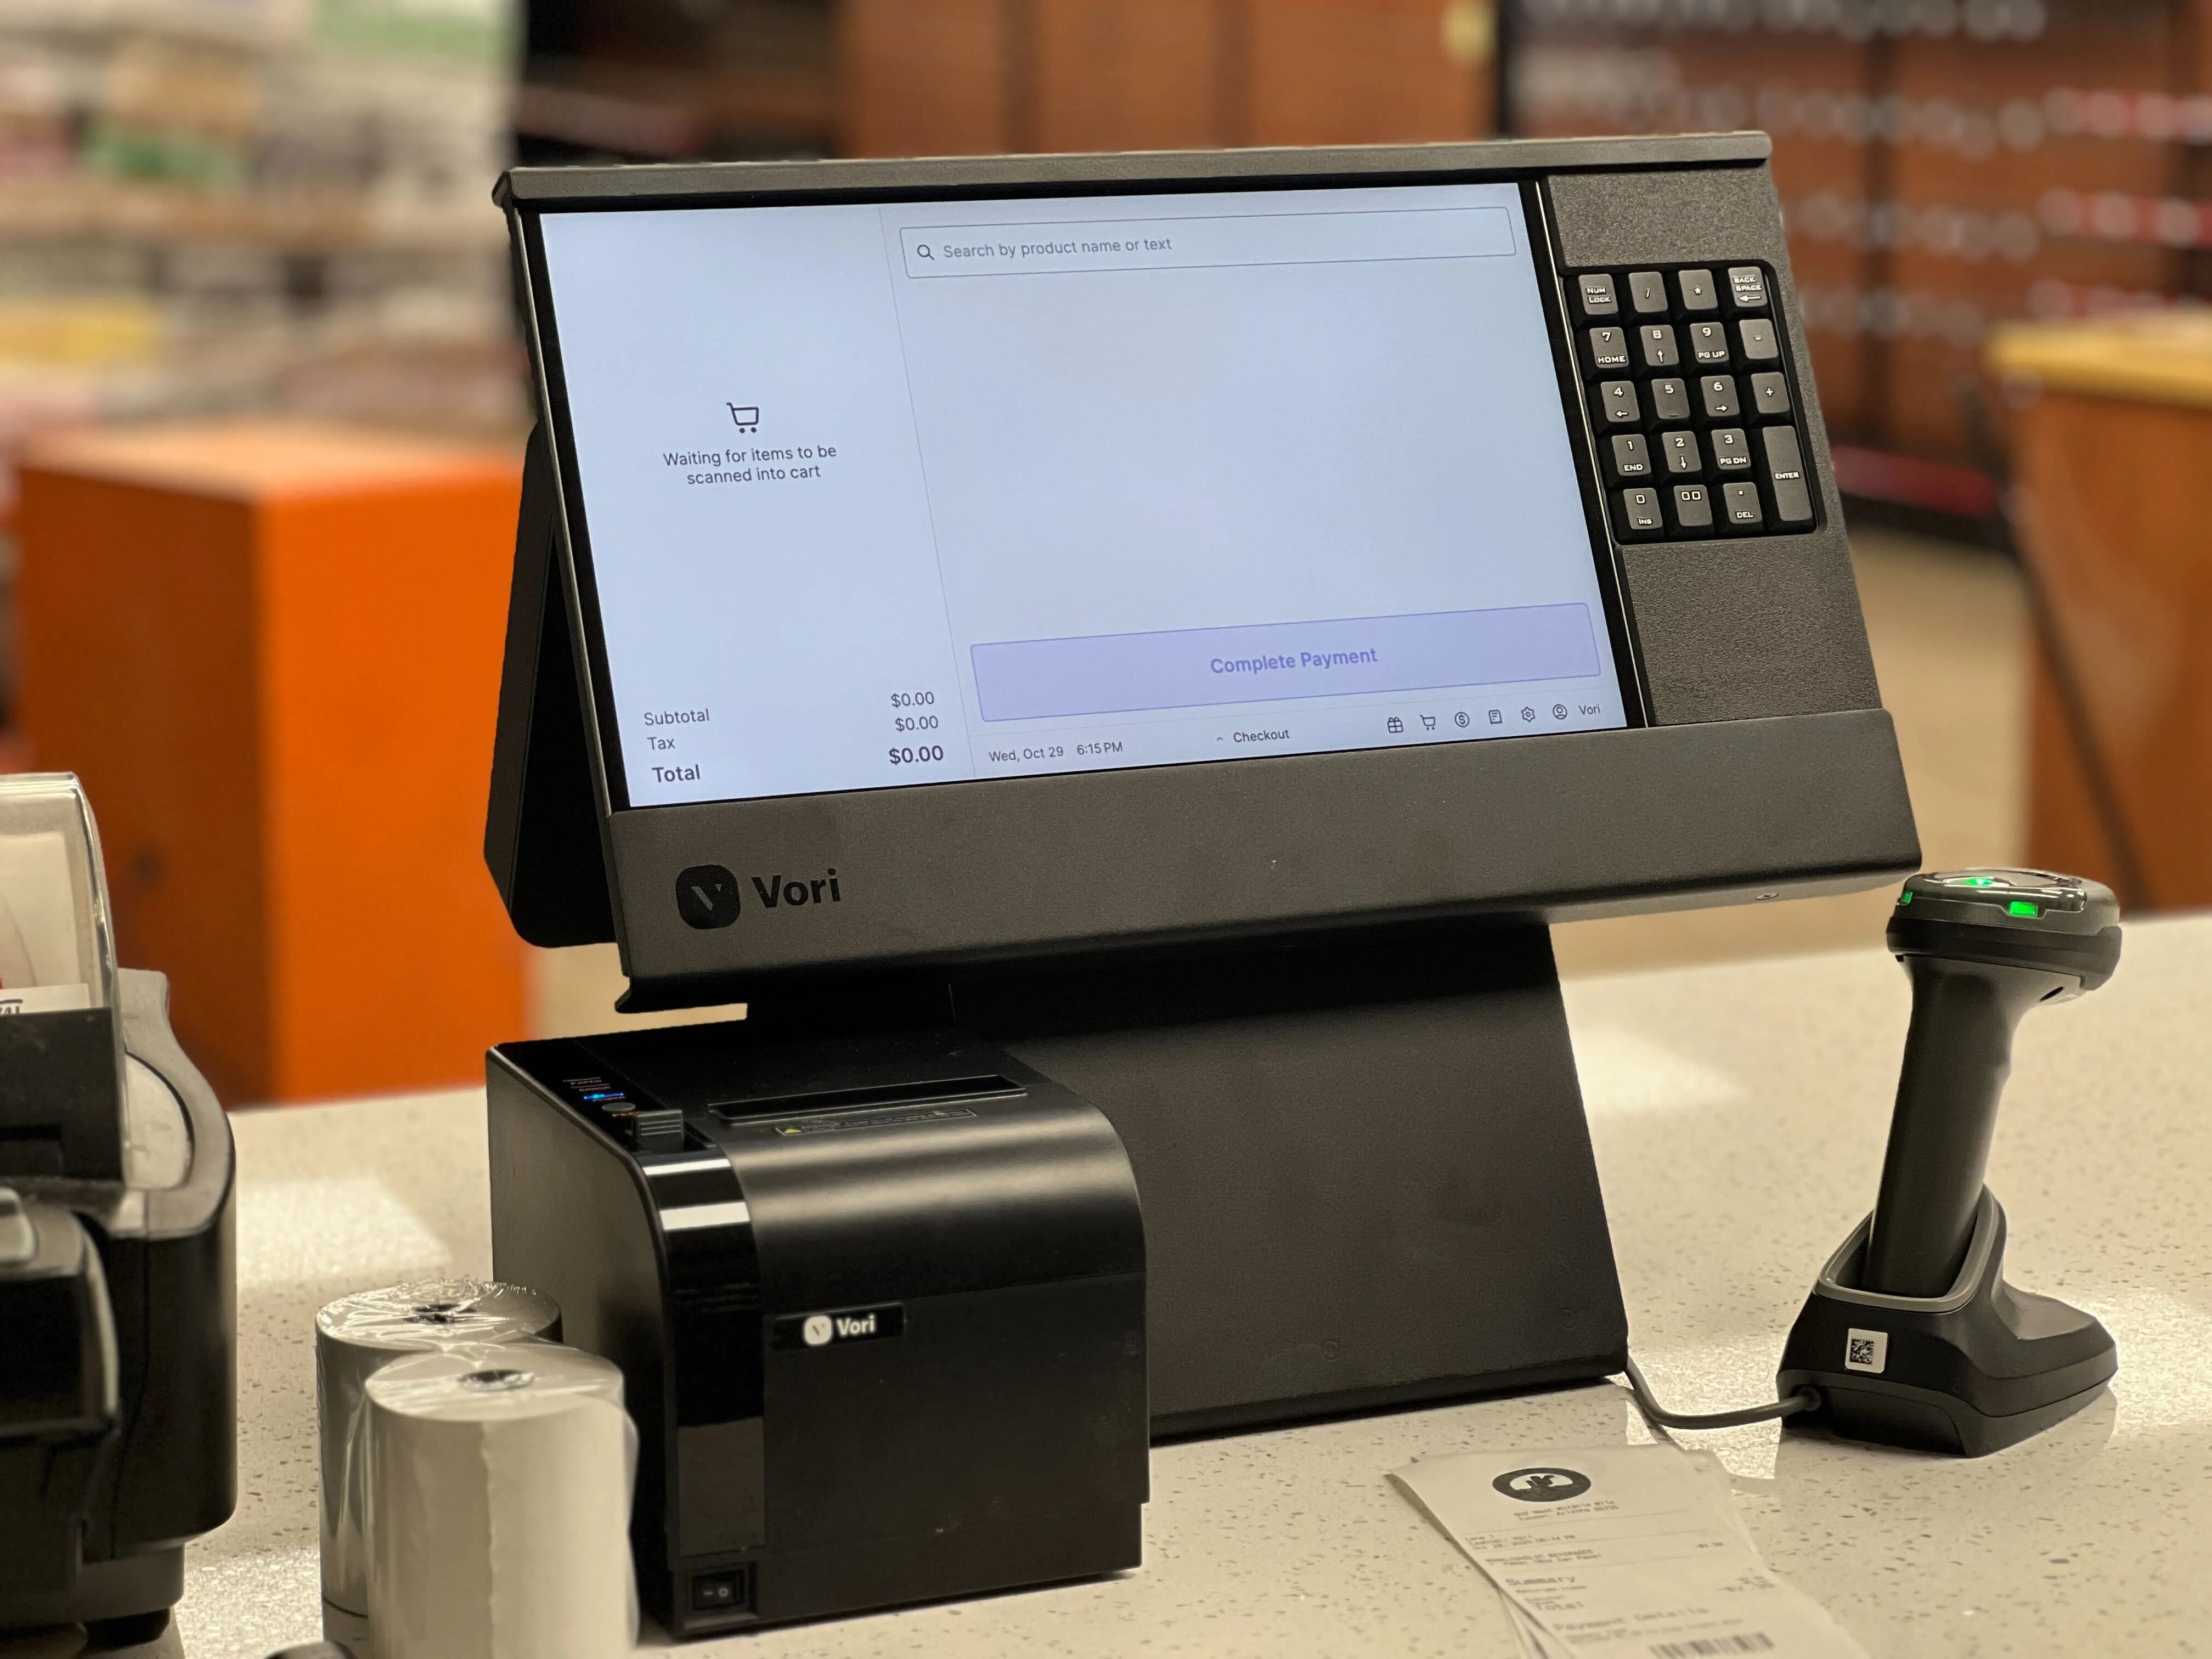
 **POS Cashier Screen:** The large monitor facing the employee. It shows the cart or basket and hot key quick action buttons used to ring up items.

 ***
Restart the POS App
1. On the main POS Cashier Screen, select the **gear icon** in the bottom-right corner. This will open the System Status window.
2. Select **Restart App** on the System Status window.
3. Log back into the POS app and check if the Shopper Display has reconnected.
**✏️ Note:** If restarting the app does not resolve the issue, continue to the next step.
***
### Restart the POS and/or Shopper Display
If restarting the app did not work, the next step is to perform a full restart of either the POS computer or the Shopper Display.
Follow the instructions in the full guide: [Remotely Restart a Shopper Display or POS](/hardware-and-integrations/cashier-screen-and-shopper-display/restart-a-pos-cashier-screen-or-shopper-display).
**✏️ Note:** If a full restart does not resolve the issue, continue to the next step.
***
### Check the Shopper Display's Communication Cable
If the display is still not communicating, a cable may have become loose.
1. Look under the POS counter to locate the POS computer.
2. Find the two USB-A ports on the far right of the computer's back panel.
***
Restart the POS App
1. On the main POS Cashier Screen, select the **gear icon** in the bottom-right corner. This will open the System Status window.
2. Select **Restart App** on the System Status window.
3. Log back into the POS app and check if the Shopper Display has reconnected.
**✏️ Note:** If restarting the app does not resolve the issue, continue to the next step.
***
### Restart the POS and/or Shopper Display
If restarting the app did not work, the next step is to perform a full restart of either the POS computer or the Shopper Display.
Follow the instructions in the full guide: [Remotely Restart a Shopper Display or POS](/hardware-and-integrations/cashier-screen-and-shopper-display/restart-a-pos-cashier-screen-or-shopper-display).
**✏️ Note:** If a full restart does not resolve the issue, continue to the next step.
***
### Check the Shopper Display's Communication Cable
If the display is still not communicating, a cable may have become loose.
1. Look under the POS counter to locate the POS computer.
2. Find the two USB-A ports on the far right of the computer's back panel. 3. Confirm that the cables in both ports are securely plugged in.
**✏️** **Note:** *If the cables are secure and the issue is not fixed, proceed to the next section.*
***
### Check the Cable Connection Inside the Enclosure
The other end of the cable may have become unplugged inside the display enclosure. You will need to disassemble the enclosure to check the connection.
**Required Materials**
* One screwdriver
#### **Directions**
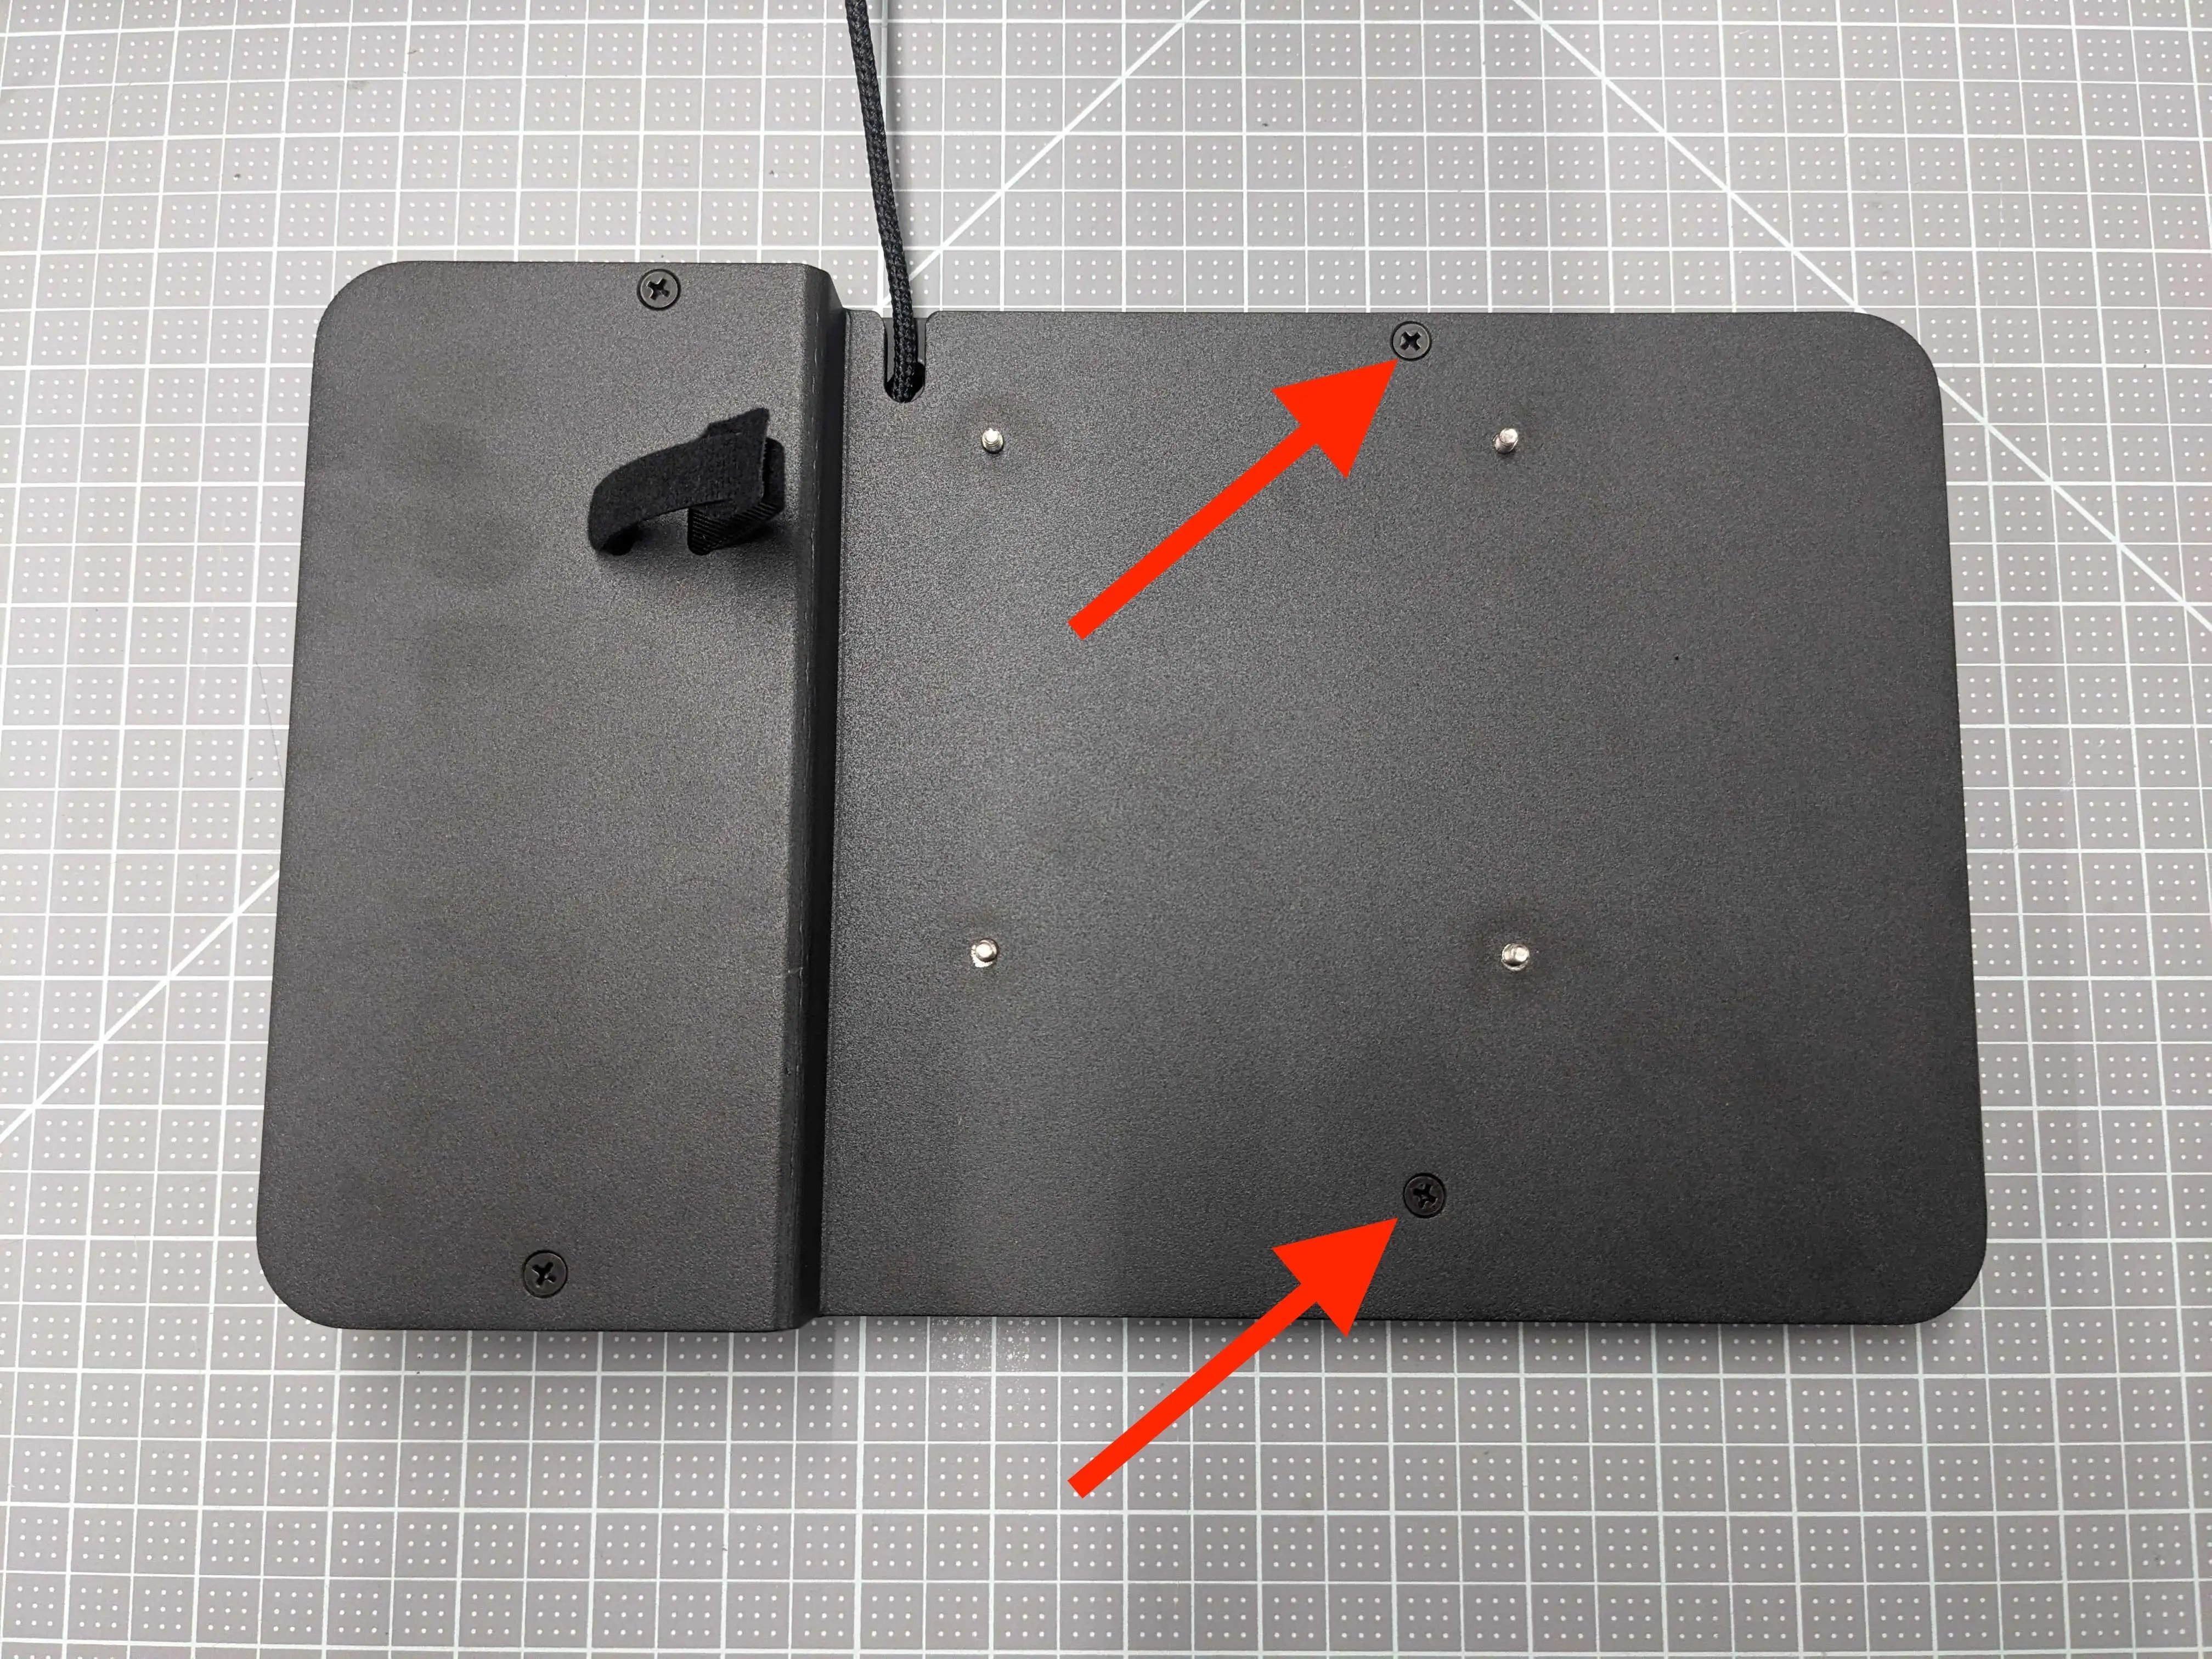
1. On the back of the Shopper Display enclosure, remove the two screws located behind the display screen.
1.
3. Confirm that the cables in both ports are securely plugged in.
**✏️** **Note:** *If the cables are secure and the issue is not fixed, proceed to the next section.*
***
### Check the Cable Connection Inside the Enclosure
The other end of the cable may have become unplugged inside the display enclosure. You will need to disassemble the enclosure to check the connection.
**Required Materials**
* One screwdriver
#### **Directions**
1. On the back of the Shopper Display enclosure, remove the two screws located behind the display screen.
1. 
 2. Carefully remove the Shopper Display and its surrounding mount from the back of the enclosure.
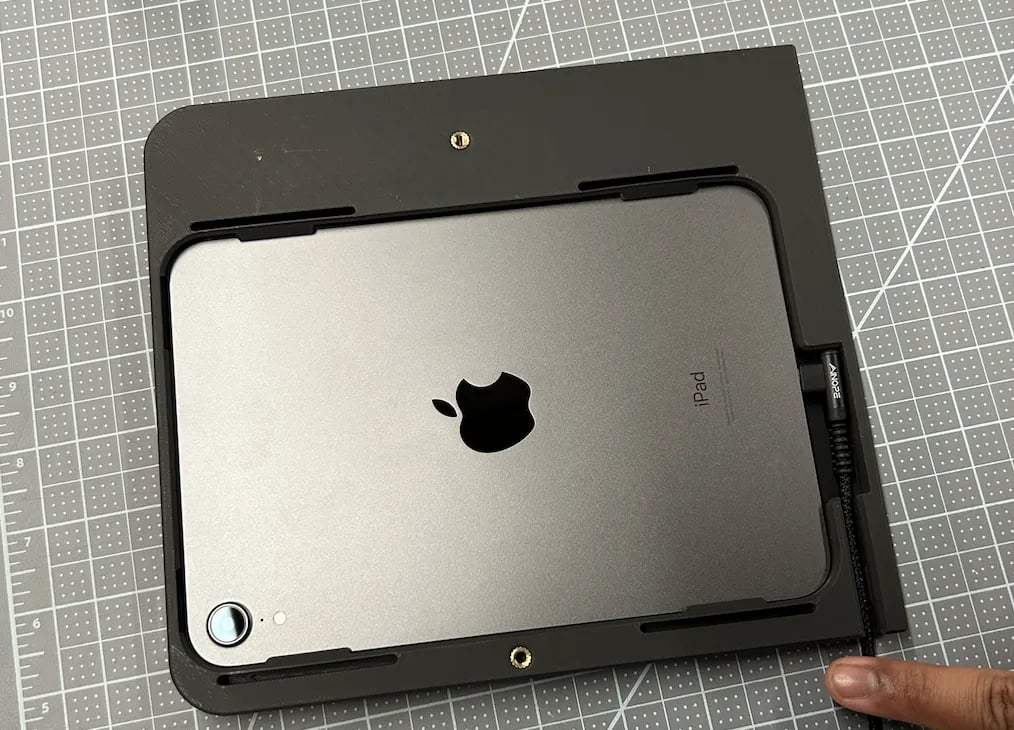 3. Confirm the display's cable is securely inserted into its port and is not damaged.
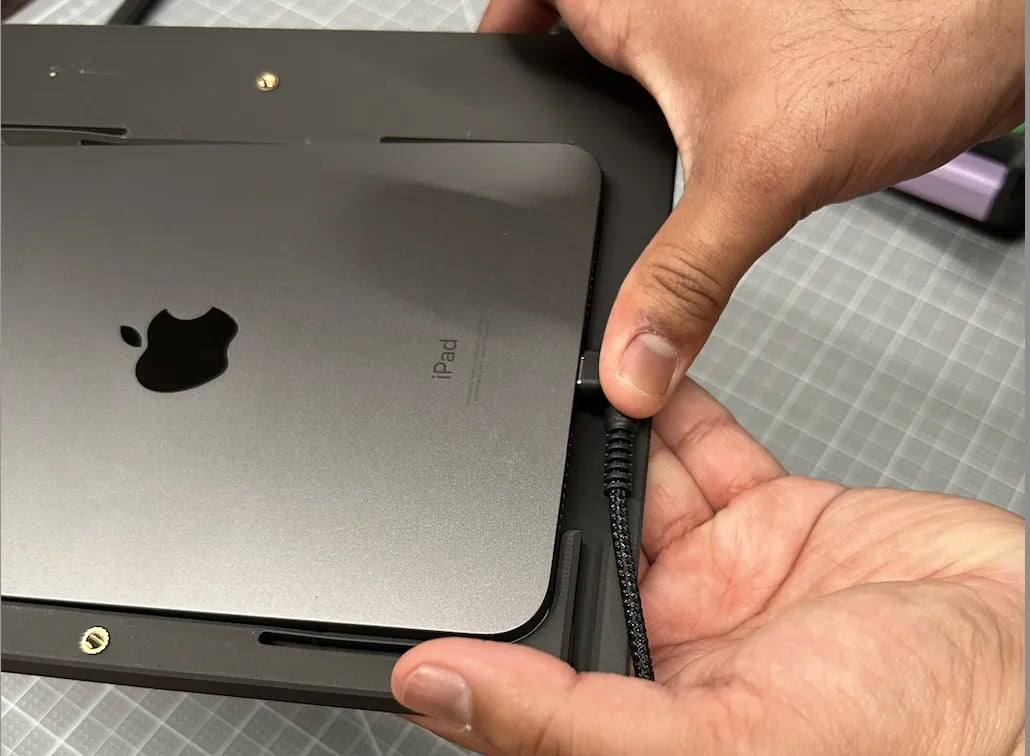 4. Once finished, align the Shopper Display with the enclosure's backplate and re-secure the two screws.
**✏️** **Note:** If the Shopper Display still does not work after checking all connections, please contact Vori support for the next steps.
## Related topics
- [Hardware Troubleshooting Guide](/getting-started-with-vori/support/hardware-troubleshooting.md)
- [Frequently Asked Questions](/faqs.md)
- [How to troubleshoot the 10-key cashier keyboard](/hardware-and-peripherals/cashier-screen-and-shopper-display/how-to-troubleshoot-the-10-key-cashier-keyboard.md)
4. Once finished, align the Shopper Display with the enclosure's backplate and re-secure the two screws.
**✏️** **Note:** If the Shopper Display still does not work after checking all connections, please contact Vori support for the next steps.
## Related topics
- [Hardware Troubleshooting Guide](/getting-started-with-vori/support/hardware-troubleshooting.md)
- [Frequently Asked Questions](/faqs.md)
- [How to troubleshoot the 10-key cashier keyboard](/hardware-and-peripherals/cashier-screen-and-shopper-display/how-to-troubleshoot-the-10-key-cashier-keyboard.md)